
Installation Guide


Siding Installation Guide / v20190507US 19
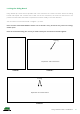
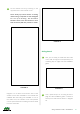
DIAGRAM 28
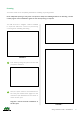
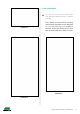
DIAGRAM 29
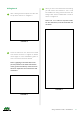
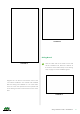
DIAGRAM 30
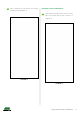
2
Fix the I trim to the joist by screw xing the
I trim and joist.
Note: Always pre-drill before screwing
unless using composite screws designed
for non pre-drilling. The distance
between each screw should be no more
than 12 inches (300 mm) center to center.
3
Install the rest of the Siding boards to the
top as shown in Diagram 31.
2
Next install the Siding board on top of the
AW-02 and install the clips as steps 1-3 of
Siding board on page 13 of this installation
guide.
Note: A gapping of at least 25/64 inch
(10 mm) needs to be left at the bottom
of the ground and the lip of the board to
allow for expansion and contraction and
ventilation.
1
Repeat steps 1-2 of starting strip on page 12
of this installation guide on the section shown
in Diagram 29.
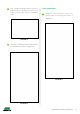
Siding Board
Diagram 32 is an above cross section view of the
I trim installed. The I trim was installed after the
Siding was installed onto the wall. The I trim then
comes in from the side and is screw xed to the
joist on the other side of the I. Alternatively, the
I trim can be installed first by screw fixing and
then have the Siding boards come in afterwards
but this would require the distance of your
cladding project pre-calculated.