
User Manual


NexLink NL102 User Manual
7
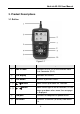
⑦
Help button
Help of live data
3.2 Specifications
Screen: 2.8” TFT 262K true color, 320*240 QVGA LCD display
Input voltage range: 8~32V
Operating current: <100mA@12V (Typical)
Power consumption: < 1.2W (Typical)
Operating temperature: 32°F~122°F / 0°C~50°C
Storage tempetature: -4°F~158°F / -20°C ~70°C @ RH60%
3.3 Accessories
User’s Manual -- Instructions on tool operations
6 PIN DLC adaptor
9 PIN DLC adaptor
USB cable -- Connect to a computer for upgrading online
3.4 Power supply
The power of the NL102 is provided via the vehicle’s Data Link Connector
(DLC). Follow the steps below to power it up:
1. Find DLC on heavy duty vehicle:
The DLC is the connector where diagnostic code readers interface with the
vehicle’s on-board computer and usually located in the driver’s cab.
A plastic DLC cover may be found for some vehicles and you need to
remove it before plugging the 6 pin or 9 pin DLC diagnostic adaptor. If it
cannot be found, refer to the vehicle’s service manual for the location.
2. Plug one end of 6 pin or 9 pin DLC diagnostic adaptor into the included OBD
II 16 pin connector, and connect the other end to the heavy duty vehicle’s
DLC.