
User Manual


NexLink NL102PLUS User Manual
8
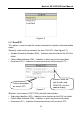
vehicle’s on-board computer and usually located in the driver’s cab.
A plastic DLC cover may be found for some vehicles and you need to
remove it before plugging the 6 pin or 9 pin DLC diagnostic adaptor. If it
cannot be found, refer to the vehicle’s service manual for the location.
2. Plug one end of 6 pin or 9 pin DLC diagnostic adaptor into the included OBD
II 16 pin connector, and connect the other end to the heavy duty vehicle’s
DLC.
3.5 Battery Monitor
The power of the NL102P supply by the vehicle’s battery, If using the tool too
long time, the energy of battery will reduce and the voltage is down. The
NL102P give 6 levels warning tips:
A, <10.8V(before Starting): Too Low; Change your battery, otherwise,
might not be able to start;
B, 10.8V-11.8V(before starting): Slightly low; Difficult to start, please turn
off other electronics and start vehicle to charge;
C, 11.8V-12.8V(before starting): Normal;
D, 12.8V-13.2V(after starting): Too Low; Might not be able to charge the
battery, please check other electrical load;
E, 13.2V-14.8V(after starting): Normal;
F, >14.8V: Too High; Might damage the battery, please check the engine
stabilizer;