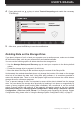
USER’S MANUAL 4 Taking Care of Your Computer In this chapter, you can find information on how to clean the exterior of your computer. General Cleaning Guidelines We recommend to follow this list of suggestions when cleaning your computer or its peripherals. Make sure not to spray any cleaning liquid onto the computer components directly. If you need to use a cleaning liquid, spray the liquid onto a cloth instead.
Preparation for Cleaning Before starting to clean your computer, do the following: 1 2 3 Turn off your computer. Disconnect the AC power. Disconnect all the peripherals. Cleaning the Sides, Covers, Keyboard, and Touchpad Clean the sides, covers, keyboard, and touchpad with a soft microfiber cloth with one of the cleaning solution as listed previously. Use additionally a portable battery powered vacuum or compressed air with a straw extension if necessary to remove the dust particles.
USER’S MANUAL 5 Protecting Your Computer In this chapter, you can find information on how to protect your computer from unauthorized access. Accessing the System You can prevent unauthorized access to your computer by using passwords. After you set a sign-in password during the initial computer setup, you are prompted to enter a correct password before proceeding with login process. In addition to the sign-in password, you can authorize yourself also using a face recognition (optional).
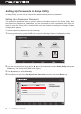
Creating or Modifying Default Sign-In Credentials To create / remove or modify your sign-in password, PIN, or picture password, do the following: 1 2 Open the Sign-in options menu. Please refer to “Configuring Sign-In Options” on page 48. Do any of the following: – Modify Your Sign-In Password: a) In Password section, click on the Change button. Change your password page opens. b) Enter your current password and click on the Next button.
USER’S MANUAL About Windows Hello Windows Hello enables you to get instant access to your computer using facial recognition. Facial recognition can replace the default sign-in password, sign-in PIN, and sign-in picture password. NOTE: Before using Windows Hello, make sure your computer supports facial recognition feature. Various PRIMUS models support these methods as optional features. Please check your system configuration, and contact Nexstgo for more information if needed.
Setting Up Passwords in Setup Utility In Setup Utility, you can set up a supervisor password and power on password. Setting Up a Supervisor Password The supervisor password helps to protect system information stored in the Setup Utility. After the supervisor password is established, you are prompted to enter a password each time you want to open the Setup Utility. Unauthorized users are denied accessing the Nexstgo System Configuration options.
USER’S MANUAL 5 Enter a new password and confirm the password. Then click on the Yes button. You are informed that changes have been saved after you press Save and Exit. 6 7 Click on the Ok button. Press the F10 key and then click on the Yes button to exit saving changes. Setting up the supervisor password is complete. Next time you open the Setup Utility, a Setup Configuration Utility Password prompt appears. Enter the supervisor password to proceed.
6 Choose how much of your drive to encrypt. The options include Encrypt used disk space only and Encrypt entire drive. When done, click on the Next button. 7 Choose which encryption mode to use. The options include New encryption mode and Compatible mode. When done, click on the Next button. 8 Check the Run BitLocker system check to ensure that BitLocker can read the recovery and encryption keys correctly and then click on the Start encrypting button. The encryption begins.
USER’S MANUAL 4 Press key and use TPM settings. 5 After done, press the F10 key to save the modifications. , keys to select Trusted Computing and enable the necessary Deleting Data on the Storage Drive If you plan to dispose of, sell, or hand your computer over to another person, make sure to delete all the sensitive data, such as your personal files and installed software.
Using Antivirus Software When you use the computer to access any apps that require Internet connection, you potentially expose the computer to malware. Different malware, such as spyware, Trojan horses, viruses, worms, and other malicious apps, can disable the operating system, apps, utilities, or cause them to function unexpectedly. Antivirus software can detect most of the malware, destroy them, and often repair any damage that they have caused.
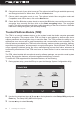
USER’S MANUAL Using the Nexstgo System Configuration Utility Using the Nexstgo System Configuration utility, you can set the boot order, manage devices, set the boot location, recover the operating system, and configure system settings. To access the Nexstgo System Configuration utility, press the F2 key during system setup. The utility page opens: 1 7 2 3 6 4 5 No. Tab Description Opens the operating system recovery page.
Nexstgo System Configuration Utility Navigation To navigate the utility menu, you can use both keyboard keys or the touchpad. Do any of the following: To select a tab or menu item: Use the four-directional keys ( , , , ) on the keyboard or move your finger across the touchpad. To enter a submenu or select an item parameter: Press the Enter key on the keyboard or left-click/ tap once on the submenu or the item parameter.
USER’S MANUAL Device Manager Description Item Driver Health Review the driver health status. Enter the Driver Health item if you need to repair a driver with specific controller or repair the whole platform until all modules reach their terminal statuses. Primary Video BIOS Not supported in this model. Boot From File Item File Explorer Description Select the boot file location for loading the operating system. The File Explorer displays the folder paths from all the connected storage devices.
Setup Utility Main Menu Description Item Main Review the system parameters, such as system manufacturer, BIOS version, BIOS date, ME version, EC version, processor type, processor speed, total memory capacity, serial number, HDD type, and HDD Type 1. System Date Set system date. Use the Tab key on the keyboard or tap directly using the touchpad to switch between the date elements. Use the Enter key and the Tab key on the keyboard or tap directly using the touchpad to select a field.
USER’S MANUAL Advanced Menu SATA H2O Event Log Config Manager Item Description Intel Virtualization Technology: Enable to allow VMM utilizing the additional hardware capabilities by Vanderpool Technology. Intel VT-d: Enable to allow Directed I/O (VT-d) extend Intel’s Virtualization Processor Technology (VT) roadmap by providing hardware assists for virtualization Configuration solution. NOTE: Modifications require a full power cycle to take effect.
Boot Menu Network Stack PXE Boot capability Windows Boot Manager (KINGSTON RBUSNS8180S3256GJ) ... Description Item Network Stack Enable/Disable UEFI network stack, usually for UEFI PXE boot. PXE Boot capability Enable this feature if you want to use the PXE boot function. Windows Boot Manager Enable/Disable Windows Boot Manager (KINGSTON RBUSNS8180S3256GJ).
USER’S MANUAL TPM Support: Enable the TPM support for advanced crypto capabilities. TPM State: Enable the TPM state to see pending TPM operations. Trusted Computing NOTE: Modifications to the TPM state will take effect after you restart the computer. Pending TPM Operation: Set the pending TPM operation to TPM Clear if you want to clear all data secured by TPM or to None if you want to discard the selection.
Installing and Updating Device Drivers Device drivers are programs that control a specific type of device that is attached to your computer. Each hardware component has its own driver which informs the operating system how to operate that device. When you add new hardware component to your computer, the operating system tries to install the device driver automatically using its built-in drivers library. If the driver cannot be located, you are prompted to install the driver manually.
USER’S MANUAL 6 Advanced Configuration In this section, you will find information on how to backup and recover your computer. Backup Features Configuring File Backup You can backup your files to another device and restore them if the originals are lost, damaged, or deleted. File backup can be performed just once or set to occur automatically. To configure file backup settings, do the following: 1 2 Open the Start menu and find the Nexstgo group in the apps list.
3 4 Click on the File Backup tab. Click on the LAUNCH button. The Windows settings Backup page opens. 5 Click on the backup. 6 Click on the storage drive that you want to choose for saving backup files. 74 l Add a drive option.
USER’S MANUAL 7 Click on the More options link under Backup page to configure more backup options, such as set the backup schedule, select the files and folders that you want to backup, and more. 8 Return to the Backup page. Set the Automatically backup my files option to On to enable automatic backup.
Configuring System Backup To backup the system, you can create a system restore point or create a recovery drive. The restore point allows you to restore Windows to a point in the past, when it worked properly. The purpose of the recovery drive is to provide a source when restoring the storage drive to the factory default values if all other recovery methods have failed. As a precautionary measure, make sure to create a restore point or recovery drive as early as possible.
USER’S MANUAL 3 4 Click on the System Backup tab. Select Configure Restore point and click on the LAUNCH button. The System Protection tab opens on System Properties page. 5 6 Select the system storage drive. 7 8 9 10 In the Restore Settings section, select Turn on system protection option. Click on the Configure... button. In the Disk Space Usage section, set the maximum disk space used for system protection. Click on the Apply button and then on the OK button to save the modifications.
Creating a Recovery Drive To create a system restore point, do the following: 1 2 Open the Start menu and find the Nexstgo group in the apps list. Click on the Nexstgo Backup and Recovery app. NOTE: You may be prompted to confirm opening an app from an unknown publisher. Click Yes to continue. 3 4 78 Click on the System Backup tab. Select Create a Recovery Drive and click on the LAUNCH button.
USER’S MANUAL The Recovery Drive page opens. 5 Make sure the Backup up system files to the recovery drive option is checked and then click on the Next button. 6 Connect a USB storage disk to the computer with a minimum free space of 16 GB when prompted and then click on the Next button. You will be informed that everything on the USB storage drive will be deleted and recommended to backup any personal files. 7 Click on the Create button to start creating a recovery drive.
Restoring Features Restoring Personal Files and Folders If you want to restore personal files or folders that have been backed up previously, do the following: 1 2 Open the Start menu and find the Nexstgo group in the apps list. Click on the Nexstgo Backup and Recovery app. NOTE: You may be prompted to confirm opening an app from an unknown publisher. Click Yes to continue. 3 4 80 Click on the File Recovery tab. Select Restore Personal File and click on the LAUNCH button.
USER’S MANUAL The Home - File History page opens. 5 / to select the backup date page and then select the Use the navigation buttons file(s) or folder(s) that you want to restore. 6 Click on the Restore to original location button and follow the onscreen instructions until restoring your file(s) or folder(s) procedure is complete. NOTE: If you need to use more advanced restore options, click on the Advanced Restore tab in Nexstgo Backup and Recovery app > File Recovery.
Restoring the System to a Previous State To restore the system from a restore point, do the following: 1 2 Open the Start menu and find the Nexstgo group in the apps list. Click on the Nexstgo Backup and Recovery app. NOTE: You may be prompted to confirm opening an app from an unknown publisher. Click Yes to continue. 3 4 82 Click on the System Recovery tab. Select System Restore and click on the LAUNCH button.
USER’S MANUAL The System Restore page opens. 5 6 Click on the Next button. Select the system restore point that you want to use and then click on the Next button. NOTE: Click on the Scan for affected programs button to review any programs that were installed later than the selected restore point was created or removed after the restore point was created. 7 Confirm your restore point and click on the Finish button. Wait until the system finishes restoring to an earlier working state.
Restoring the System From an Image To restore the system from an image, do the following: 1 2 Open the Start menu and find the Nexstgo group in the apps list. Click on the Nexstgo Backup and Recovery app. NOTE: You may be prompted to confirm opening an app from an unknown publisher. Click Yes to continue. 3 4 Click on the System Recovery tab. Select System Image Recovery and click on the LAUNCH button. You are informed that this action restarts the computer in WinRE environment.
USER’S MANUAL The Choose an option page opens. 6 7 Click on the Use a device > EFI USB Device tab. Follow the onscreen instructions to complete restoring Windows operating system from an image. Resetting the System To reset your computer, do the following: 1 2 Open the Start menu and find the Nexstgo group in the apps list. Click on the Nexstgo Backup and Recovery app. NOTE: You may be prompted to confirm opening an app from an unknown publisher. Click Yes to continue.
Using Advanced Startup Options The Advanced options menu includes shortcuts to advanced troubleshooting tools and Windows startup methods that can be used to repair important files, start Windows with the minimum necessary processes, restore previous settings, and more. To access and start using the Advanced options menu, do the following: 1 Open the Start menu and click on the Settings > Update & Security > Recovery > Advanced startup > Restart now. The Choose an option page opens.
USER’S MANUAL Recovering the Operating System if Windows 10 Fails to Start The Windows recovery environment functions independently from the Windows 10 operating system. It enables you to recover or repair the operating system even if Windows 10 fails to start. After two unsuccessful attempts to boot the computer, Windows recovery environment starts automatically. You can choose between recovery or repair.
7 Troubleshooting In this chapter, you can find information on possible solutions to problems that may occur when using your computer. General Recommendations Always keep your system up-to-date. This might resolve problems you face with your computer. – For checking and updating drivers and apps in your computer, please refer to “Nexstgo Software Updater” on page 26.
USER’S MANUAL Always close open apps and windows you are not currently using. Uninstall unused apps and empty the recycle bin regularly to free some space on the storage drive. Other methods for cleaning the space on the storage drive: – Use the Disk Defragmenter (Control Panel (view by Large icons or Small icons) > Administrative Tools > Defragment and Optimize Drives).
Problems with Wireless Networks Wireless-LAN Description Problem Computer cannot connect to the wireless network Make sure of the following: WLAN function is enabled. Please refer to “Wireless Connections” on page 39. Airplane mode is off. Your computer is within the range of the wireless router’s signal. Your computer is using the correct WLAN adapter driver.
USER’S MANUAL When using an external keyboard, all or some of the keys do not function properly. 1 Turn off the computer. 2 Disconnect and reconnect the keyboard. 3 Turn on the computer and see if the problem is solved. If the keyboard is still not functioning, make sure you have installed the correct driver for the keyboard. To check the driver’s status, do the following: a) Open the Control Panel (view by Large icons or Small icons) > Keyboard > Hardware tab.
Problems with Audio Description Problem Sound is not audible Make sure the audio mute toggle key (F1) is not on. Please refer to “Audio mute toggle key” on page 11. MIDI or wave sound does not play correctly Make sure the built-in audio device is functioning properly. To check the audio device status, open the Control Panel (view by Category) > Hardware and Sound > Devices and Printers > Device Manager > Sound, video and game controllers.
USER’S MANUAL The AC power adapter is connected to the computer but the battery does not start charging Make sure the AC power adapter is connected correctly to the computer and to the electrical outlet. If charging does not start, do the following: a) Disconnect the AC power adapter from the electrical outlet. b) Connect another electrical device to the power outlet, and then check that you can use that electrical device. If the outlet is working, disconnect the electrical device.
8 Index A Accessibility Features 50 Ease of Access Center 50 Keyboard Shortcuts 50 Airplane mode 41 Antivirus Software 64 Audio Features 42 Audio Settings 42 B Backup Features 73 File Backup 73 System Backup 76 Recovery Drive 78 Restore Point 76 C Camera 43 onscreen controls 43 D Deleting Data 63 Device Drivers 72 Getting the Latest Drivers 72 Display Settings 37 Advanced Settings 46 Intel HD® Graphics Control Panel 46 E Ergonomic Considerations 54 External Display 48 Connecting an External Display 48
USER’S MANUAL Boot Manager 66 Device Manager 67 Setup Utility 68 P Power Management 36 AC Power 36 Charging the battery 36 Battery Status 37 Managing the Battery Power 37 Power-Saving Modes 38 Hibernation mode 38 Sleep mode 38 Wireless function off 38 Protecting Your Computer 57 Default Sign-In Credentials 57 Sign-In Password 58 Sign-In Picture Password 58 Sign-In PIN 58 Passwords in Setup Utility 60 Supervisor Password 60 Trusted Platform Module (TPM) 62 Windows BitLocker 62 Windows Hello 59 Facial Recog
FEDERAL COMMUNICATIONS COMMISSION INTERFERENCE STATEMENT This equipment has been tested and found to comply with the limits for a Class B digital device, pursuant to part 15 of the FCC Rules. These limits are designed to provide reasonable protection against harmful interference in a residential installation. This equipment generates, uses and can radiate radio frequency energy and, if not installed and used in accordance with the instructions, may cause harmful interference to radio communications.
Users should also be advised that high-power radars are allocated as primary users (i.e. priority users) of the bands 5250-5350 MHz and 5650-5850 MHz and that these radars could cause interference and/or damage to LE-LAN devices. Devraient également être informés les utilisateurs que les radars à haute puissance sont désignés comme utilisateurs principaux (c.