ITEM# MM1007 Motorized 7” Color Display DVD Player INSTRUCTION MANUAL
ITEM# MM1007 TABLE OF CONTENTS FEATURES PRECAUTIONS ACCESSORIES INSTALLATION OPERATION 2 3 4 5 6 MISCELLANEOUS TROUBLESHOOTING SPECIFICATION WIRING DIAGRAM 31 34 35 36 Buttons on the Panel and Remote Control 7 Screen Panel and Front Panel Power, Preset Buttons 1 ~ 6 Mute, Mode, Eject, Volume (Select), Open P.
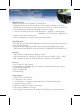
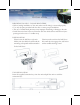
ITEM# MM1007 FEATURES Monitor Screen • Motorized Open/Close Monitor Control System • Tilting Safety System (If the movement of the monitor opening or closing is hindered by an obstacle, the monitor will stop or returns to its previous position) • Swivel Adjustment: Monitor is adjustable to the left or right • 7.
ITEM# MM1007 PRECAUTIONS • Do not watch video playback while driving. This distraction can be the cause of significant danger and/or increase the risk of a traffic accident. In addition it may violate state and local laws and regulations. • Do not install the unit where it may obstruct or interfere with safe operation of the vehicle. • Do not open or disassemble the unit if the unit is damaged operating abnormally. Please consult a local service-center or distributor for proper repair.
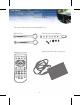
ITEM# MM1007 ACCESSORIES The unit contains the accessories detailed below: Release Keys Mounting Screw and Bracket IR Remote Control External TV Tuner Box (Optional) 4
ITEM# MM1007 INSTALLATION IMPORTANT NOTES – PLEASE READ FIRST • Before starting installation of the unit, make sure all wiring is connected properly. • Use only the parts provided with the unit to ensure proper installation. • The use of unauthorized parts may cause improper functioning or damage to the unit. • Install the unit where it does not interfere with the vehicle driver and will not injure passengers in the case of a sudden stop.
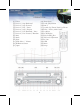
ITEM# MM1007 OPERATION [1] Power [2] Preset 1 / Step Backward [3] Preset 2 / Step Forward [4] Preset 3 / Play / Pause [5] Preset 4 / Stop / Repeat [6] Preset 5 / Fast Backward / Intro [7] Preset 6 / Fast Forward / Random [8] Mute [9] Mode [10] Eject [11] Push Select / Volume [12] IR Remote Sensor [13] Open [14] Preset Scan [15] Local (DX) Button [16] Ban d [17] Joystick Up/Down/Seek Up/Down [18] Enter / Stereo, Mono Select [19] Loudness [20] LCD Display [21] Disc Loading Slot [22] Tilt Level Adjustment [2
ITEM# MM1007 Front Panel And Remote Control Buttons [1] POWER Button (STANDBY Button on Remote Control) Press any button to turn on the unit. Press POWER button to turn off the unit. When the Tilt is set to AUTO and the monitor is opened, power-off will automatically close the monitor. When the Tilt is set to MANUAL, power–off will not close the monitor automatically and the monitor will remain opened.
ITEM# MM1007 [2] ~ [7] Radio Station Preset Buttons, Disc Play-mode Control MODE DVD [2] Move to previous chapter or track [3] Move to next chapter or track [4] [5] Play, Pause [6] Fast backward for Audio disc and slow backward for video title. (Speed min 2x to max 32x).Press and hold for intro track mode [7] Fast forward for Audio disc and slow forward for video title. (Speed min 2x to max 32x).Press and hold for random play mode [8] MUTE Button Mute On and OFF.
ITEM# MM1007 • Video relative menu can be set only when monitor is opened. • When clock (optional feature) is available, push select button long to display clock. • Time setting sequence is as follow a) Push SELECT long to display clock. b) Push and hold ENTER to enter the time setting c) Control joystick LEFT/RIGHT or rotate VOLUME to set hour.
ITEM# MM1007 [14] PRESET SCAN (In Radio and TV Mode) Press and hold to memorize received stations automatically. Press button and the unit will tune to preset stations set for buttons 1 to 6 . [15] LOC (Local / DX) Button Change radio tuning from regional stations to national stations or from national stations to regional stations The default is Local (regional). [16] BAND Button In Radio mode, Change radio band in the sequence of FM1/FM2/FM3/AM1/AM2. In TV mode, Change band 1 /band 2.
ITEM# MM1007 [18] ENTER Button Same as ENTER key in [17] above. [19] LUD (Loudness) Button Activate and deactivate Loudness. [20] Mini Color LCD Display [21] DISC LOADING SLOT [22] TILT Button Adjust monitor tilt angle. You can set tilt adjustment angle from min 3 level to max 5 level. To setup tilt level, press MENU and select SYSTEM _ TILT RANGE using joystick and set 3 level, 4 level, AUTO (5 level). [23] IN / OUT Button Monitor moves forward or backward in 3 steps when the monitor is opened.
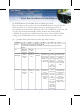
ITEM# MM1007 SOURCE MENU FUNCTION TUNER DVD TV CDC AUX DESCRIPTION Change mode to Radio Change mode to DVD (CD) Change mode to TV (optional feature) Change mode to CD Changer (optional feature, when CD Changer is connected) Change mode to AUX Input AUDIO MENU FUNCTION BASS TREBLE BALANCE FAD SUB Woofer START VOLUME DESCRIPTION Support 15 levels. Default level is 0. Support 15 levels. Default level is 0. Support 7 levels for each left and right channel. Default is left equal to right.
ITEM# MM1007 SCREEN MENU FUNCTION PICTURE FULL NORMAL DESCRIPTION Invert the screen picture from normal to upside down Change to full screen mode, You can move the screen by joystick key Return to normal screen mode. SYSTEM MENU FUNCTION TILT IN/OUT FIX TILT RANGE TV PICTURE TV SOUND BACK LIGHT DESCRIPTION Set to auto or manual monitor close (please refer to 22.
ITEM# MM1007 [25] MENU Button RADIO DISPLAY (1) Display current Band and current memorized station (2) Contents of current Band • Current Tuning memory Position is highlighted with red color (3) STATUS display • MEM : Display current memory. If there is no matching memory exists, display MEM 0 • Play status display a. AUTO: auto seek mode b. MANUAL: manual seek mode c. P.SCAN: preset scanning mode d. A.SAVE : auto save mode.
ITEM# MM1007 TV MODE DISPLAY (1) TV mode display (2) Current Band and current channel display When there is no matching channel, oscillator freq is displayed in PAL mode. (3) Contents of current band • Current channel is red color (4) TV function status display • AUTO: auto seek mode • MANUAL: manual seek mode. • P.SCAN: preset scanning mode • A.SAVE: auto save mode.
ITEM# MM1007 (1) Current disc number (2) Current track number (3) Current Playing status • PLAY : playing disc • PAUSE : pause playing • STOP : stop playing • F.FORWARD : current track fast forward • F.BACKWARD : current track fast backward • DISC CHANGE : change to next disc • NORMAL : play all tracks in sequence • REPEAT ONE : play current track repeatedly • REPEAT DISC : play all tracks of current disc repeatedly • INTRO : play each track for several secs.
ITEM# MM1007 SYSTEM STATUS DISPLAY (1) Loudness on/off display (2) TV channel display • Current channel number display • TV function status display (3) Monitor Error display • When monitor is turned left or right, monitor close is impossible (4) Volume level display (5) Mute indicator (6) In the DVD, TV, AUX modes, no picture is showed on screen but the warning message on black screen as above picture (7) Select menu display (8) Clock time display (if clock feature is included) (9) OSD main menu (10) OSD
ITEM# MM1007 AUDIO Change the language by L/R channel. (available only with dual language Movie Disc) SUBTITLE If the DVD or SVCD has more than one language caption, press this key to select the caption displaying option or to hide caption. The caption information corresponds to the disc currently being viewed. ZOOM While in normal operation, press [ZOOM] to enlarge or contract the screen display.
ITEM# MM1007 DVD SETUP General Setup Use the [SETUP] option to set up system functions. Press [SETUP] to enter into the setup menu; press right & left keys to move curser and select “General setup”, “Audio setup”, “Video setup”, “Initial setup page” or “Password setup” options. The setup page is shown in the following image: Press [SETUP] to enter into the setup menu. The system then enters into the “General setup” page.
ITEM# MM1007 Angle Mark Use this option to turn on/off the angle mark. When playing multi-angle-screen discs, the angle mark will be displayed when this option is “ON” and hidden when it is “OFF”. OSD Language Language displayed: option to select ENGLISH or Chinese for the On Screen Display (OSD). Captions For NTSC-mode TV’s, this option can display or hide caption included on a disc with CLOSED CAPTION content. The TV set must be able to support this option; otherwise it will be unavailable.
ITEM# MM1007 Audio Setup In the Audio Setup Menu option users can perform the actions shown in the following image: Speaker Setup In the “Audio Setup Menu”, use the up and down keys to move the cursor selecting the “Speaker Setup” option. Press “PLAY” key to enter into the “Speaker Setup Menu” and then the user can make the following selections: DOWNMIX Mode In this menu the user can select the “LT/RT”, “Stereo”, “Simulated Circulation” and “Off ” options.
ITEM# MM1007 The Rear Speaker Under the “DOWNMIX” mode off condition, the user can select “Large/ Small/ Off ” for the rear speaker. (Note) “Large” means full-frequency speaker; “Small” means medium-to-highfrequency speaker. Bass Speaker ”ON/OFF” option for bass speaker. “OPEN” means the bass speaker is initiated. Tone Test When the 5.1 audio is active, select “Open” and a test tone will be passed to all 5.1 channels.
ITEM# MM1007 SPDIF Setup On “SPDIF” page menu, the available options include “SPDIF output”, “CD”, “Dolby code”, “DTS”, “MPEG”, “PCM” and “LPCM” channels. (Note) “SPDIF” means optical output. SPDIF Output At the “SPDIF output” option, users can select “SPDIF off ”, “SPDIF source code” and “SPDIF/PCM” manually. CD If selecting manual mode for the “SPDF output” item, users can select “SPDIF off ”, “SPDIF source code” and “SPDIF/PCM” manually.
ITEM# MM1007 PCM Channel Select “PCM channel” option in “SPDIF” menu page and select “SPDIF R/L”, “SPDIF LS/RS” or “SPDIF C/LFE” options. The “SPDIF R/L” means to select right or left stereo channel; the “SPDIF LS/RS” means to select right or left circulation channel; and the “SPDIF C/LFE” means to select the medium and heavy bass channel. Dolby Digital Setup Press “PLAY” at “Dolby code setup” option to enter into the menu; user can then set up the “R+L dynamic range compression”.
ITEM# MM1007 Equalizer To get a more pleasing sound, users can adjust the equalizer to follow his/her music style preferences. Users can select rock-and-roll, fashion, field, dance-music, electronic, classic and light-music options. 3D Processing In the “Tone setup” menu page users can use up/down keys to move cursor and select the “3D processing setup” option to set up “PRO LOGIC” or “MIX”. PRO LOGIC II At the “PRO LOGIC II” option page press “PLAY” to enter into the setting mode.
ITEM# MM1007 Mix mode To experience better field echo effects, users can select various environments. The options include “Off ”, “Concert”, “Hall”, “Bathroom”, “Cave”, “”Arena” and “Church”. HDCD In the “Tone setup” page user can use up/down keys to move the curser and select the “HDCD” option to enter into the “HDCD setup” page and set up the High Definition CD options. “OFF” means to use standard CD format.
ITEM# MM1007 Video Setup In the “Video setup” page users can set up the distributed video, TV node and video quality, as shown in the image below: Component “OFF” means system is now outputting compound video, YUV means YUV signal output and RGB means RGB signal output. Quality (Video Quality Setup) On this option page users can set up the “Sharpness”, “Brightness”, “Contrast”, “GAMMA correction”, “Hue”, “Saturation” and “Luma Delay” options. Sharpness Select “High”, “Medium” or “Low” screen sharpness.
ITEM# MM1007 GAMMA Correction The GAMMA correction curve can be adjusted to high, medium and low. “OFF” means no GAMMA correction is to be performed. Hue Users can set up the screen color saturation from background brightness status. Saturation Users can set up the screen color saturation from background brightness status. Luma Delay In the “Luma Delay” option users can set up “0T” or “1T” toward bright delay. Users can perform “0T” or “1T” setup according to the TV brightness and color.
ITEM# MM1007 Preference Setup Users can perform initial setup when turning on the unit or changing a disc. In the “Initial setup” page users can set up “TV type”, “PBC”, “Audio”, “Caption”, “Disc menu language”, “Country/Region” and “Default value”, etc., as displayed in the image below: TV type In “TV type” option users can select “PAL”, “Multi (Auto)” or “NTSC” video systems. PBC Select “on”, “off ”.
ITEM# MM1007 Country Region Indicates the region code where the disc can be played. Region codes of each country are shown below: Region 1 : USA, Canada, East Oceania Region 2 : Japan, West Europe, Middle East Region 3 : Taiwan, South Korea, Southeast Asia Region 4 : Mid and South America, Australia, New Zealand, South Oceania Region 5 : Russia, India, Middle Asia, Africa East Europe Region 6 : China (Mainland) Default System will load factory default settings.
ITEM# MM1007 Password Setup Users can set up passwords in the “Password setup” page as shown below: Master Password : this is default password (code is 136900) User Password : User can change password code MISCELLANEOUS JEPG Format Disc PLAY : press this key to enter into auto-picture-displaying mode. MENU : while playing a JPEG disc, press this key to enter into the indexbrowsing mode. Use the up/down/right/left keys to move curser to the desired option and press “PLAY” to confirm the selection.
ITEM# MM1007 FAST BACKWARD : while playing a JPEG format disc, press this key to turn the picture counterclockwise 90 degrees. MP3 / WMA™ Disc While playing MP3 or WMA™ discs, user can press PROGRAM key to select the following two playing modes: Folder Browsing Mode In this mode, the index is shown on the left side of menu and blank on the right side.
ITEM# MM1007 Playlist Mode In this mode, the song list is shown on the left side of menu. Use up/down keys to select the song to be played. After pressing “PLAY” the selected songs then will be displayed on the right side. Move the curser to the targeted song, press “PLAY” again and the system will play the songs in the list sequentially. This mode is convenient for users to edit the song-playing order as shown in the image on right.
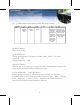
ITEM# MM1007 TROUBLESHOOTING Symptom Power does not turn on.(No sound is produced.) Cause Remedy Fuse is blown No sound output when operating the unit with amplifiers or power antenna attached. Power antennal lead is shorted to ground or excessive current is required for remote on the amplifiers or power antenna. Nothing happens when buttons are pressed. Display is not Accurate The microprocessor has malfunctioned due to noise, etc. Sound is bad directly after power is turned on.
ITEM# MM1007 SPECIFICATIONS GENERAL Operation Voltage Operation Voltage Range Maximum Operation Current Grounding System Installation Dimension (WxHxD): Installation Angle: Net Weight: DC 12V 10-16.0V DC 10A Car Battery Negative Pole 178mm x50mm x(165+25)mm Vertically 0º ~+ 30º Horizontally ± 15º 2.5Kg FM RECEIVER Signal Noise Ratio: Usable Sensitivity (S/N 30 dB) Frequency Response (± 3dB): Station Seeking Level: Distortion: Stereo Separation (1KHz): Antenna Impedance: 60dB 10dB 40Hz ~ 12.
ITEM# MM1007 WIRING DIAGRAM 36