TABLE OF CONTENTS Introduction.........................................................................................................................................................................................................................1 Important Safety Precautions............................................................................................................................................................................................2 Features ....................................
Introduction Congratulations on your purchase of this Digital Photo Frame. Before operating this unit, please read this manual thoroughly and keep it for future reference. This manual will help you use all of the exiting features to make your Digital Photo Frame view more enjoyable. The Digital Photo Frame is compatible with most popular memory card types on the market, including SD, MMC and MS, which enables you to view the digital photo directly from your camera’s memory card.
Important Safety Precautions Always follow these basic safety precautions when using your Digital Photo Key Chain. This will reduce the risk of product damage and personal injury. y Warning: To reduce the risk of electric shock, do not remove the cover or back. There are no user-serviceable parts inside. Refer serving to qualified personnel. y Warning: To prevent fire or electric shock hazard, do not expose the unit to rain to moisture.
Features y Shows sharp photos on a 3.
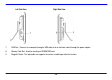
Location of Controls Front View 1. 2. 3. Top View LCD display screen - Press once to start slide show; or move the cursor right in thumbnail mode. Press and hold to turn on or turn off the screen. - Press to move the cursor down in thumbnails mode; or select next photo in single view mode; or move the cursor left in the menu. 4. – Press to move the cursor up in thumbnails mode; or select previous photo in single view mode; or move the cursor right in the menu. 5. 6.
Left Side View Right Side View 7. USB Port - Connects to a computer through a USB cable or to an electronic socket through the power adaptor. 8. Memory Card Slot - Used for inserting an SD/MMC/MS card. 9. Magnetic Stand - This adjustable arm supports the unit on a stable top or other flat surface.
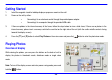
Getting Started 1. Install the magnetic stand for tabletop display or prepare a mount on the wall. 2. Power on the unit by either: 3. y Connecting it to an electronic socket through the provided power adapter y Connecting it to a computer through the provided USB cable.
Viewing thumbnails 1. Press the [©] and [ª] button to select Play Photos on the main screen, and press the [ ] button. The photos appear on the screen as thumbnails (3 rows x 3 columns). 2. To navigate through the thumbnails, press the [ 3. To view a single photo, select it and press the [ 4. To return to the main screen, press the [ ] button. ], [©] and [ª] buttons. ] button.
Running a slideshow While browsing a single photo, press the [ y ] button to start slideshow from the current photo. To set the interval between slides, press the [ ] button repeatedly. Each time the [ ] button is pressed, the interval settings are changed as follows: TIME 3S, TIME 5S, TIME 10S, TIME 1M, TIME 10M, TIME 30M. y To stop slideshow and return to the thumbnail mode, press the [ ] button. Managing Files There is a Nand Flash with 256M memory of the Digital Photo Frame.
To copy all photos once Press the [©] and [ª] button to select Copy All, and press the [ ] button. Wait for the Digital Photo Frame to complete the processing until “All OK” message appears. To delete all photos Press the [©] and [ª] button to select Delete All, and press the [ ] button. All photos on the Nand Flash of Digital Photo Frame are deleted. To delete photos one by one 1. Press the [©] and [ª] button to select Delete One, and press the [ ] button.
Question/Troubleshooting If you have problems in operating your Digital Photo Frame, try to using the following guidance to solve the problem before sending it to the service center. Even if the problem persists, do not disassemble the unit; just refer the problem to your dealer or service center. 1. What kind of photos does this unit support? y The Frame will display digital Photos that are stored in the JPEG format, which is the standard format for nearly all digital cameras.
Specification Digital TFT LCD Display Panel size: 3.5 inches Resolution: 320*240 pixels SLC Nand Flash 256M Power Supply Input: 100~240V AC, 50/60Hz Output: 5V 0.5A DC Supported devices peripheral Supported photo format SD™ (Secure Digital Card), MMC™ (MultiMedia Card), MS™ (Memory Stick) JPEG Operating temperature 5℃ ~ 35℃ Dimension 115* 99* 20mm Weight 170 g This manual was correct and complete at the time of printing.
FCC Compliance This device complies with Part 15 of the FCC Rules. Operation is subjected to the following two conditions: (1) This device may not cause harmful interference, and (2) this device must accept any interference received, including interference that may cause undesired operation. Note:This equipment has been tested and found to comply with the limits for a Class B digital device, pursuant to Part 15 of the FCC Rules.
Nextar™ is a trademark of Nextar (Hong Kong) Limited Nextar may find it necessary to modify, amend or otherwise change or update this manual. We reserve the right to do this at any time, without any prior notice. All specifications and features are subject to change without notice. All screen shots shown are simulated and may not represent the actual screen on production units sold to consumers. For instruction manuals, updated drivers or other information, be sure to visit our website at: www.Nextar.