Contents Precautions..............................................................................2 Notes on Installation.................................................................3 Before You Install.....................................................................4 Installation (DIN Front Mount)...................................................5 Installation (Vehicle's Brackets)................................................6 Wiring Connections...................................................
Precautions • This unit will only play the following discs. Type of disc Label on the disc CD, MP3, WMA Recorded material Size of disc Audio only 12 cm Care of Discs • Handle the disc by its edge to keep the disc clean. Do not touch the • Do not use CDs with labels or stickers attached. The label may leave a sticky residue when it begins to disc’s surface. peel. • Do not use a CD with paste or ink • Clean the discs with an optional cleaning cloth. Wipe each disc from residue on it.
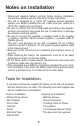
Notes on Installation • Disconnect negative battery terminal before starting installation. Consult the vehicle’s owner’s manual for proper instruction. • The unit is designed for a 12Volt DC negative ground operation system only. Before installing the unit, make sure your vehicle is a 12Volt DC negative ground system. • Be sure to connect the color coded leads according to the diagram. Incorrect connections may cause the unit to malfunction or damage the vehicle's electrical system.
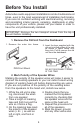
Before You Install Automotive audio equipment installations can be troublesome at times, even to the most experienced of installation technicians. If you are not confident working with electrical wiring, removing and reinstalling interior panels, carpeting, dashboards or other components of your vehicle, please call your dealer in order to have the unit professionally installed. IMPORTANT: Remove the two transport screws from the top of the unit before installing. 1.
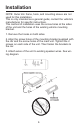
Installation WARNING! Disconnect negative battery terminal from battery before starting installation. Consult the vehicle’s owner’s manual for proper instructions. NOTE: Mark the polarity of the existing speaker wires before disconnecting battery. NOTE: Remove the two transport screws from the top of the unit before installing. DIN Front Mount 1. After removing the old radio and mounting sleeve, insert supplied mounting sleeve into opening. 2.
Installation NOTE: Outer trim frame, hook, and mounting sleeve are not used for this installation. This is only intended as a general guide; contact the vehicle's manufacturer for specific instructions. This method of installation uses the screw holes at the sides of the unit and the holes of the existing vehicle mounting bracket. 1. Remove the hooks on both sides. 2. Align the screw holes of the mounting bracket supplied with the car and the screw holes of the main unit.
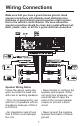
Wiring Connections Make sure that you have a good chassis ground. Good ground connections will eliminate most electrical noise problems. A good chassis ground requires a tight connection to the vehicle's metal chassis. The area around the ground connection should be clean, bare metal without rust, paint, plastic, dust, or dirt for a good electrical connection. Speaker Wiring Notes Follow the above wiring diagram to install the head unit with new or existing speakers.
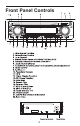
Front Panel Controls 8
Basic Operation VOL +/- Button to adjust the balance between the left & right speakers. Tuning the unit On / Off Press any Button to turn the unit on, the display will show a message WELCOME to indicate it is ready for use. Press the POWER button for 2 seconds to turn the unit off. Fader Press SEL Button five times and the display shows "FAD", then use the VOL +/- Button to adjust the balance between the front & rear speakers. Clock The time clock can be set anytime when the power is on.
Radio Operation Save Your Preset Stations There are six numbered preset buttons which can store and recall stations for each band. While listening to a radio station you would like to save as a pre-set, press and hold one of the buttons numbered 1-6 until you hear a beep. The button you pressed is now the pre-set button for that station. Choose Radio Band Press the BND•ID3 Button anytime to access the radio function.
CD Operation(Cont) 10 seconds of each track. Press this button again to resume playback. Insert/Eject CD Insert a disc into CD slot with label side up. The disc will be automatically loaded into the unit, even when it is off or at radio mode. The word “LOAD” will blink on the display and the CD will play automatically. Press the EJECT Button to eject the disc from the slot. If the disc is not removed from the slot within 5 seconds, it will automatically be loaded into the slot again.
Selecting Tracks On the Head Unit, press the SEEK >>| Button to advance CD to the next track. Track numbers will be shown on the display. Press and hold SEEK >>| to fast forward. Press the SEEK |<< Button to go to a previous track. Track numbers will be shown on the display. Press and hold the SEEK |<< Button to fast reverse. Disc will play normally when the SEEK >>| or SEEK |<< Button is released. On the Remote Control, use the |<< or >>| Buttons. track.
Auxilliary in, RCA out & Subwoofer out LCD. If there is no ID3 Tag information, nothing will shown on LCD. The sequence of ID3 Tag information will be shown as follows: (FILE) ALBUM Auxiliary Input The Auxiliary Input Jack is on the panel of the unit. Insert the AUX IN cable's stereo plug into the AUX IN jack on the panel of the unit. Route the other end of the stereo plug to the headphone jack of any external audio device such as walkman and discman. Press the Mode button to choose AUX.
Infra Red Remote Control This unit comes with a full remote control system. The CR-2025 Lithium battery is an included item with the remote control. In case you have to replace the batteries (1) remove the cover from the back of the remote control. (2) insert a CR-2025 Lithium battery. (3) Fix the cover to the back of the remote control. Operating the remote control Aim at the face panel of the CD Receiver, the maximum distance at which signals can be received is about 6M.
Simple Troubleshooting Guide PROBLEM CAUSE/SOLUTION No Power Check wiring connections. Check and make sure the fuse is not blown. Replace with the proper rating/size fuse. Some errors occur in the LCD or nothing functions when buttons are pressed. Press the RESET Button (21). Unable to receive stations Check and make sure the antenna is connected properly. Poor radio reception Check and make sure the antenna is the correct length. Make sure the antenna is not broken.