Instruction Manual English
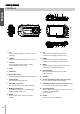
TABLE OF CONTENTS English PRECAUTIONS ........................................................................................................................ 01 CAUTIONS ON USING THIS PRODUCT ................................................................................. 02 PRODUCT SPECIFICATION .................................................................................................... 02 PACKAGE CONTENTS ..........................................................................................
English CAUTIONS ON USING THIS PRODUCT 1. Ensure that the windscreen is free of dirt or grease before placing mount upon it. 2. Do not obscure the view of the road ahead or impede the deployment of any airbags in the event of an accident. 3. When not in use, please disconnect the car adaptor from both the 12/24Vdc outlet in your vehicle and the device itself. 4. Only clean the device with a soft dry cloth, for tough dirt, apply some neutral detergent diluted in 5 to 6 parts water to a soft cloth.
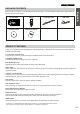
PACKAGE CONTENTS iN-CAR CAM Mount Installation Disk Instruction Manual Car Power Cable English Please check the contents of your iN-CAR CAM product package. The actual products might appear slightly different from the pictures shown below. USB Cable PRODUCT FEATURES Thank you for purchasing this NEXTBASE iN-CAR CAM product, in this section we will outline some of the features available with this device. 2.
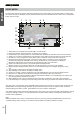
English CONTROLS 6 1 2 7 8 9 10 11 12 13 14 15 3 4 5 ON CHARGE RESET NBDVR202 16 17 18 19 1. OK Press to confirm selection or to start / stop a recording. 11. UP Press to zoom in when in video & photo modes and to navigate up within menus. 2. POWER Press and hold for 2 seconds to turn on / off. 12. DOWN Press to zoom out when in video & photo modes and to navigate down within menus. 3. IR LEDS Turn on/off within Setup menu to enable enhanced night time recording. 13.
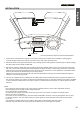
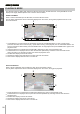
INSTALLATION English 12-24V DC The above illustration depicts recommended installation. 1. Insert memory card (Class 6 or higher) in to the device, taking care to follow correct orientation markings (gold contacts facing the back of the device). Push the memory card until it clicks into place. 2. Attach the device to the supplied windscreen mount, taking care the locking tab has ‘clicked’ firmly into place and plug the aerial cable into the socket marked GPS. 3.
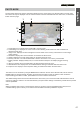
English VIDEO MODE The key below explains the various information displayed on the screen when your iN-CAR CAM is in Video mode, some icons will only be displayed once the relevant function has been selected within the Video menu, as described further down this page. 1 2 3 4 5 720P 17 6 7 16 15 8 14 13 x2.0 7. 8. 9. 10. 11. 12. 13. 14. 15. 16. 17. 9 10 12 1. 2. 3. 4. 5. 6. 30.0MPH 11 Video Mode Icon: Indicates the iN-CAR CAM is in Video mode.
PHOTO MODE English The key below explains the various information displayed on the screen when your iN-CAR CAM is in Photo mode, some icons will only be displayed once the relevant function has been selected within the Video menu, as described further down this page. 1 10 + -0 9 AWB 8 AUTO ISO 2 01234 5M 3 4 5 6 7 1. Photo Mode Icon: Indicates the iN-CAR CAM is in Photo mode. 2.
English PLAYBACK MODE The iN-CAR CAM can display both Videos and Photos stored upon the SD card when in Playback Mode. As the displays are slightly different please refer to the two sections below. VIDEO PLAYBACK When a video is detected upon the SD Card, the screen below is shown. The key below explains the various information displayed on the screen, during video playback and how to use the control buttons. 3 2 1 OK: /II MODE: UP: 101-0001 720P 4 5 01/01/13 00:29 6 DOWN: 1.
DRIVING RECORDER PLAYER SOFTWARE INSTALLATION System Minimum Requirements: Windows XP, Vista, Windows 7, Windows 8 Pentium III 500 MHz or Celeron at 800 MHz. 1 Gb RAM. 500 Mb hard drive space. CD-ROM Drive (tray loader only) 1024 x 768 monitor display English This section will guide you through the installation of the Driving Recorder Player software, designed to enable the viewing of recorded files as well as checking journey route / GPS data (location and speed) and G Sensor information.
English DRIVING RECORDER PLAYER OPERATION The key below explains the various information displayed within the Driving Recorder Player when using a Windows platform Driving Recorder Player MPH Software (V2.0) 13 1 12 11 2 3 4 11/09/2013 13:31:55 65.0MPH 5 6 7 8 9 10 1. Playback window of selected video file Displays selected video file video. 2. Date / Time / Speed Stamp Data saved to the recorded file, this content may vary depending on iN-CAR CAM settings and GPS signal. 3.
DRIVING RECORDER PLAYER OPERATION (CONTD.) English 6. Driving Recorder Player controls Maximise playback window, press Esc key to return to normal playback window. Browse for files stored on your computer to add to the File List window. Capture map as an .png file. Delete selected file within the File List. 7. Continuous playback of files Tick box to allow continuous playback of files within the file list window. 8.
English MENUS AND SETTINGS Each mode (Video, Photo and Playback) has a menu used to access the various options and settings, press the MENU button on the rear of the device to access the menu, specific to the current mode selected. Use the UP, DOWN buttons to select chosen option and press the OK button to confirm. 1. VIDEO MODE 1.1 Resolution Select recording resolution, this will increase or decrease the quality of the recorded video. Default Setting: 720P (1280 x 720 @ 30Fps) 1.
MENUS AND SETTINGS (CONTD.) 2.1 Capture Mode Turn On / Off the timer function, when this feature has been turned on, the iN-CAR CAM will take a photo the selected period of time after the OK button has been pressed. Default Setting: Single English 2. PHOTO MODE 2.2 Resolution Select image size, this will increase or decrease the size of the recorded image Default Setting: 5M 2.3 Quality Increase or decrease the quality of the recorded image. Default Setting: Fine 2.
English MENUS AND SETTINGS (CONTD.) 4. SETUP MENU There is also a Setup menu for the general settings, press the MENU button twice on the rear of the device to access the menu. The options and settings available are described below. 4.1 Date / Time Adjust the date / time as required using the OK button to toggle through fields, press the UP and DOWN buttons to set variables. Note: In event of battery becoming fully dis-charged, the date will reset to 01/01/2013. 4.
PC CONNECTION ·· · Mass Storage PC Camera Use the UP and DOWN buttons to select preferred option and OK to confirm. English Connecting the iN-CAR CAM to a Windows based PC using the supplied USB Cable will automatically trigger the iN-CAR CAM to display the two options of: Mass Storage If Mass Storage is selected, the iN-CAR CAM screen will blank and then take the function of an SD Card reader for your PC. Upon your PC an extra drive will appear (e.g.
English TROUBLE SHOOTING The iN-CAR CAM can not lock onto satellite. After power on and with the device mounted with clear view of the sky it can take up to 10 minutes to find the three satellites required to achieve a stable signal. Reception can also be affected by atmospheric conditions and the proximity of buildings / trees obscuring the sky. Turn iN-CAR CAM off and on to restart GPS search procedure.
NBDVR302G-IM-EN-A1