Instruction Manual ENGLISH NORSK SVENSKA DANSK SUOMI NB7-CAR / NB7T-CAR / NB7D-CAR NB9-CAR / NB9T-CAR / NB9D-CAR
TABLE OF CONTENTS This manual covers the following NEXTBASE models: 1) NB7-CAR: CAR 7" DVD Player 2) NB7T-CAR: CAR 7" DVD Player/Monitor 3) NB7D-CAR: CAR 7" DVD Player/Player 4) NB9-CAR: CAR 9" DVD Player 5) NB9T-CAR: CAR 9" DVD Player/Monitor 6) NB9D-CAR: CAR 9" DVD Player/Player 01 ENGLISH TABLE OF CONTENTS ............................................................................................................. 01 PRECAUTIONS ........................................................................
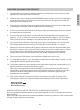
ENGLISH PRECAUTIONS Thank you for choosing this NEXTBASE portable DVD player. Please read this manual carefully before operation and keep it for future reference. It will be helpful should you encounter any operational problem. WARNING: Do not expose this product to rain, moisture or water under any circumstances, doing so may result in the risk of electric shock or fire.
CAUTIONS ON USING THIS PRODUCT Please read this instruction manual carefully and follow the instructions for safe operation of the player and accessories. 2. Refer all servicing to authorized NEXTBASE repair centres only. Do not attempt to repair this product yourself due to risk of electric shock, doing so will render the manufacturers warranty void. 3. Only use the supplied accessories with the DVD player, failure to do so may result in damage not covered under the manufacturers warranty. 4.
ENGLISH PACKAGE CONTENTS Please check the contents of your purchased model using the guide below. In the event of an item being missing please contact your local NEXTBASE dealer.
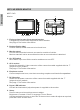
NB7-CAR SERIES DVD PLAYER NB7-CAR / NB7T-CAR / NB7D-CAR ENGLISH Player 20 21 1 19 18 17 16 15 14 13 12 11 10 9 8 7 6 5 4 3 2 1. Fixing points for easy fit car mount bracket Fixing points to secure the supplied car mount bracket. See page 15 for further information. 2. Product Rating label Product details, model name etc to be found here. 3. Player stand Pull out stand from the bottom to use DVD player outside of vehicle. Player stand will not be accessible when the car mount bracket is attached. 4.
NB7-CAR SERIES DVD PLAYER (CONTD.) ENGLISH NB7-CAR / NB7T-CAR / NB7D-CAR Player 20 21 1 19 18 17 16 15 14 13 12 11 10 9 8 7 6 5 4 3 2 9. OK / Play & Pause Press to confirm selection made within the Setup menu or DVD menu Press to start / pause / resume playback. 10. VOLPress to decrease volume level. Applies to DVD player speakers and earphones. 11. Previous / Up Press to move to previous chapter or track. Press to navigate up within the menus. 12.
NB7-CAR SERIES DVD PLAYER (CONTD.) NB7-CAR / NB7T-CAR / NB7D-CAR ENGLISH Player 20 21 1 19 18 17 16 15 14 13 12 11 10 9 8 7 6 5 4 3 2 16. AV In socket Used to connect the DVD player to a second DVD player using the connection cable supplied with the ‘D’ (player/player) models. The DVD player can also be connected to other devices, such as a camcorder and used as a monitor using an AV cable (not supplied). See page 20 for further information. 17.
NB7-CAR SERIES MONITOR ENGLISH NB7T-CAR Monitor 1 4 5 6 7 1312 1110 9 8 3 2 1. Fixing points for easy fit car mount bracket Fixing points to secure the supplied car mount bracket. See page 15 for further information. 2. Product Rating label Product details, model name etc to be found here. 3. Monitor stand Pull out stand from the bottom to use monitor outside of vehicle. Monitor stand will not be accessible when the car mount bracket is attached. 4.
PLAYER PARTS NB7-CAR SERIES & MONITOR CONTROLS (CONTD.) (CONTD.) NB7T-CAR ENGLISH Monitor 1 4 5 6 7 1312 1110 9 8 3 2 10. VOL+ / Right Press to increase volume level. Press to navigate right and adjust settings within the monitor displaySETUP menu. 11. DOWN Press to navigate down within the monitor display SETUP menu. 12. UP Press to navigate up within the monitor display SETUP menu. 13. VOL- / Left Press to decrease volume level.
NB9-CAR SERIES DVD PLAYER ENGLISH NB9-CAR / NB9T-CAR / NB9D-CAR Player 20 21 1 19 18 17 16 15 14 13 3 12 11 10 9 8 7 6 5 4 2 1. Fixing points for easy fit car mount bracket Fixing points to secure the supplied car mount bracket. See page 15 for further information. 2. Product Rating label Product details, model name etc to be found here. 3. Player stand Pull out stand from the bottom to use DVD player outside of vehicle. Player stand will not be accessible when the car mount bracket is attached. 4.
NB9-CAR SERIES DVD PLAYER (CONTD.) NB9-CAR / NB9T-CAR / NB9D-CAR ENGLISH Player 20 21 1 19 18 17 16 15 14 13 3 12 11 10 9 8 7 6 5 4 2 9. OK / Play & Pause Press to confirm selection made within the Setup menu or DVD menu Press to start / pause / resume playback. 10. VOLPress to decrease volume level. Applies to DVD player speakers and earphones. 11. Previous / Up Press to move to previous chapter or track. Press to navigate up within the menus. 12.
NB9-CAR SERIES DVD PLAYER (CONTD.) ENGLISH NB9-CAR / NB9T-CAR / NB9D-CAR Player 20 21 1 19 18 17 16 15 14 13 3 12 11 10 9 8 7 6 5 4 2 16. AV In socket Used to connect the DVD player to a second DVD player using the connection cable supplied with the ‘D’ (player/player) models. The DVD player can also be connected to other devices, such as a camcorder and used as a monitor using an AV cable (not supplied). See page 20 for further information. 17.
NB9-CAR SERIES MONITOR NB9T-CAR ENGLISH Monitor 1 4 5 6 7 13 12 1110 9 8 3 2 1. Fixing points for easy fit car mount bracket Fixing points to secure the supplied car mount bracket. See page 15 for further information. 2. Product Rating label Product details, model name etc to be found here. 3. Monitor stand Pull out stand from the bottom to use monitor outside of vehicle. Monitor stand will not be accessible when the car mount player bracket is attached. 4.
NB9-CAR SERIES DVD MONITOR (CONTD.) ENGLISH NB9T-CAR Monitor 1 4 5 6 7 13 12 1110 9 8 3 2 10. VOL+ / Right Press to increase volume level. Press to navigate right and adjust settings within the monitor SETUP display menu. 11. DOWN Press to navigate down within the monitor display SETUP menu. 12. UP Press to navigate up within the monitor SETUP display menu. 13. VOL- / Left Press to decrease volume level. Press to navigate left and adjust settings within the monitor SETUP display menu.
EASY FIT CAR MOUNT & INSTALLATION Car Mount Bracket 1 2 6 3 5 4 1. Locating hole for thumbwheel Thumbwheel will pass through the car mount bracket here. 2. Locating hole for Anti-rotation pin Anti-rotation pin will pass through the car mount bracket here. 3. Anti-rotation pin This metal pin will locate through the car mount bracket and into a hole in the rear housing of the player / monitor to stop possible rotation of the screen when vehicle is moving. 4.
EASY FIT CAR MOUNT & INSTALLATION (CONTD.) ENGLISH Car Mount 7 8 9 11 10 PUSH 12 7. Seat / Screen adjustment thumbwheel Loosen thumbwheel to increase / decrease the distance between seat and the screen as required, remembering to re-tighten the thumbwheel before use. 8. Screen viewing angle adjustment thumbwheel Loosen this thumbwheel to change the angle of the screen as required, remembering to re-tighten the thumbwheel before use. 9.
SYSTEM CONNECTIONS The only connection required is 12VDC (not 24VDC) power using the supplied car adaptor. With the vehicle running connect the car adaptor to the 12VDC outlet within the vehicle and making sure the DVD player is turned off connect the car adaptor to the socket marked ‘DC IN 9-12V’ which is located on the left hand side of the DVD player. C OUT DC IN 9-12V 12VDC car adaptor The DVD player can now be turned on.
ENGLISH SYSTEM CONNECTIONS (CONTD.) NB7D-CAR / NB9D-CAR (Player / Player models) For the player / player models there is the standard car adaptor connection as described on the previous page to one of the two DVD players and also the audio / video / power connection between the two players to be made using the supplied cable. DVD Player A: Insert the DC connector into the ‘DC OUT’ socket located on the left hand side of the DVD player. Insert the 3.
CAR ADAPTOR FUSE INFORMATION The fuse is user-replaceable by unscrewing the end-cap, take care when removing the end-cap as there is a spring within the assembly. 20mm glass fuse 3A unscrew Replacements fuses are readily available, should you have any difficulties please contact you local NEXTBASE dealer. INSERTING A DISC To open the disc compartment move the OPEN catch located on the top of the DVD player to the right.
ENGLISH AUDIO / VIDEO CONNECTONS The CAR Series range of DVD players have Audio / Video (AV) Out and In functionality. This allows the DVD player to be connected using the an AV cable (sold separately) to an external screen, i.e. a television or an external AV source, i.e. a camcorder. Please contact your local NEXTBASE dealer to purchase the correct AV Cable. The connectors are located on the left hand side of the DVD player, see image below. AV OUT AV IN Audio / Video Out Connection Connect the 3.
REMOTE CONTROL This section describes the remote control functions. 23 22 21 20 1 2 STEP SEARCH MUTE SOURCE 1 2 3 4 5 6 7 8 9 0 10+ DISPLAY SUBTITLE ANGLE AUDIO MENU /PBC MODE 4 5 6 7 8 9 VOL- VOL+ 10 TITLE 3 19 18 17 SETUP 16 15 14 REPEAT SLOW 11 PROGRAM ZOOM 12 ENTER 13 Battery Compartment 1. MUTE Disable the audio output, applies to DVD player speakers, earphones and audio out. 2. SOURCE Press to select media source: DVD / AV IN / MEDIA / SETUP. 3.
ENGLISH REMOTE CONTROL (CONTD.) 8. STOP Press once during playback to stop playback of DVD content, pressing the play/pause button will then resume playback from that point. Press twice to stop playback of DVD content, this will cancel resume function. 9. IR HEADPHONE MODE Press once to turn on the IR transmitter, this will open Channel A. Press twice for ‘Channel B’. Press a third time to turn the IR transmitter OFF. 10.
REMOTE CONTROL (CONTD.) 19. NAVIGATION BUTTONS Press as required to navigate through the options within the menus. 20. TITLE Press to return to the DVD title menu. 21. ANGLE Press to change the viewing angle during DVD playback. This feature may not be available on some discs. 22. SUBTITLE Press to toggle through available subtitle languages on current disk. 23. STEP Press to view movie frame by frame. 24. SEARCH Press to enter a specific time, title or chapter on current disk.
REMOTE CONTROL BATTERY REPLACEMENT ENGLISH To replace the battery please follow given instructions and see diagram below. 1. Using a finger nail move the spring clip to the right and hold in that position. 2. Pull the battery tray away from the main body of the remote control. 3. Replace the battery with correct type (CR2025 3V) taking care that the positive (+) side is uppermost and not to touch the underside (negative).
MEDIA PLAYBACK Insert the memory device as shown below, these can only be inserted fully when they are in the correct orientation, i.e. the memory card has contacts facing the front of the player as shown below. Once a memory device is inserted, press the MODE button on the front of the DVD player or press SOURCE on the remote control and select Media, then USB or SD as required.
ENGLISH MEDIA PLAYBACK (CONTD.) Movie Playback Once a compatible video file (MPEG-2, DIVX4/5, AVI, XVID, JPG, MP3) has been selected playback will begin. Should the file be of a format that is not supported (e.g. MPEG-4) an on screen message will appear saying ‘CODEC NOT SUPPORTED’. During playback, functions such as play / pause, fast forward, repeat, zoom etc. remain available. Once playback is stopped press to return to previous directory.
WIRELESS HEADPHONES The transmitter is set to OFF by default and can be turned on by simply pressing the IR Headphone ( MODE ) button on the remote control. Press once for ‘Channel A’ Press twice for ‘Channel B’ Press a third time to turn the IR transmitter OFF. The IR transmitter can also be turned on through the SETUP menu as described later in this instruction manual. Four red LED’s will be visible on the DVD player when the transmitter has been turned on.
ENGLISH SYSTEM SETUP - GENERAL Press SETUP on the remote control to access the system setup menus. Using the navigation buttons and enter button, select required option, press SETUP to exit. TV DISPLAY ANGLE MARK OSD LANGUAGE CLOSED CAPTION SCREEN SAVER IR HEADPHONE LAST MEMORY AUTO STANDBY 16:9 ON ENG ON ON OFF ON 3H A B OFF ENGLISH FRENCH GERMAN SPANISH PORTUGESE DANISH SWEDISH FINNISH NORWEGIAN 4:3 PANSCAN 4:3 LETTERBOX 16:9 16:9 SQUEEZE TV DISPLAY Select the aspect ratio of the playback image.
SYSTEM SETUP - VIDEO Video Setup Page ENGLISH BRIGHTNESS Adjust the brightness to best suit viewing environment. Default: 00 CONTRAST Adjust the contrast to best suit viewing environment. Default: 00 HUE Adjust the hue to best suit viewing environment. Default: 00 SATURATION Adjust the saturation to best suit viewing environment.
SYSTEM SETUP - PREFERENCES ENGLISH Preference Page ADU ENGLISH FRENCH GERMAN SPANISH PORTUGESE DANISH SWEDISH FINNISH NORWEGIAN ENGLISH FRENCH GERMAN SPANISH PORTUGESE DANISH SWEDISH FINNISH NORWEGIAN OFF ENGLISH FRENCH GERMAN SPANISH PORTUGESE DANISH SWEDISH FINNISH NORWEGIAN TV TYPE Select the TV type for when DVD player is used with a televison. Default: PAL AUDIO Select the preferred audio language. Default: ENG SUBTITLE Select the preferred subtitle language or turn subtitles off.
SYSTEM SETUP - PASSWORD Password Setup Page ENGLISH PASSWORD MODE Turn Off / On the requirement to enter a password when selecting the Parental Control level. Default: ON PASSWORD Change the default password ‘1234' to one of your choice. This new password will now be used for changing parental control, unless password mode has been turned off. Note: A master password of ‘1369' will always remain functioning in event of password being forgotten.
ENGLISH PRODUCT SPECIFICATION Compatible Disc Types DVD / SVCD / VCD / DVD±R / DVD±RW / CD / CD-R CD-RW / Kodak Picture CD / MP3 CD Compatible Media Formats MPEG-2, DIVX4/5, AVI, XVID, JPG, MP3 LCD Panel Size CAR 7 Series: 7" CAR 9 Series: 9" LCD Screen Ratio 16:9 LCD Panel Resolution CAR 7 Series: 800 x 480 x RGB CAR 9 Series: 800 x 480 x RGB Car Power Cable Input: 12VDC (NOT FOR USE WITH 24VDC) Output: 12VDC 1A Fuse Type: 20mm 3A Mains Adaptor (sold separately) Input:100-240V 50-60Hz Output:
SMASHED SCREEN IDENTIFICATION A Liquid Crystal Display (LCD) Screen is a multilayer complex component. The broken glass normally shows signs of the impact mark and also cracks radiating away. The resultant fluid leakage renders the panel inoperable. Symptoms are often a dark round mark, a white screen without picture and maybe some multi-coloured lines. Depending on the individual break, an element of the image may remain for a while, but not for long, as the fluid leaks away.
TROUBLE SHOOTING ENGLISH Problem Solution DVD player will not work. Apply power to the DVD player by using the supplied car power cable. Check DVD player On / Off switch is in the On position. Check the fuse within the car power cable, see page 19. Check the power LED indicator is illuminated on the DVD player, if not then the car power cable or DC IN socket may have been damaged, please contact your local NEXTBASE dealer for further information.
TROUBLE SHOOTING (CONTD.) Problem Monitor shows no audio or video image. Second DVD player in a NB7D-CAR / NB9D-CAR system does not show the image from the other DVD player. Solution Turn monitor power switch to ON. Always supply power to the monitor from the DVD Player, using the audio/video/power connection cable supplied with the product Ensure that the power is applied to the DVD player using the supplied car power cable. Check the fuse within the car power cable, see page 19.
www.nextbase.co.