MODEL NO. SDV685-AC OPERATING INSTRUCTIONS PDF 文件使用 "pdfFactory Pro" 试用版本创建 www.fineprint.
IMPORTANT SAFETY INSTRUCTIONS ENG 01 1. 2. 3 4. 5. 6. 7. Read these instructions. Keep these instructions. Heed all warnings. Follow all instructions. Do not use this apparatus near water. Clean only with dry cloth. Do not block any ventilation openings. Install in accordance with the manufacturer's instructions. 8. Do not install near any heat sources such as radiators, heat registers, stoves, or other apparatus (Including amplifiers) that produce heat. 9.
02 ENG PRECAUTIONS Thank you for purchasing this tablet DVD player. Please read this manual carefully before operating and reserve it for future reference. It will be helpful to you if you encounter any operational problem. WA RNING: To reduce the risk of fire or electric shock, do not expose this appliance to rain or moisture, Dripping or splashing and that no objects filled with liquids, such as vases, shall be placed on the Apparatus. Dangerous high voltages are present inside the enclosure.
PRECAUTIONS ENG 03 CAUTION To reduce the risk of electric shock, do not remove cover (or back). No user serviceable parts inside. Refer servicing to qualified service personnel. DANGERO US VOLTAGE INSTRUCTION MOBILE ENTERTAINMENT PDF 文件使用 "pdfFactory Pro" 试用版本创建 www.fineprint.
04 ENG PRECAUTIONS MA CROVISION: This product incorporates copyright protection technology that is protected by U.S. patents and other intellectual property rights. Use of this copyright protection technology must be authorized by Macrovision. If not, the use of this technology is only permitted for domestic use and other limited playback uses. Reverse engineering or disassembly is prohibited. DOLBY: Manufactured under license from Dolby Laboratories.
TABLE OF CONTENTS ENG 05 IMPORTANT SAFETY INSTRUCTIONS PRECAUTIONS TABLE OF CONTENTS IMPORTANT SAFETY INSTRUCTIONS.......................... 1 CAUTIONS ON USING THIS PLAYER DISCS PLAYABLE CAUTIONS ON USING THIS PLAYER............................ 7 PACKAGE CONTENTS PACKAGE CONTENTS..................................................10 PARTS AND CONTENTS FRONT SIDE.................................................................. 11 LEFT SIDE.............................................................
06 ENG TABLE OF CONTENTS ZOOM FUNCTION........................................................ 30 SEARCHING FOR A SPECIFIC SCENE...................... 30 SELECTING SUBTITLE............................................... 30 CHANGING THE ANGLE............................................. 30 CHANGING THE AUDIO LANGUAGE......................... 30 PROGRAM PLAYBACK............................................... 31 USING THE ON-SCREEN DISPLAY............................ 32 PLAYING A MP3 FORMAT DISC AND JPEG CD.
CAUTIONS ON USING THIS PLAYER ENG 07 CAUTIONS ON USING THIS PLAYER 1. DO NOT MOVE THE PLAYER DURING PLAYBACK During playback, the disc spins at high speed. So do not lift or move the player. Doing so may damage the disc. 2. TRANSPORTING THE PLAYER Before transporting the player, be sure to remove the disc and turn off the power, then unplug the power cord. 3. PLACE OF INSTALLATION AT HOME Select a stable place upon which to site the DVD player. Do not place the player on top of a TV or color monitor.
08 ENG CAUTIONS ON USING THIS PLAYER 7. W HEN USIN G THE DVD PLAYE R IN A CAR Always switch the engine on, before connection power to the DVD player. 8. CLEANING T HE PL AYER Normally clean the player with a soft, dry cloth. For tough dirt, apply some neutral detergent diluted in 5 to 6 parts water to a soft cloth, wring out thoroughly. Wipe off the dirt, then wipe off the player with a dry cloth. Note that alcohol, thinner, benzene, insecticides, etc., may cause the print or coating to peel off.
DISCS PLAYABLE ENG 09 TYPES OF DISCS PLAYABLE ON THIS PLAYER The discs listed on the table below can be played on this player without an adapter. The marks shown on the table below are indicated on the disc's label, package or jacket. Types of playable discs and their marks DVD-Video disc CD Diameter/Playable sides Playback time DVD video 12cm/singlesided 12cm/doublesided 1 layer 2 layer 1 layer 2 layer Playback time (MPEG 2 format) 133 minutes (4.7GB) 242 minutes (8.5GB) 266 minutes (9.
10 ENG PACKAGE CONTENTS PACKAGE CONTENTS After unpacking, first check the contents of your DVD player package, as listed below: Operating Ma nual Two Main Units AVP Cable Two AC / DC Adapters Two Remote Controls Two Car Power Cables Two Headrest mounts Two AV Cables Two Earphones Carrying Bag Two Batteries (optional) NOTES: 1. Actual products' appearance might vary slightly from the pictures shown. 2.
PARTS AND CONTENTS ENG 11 FRONT SIDE 1 2 3 5 4 1. Disc compartment cover 2. TFT Screen 4. IR Headphone Transmitter LED 3. Speakers 5. Remote Control Sensor LEFT SIDE USB 1 1 2 3 2 V ID EO IN /O U T DC OUT 12V 1A C AR USE ONLY 3 4 A UD IO IN/ OUT C OAX IA L OUT 5 EARPHONE jack For connecting a stereo earphone or an amplifier. USB port Support USB 1.1 use. DC OUT jack (12V 1A) DC output for car use only. Note: this connector is for interconnection to a second NEXTBASE player only.
12 ENG PARTS AND CONTROLS TOP PANEL BUTTON DEFINITION 1 Volume UP/ down button Press“+” button to increase the volume. Press“-” button to decrease the volume. In the menu state, press +/- buttons to move the cursor right/left. 2 PREV/NEXT button Press to locate the previous track or chapter. Press to locate the next track or chapter. In the menu state, press / buttons to move the cursor down/up. 3 OPEN Press it to open the disk cover. 4 PLAY / PAUSE button Press it to play.
PARTS AND CONTROLS ENG 13 REAR SIDE 1. Supp or t The unit can stand with this device. 1 HOW TO STAND 1) Pull out the support to the full extent. 2) Lean the player lock to rest upon the support. NOTE: Do not press down upon the DVD player when using the support, or damage will result. MOBILE ENTERTAINMENT PDF 文件使用 "pdfFactory Pro" 试用版本创建 www.fineprint.
14 ENG PARTS AND CONTROLS REMOTE CONTROL 32 30 MOBILE ENTERTAINMENT PDF 文件使用 "pdfFactory Pro" 试用版本创建 www.fineprint.
PARTS AND CONTROLS ENG 15 KEY DESCRIPTION OF REMOTE CONTROL 14 ( SETUP Press this button to display setup screen when at stop status. 2 3 Press this button to switch the audio languages on the DVD. 16 STOP( SU BTITLE 17 REV( MENU Press this button to display the DVD's menu screen. While playing VCD disk, press it to switch between menu on or off. 5 6 7 MO DE It is the shortcut key for AV IN founction ( ) ) Press this button to stop playback. ) Fast backward key.
16 ENG PARTS AND CONTROLS 30 Vol - 27 ANGL E Press this button to switch angle. Press it to decrease the volume 31 Vol + 28 SHIF T Press this button to switch between number & function. (Default: function) 29 MUTE Press it to increase the volume 32 NUMBER KEYS Input number. Press this button to mute the player. NOTES ON USING THE REMOTE CONTROL UNIT Do not drop or step on the remote control unit or subject it to shocks.
PARTS AND CONTROLS ENG 17 FITTING HEADREST MOUNT The headrest mount is designed to fit the wide variety of shapes and sizes of headrests in modern cars. The foam pad allows you to set the angle of the screen and will eliminate vibration when the car is moving. 1. Place the two mounting straps over your headrest with the mount's sponge facing headrest, and release button on top. 2. Adjust to your desired viewing angle, then firmly secure the mount by tightening the straps. See diagrams below.
18 ENG AUDIO/VIDEO CONNECTIONS CONNECTING THE PLAYER TO A TV SET US B DC OUT 12V 1 A C AR USE ONLY VID EO IN/ OUT Yellow A UD IO IN/ OU T C O AXI AL OU T DC IN 12 V Black Yellow Red White Use the supplied AV cable to connect between the DVD player and your TV set, as shown. MOBILE ENTERTAINMENT PDF 文件使用 "pdfFactory Pro" 试用版本创建 www.fineprint.
CONNECTIONS ENG 19 CONNECTING THE ADAPTER TO THE DC IN 12 V SOCKET IN CAR US B DC OUT 12V 1 A C AR USE ONLY VID EO IN/ OU T A UD IO IN/ OU T C OAXI AL OU T DC IN 12V AT HOME NOTE: Do not connect to 24V supply or damage will result. USING THE EARPHONE US B DC OUT 12V 1 A C AR USE ONLY VID EO IN/ OUT A UD IO IN/ OU T C OAXI AL OU T DC IN 12V 1. Set the volume control to minimum sound level. 2. Connect the plug of earphone to the player's " " jack. 3.
20 ENG CONNECTING THE PLAYER TO OTHER DEVICES CONNECTING TO A DOLBY DIGITAL/MPEG DECODER OR AN AMPLIFIER WITH BUILT-IN DECODER With this player, you can enjoy powerful Dolby Digital or MPEG sound. Output the digital signals from the player's digital output to a decoder or amplifier with built-in decoder. US B DC OUT 12V 1A CAR USE ONLY V ID EO I N/O UT A UD IOI N/O UT C OA XIA LO UT D C IN1 2V Left panel See details of connections to the TV.
CONNECTING THE PLAYER TO OTHER DEVICES ENG 21 CONNECTING TO A DOLBY DIGTAL AMPLIFIER THAT IS NOT DOLBY DIGITAL / MPEG COMPATIBLE Output the digital signals from the player's digital output to a digital amplifier that is not Dolby/ MPEG compatible. For instructions of audio settings, refer to AUDIO OUT of AUDIO SETUP. U SB DC OUT 12V 1A CAR US E ONLY VI DEO IN/O UT AUDIO IN/OUT COAXIA L OUT D C IN 1 2V Left panel See details of connections to the TV.
22 ENG CONNECTING THE PLAYER TO OTHER DEVICES CONNECTING TO ACTIVE SPEAKER SYSTEMS Left side US B DC OUT 12V 1A CAR USE ONLY V ID EO IN/O UT AUDI OI N/OUT C OA XIA L OUT D C IN1 2V black yellow AV cable Signal flow To Video Input jack To audio input jacks yellow Active speaker systems MOBILE ENTERTAINMENT PDF 文件使用 "pdfFactory Pro" 试用版本创建 www.fineprint.
CONNECTION BETWEEN PLAYERS ENG 23 AVP CABLE ( Audio / Video / Power Cable) (Yellow) Video Video(Yellow) (White) Audio Audio(White) (Black) DC OUT DC IN (Black) NOTE: The AVP Cable has different size plugs and colors at either ends. Pay carefully attention to ensure correct orientation. Do not force. Connect the two players with AVP cable as described below: 1. Disconnect any 12V DC supply from both master & slave DVD players. 2.
24 ENG CONNECTION BETWEEN PLAYERS Master Slave 4. Put a disc into the master unit to play the movie. 5. Both DVD players now show the same movie. WHEN ENJOYING TWO DIFFERENT MOVIES: IN CAR Master Slave 1. Connect the two players with AVP cable first, and then plug the car power cable to DC IN socket of the Master unit. 2. Turn on the two players. 3. Put two different discs into these two players respectively. 4.
CONNECTION BETWEEN PLAYERS ENG 25 , IR TRANSMITTER S CHANNEL ADJUSTMENT 1.When sharing the same movie, i.e. one DVD player acts as a monitor, the two DVD players can choose the same IR channel option simultaneously. 2.When enjoying two different movies, the IR channels of the two DVD players must be adjusted to channel A and channel B respectively. Or interference will occur. See diagram below. 3.
26 ENG BASIC OPERATIONS TURNING ON THE POWER 1 Connect the AC/DC adapter to socket, or connect the cigarette plug to the outlet on your vehicle. 2 Connect the DC output plug of the cable to the DC input jack on the main DVD player. 2 Car 1 3 Hold on the Power button for 3 secs to turn on the unit . Home Hint: The included AC/DC adapter is compatible with voltage from 100 V to 240 V, you can use it on trips overseas.
BASIC OPERATIONS ENG 27 LOADING 1. Open TFT cover first, the disc cover will be opened thereafter. 1 2. Place in a disc and press down the disc with your fingers near the center hole. OPEN button A click is heard. Not es: 2 Set the disc securely. Failure to set it securely could result in damage. Do not use cracked or warped discs. Doing so could result in damage. Place single-sided DVDs or CDs in with the label (Printed) side facing upwards.
28 ENG BASIC OPERATIONS PLAYBACK 1. 2. 3. 4. 5. Turn on the power of the player. Open the disc cover. Insert a disc correctly. Close the cover. The player will load the disc and play automatically. If the disc does not play, push the PLAY/PAUSE button. STOP PLAYBACK 1. Press on the key board or on the remote control while playing. STOP 2. The player remembers the stopping place. 3. Resume playback from the point where it stopped by pressing the key. 4.
BASIC OPERATIONS ENG 29 PLAYING AT FAST SPEED 1. Press or button on the key board or on the remote control during playback. REV FWD 2. The playback speed will be changed each time you press the or . The speed will be changed to 2X, 4X, 8X, 20X, 1X . PLAYBACK IN SLOW MOTION 1. Press the button on the remote control during playback. The playback speed becomes1/2, 1/3, 1/4, 1/5, 1/6 or 1/7 of the normal speed each time you pressing the button. 2.
30 ENG BASIC OPERATIONS ZOOM FUNCTION 1. Press ZOOM on the remote control during playback. The picture on the screen will be zoomed. 2. The zooming rate changes each time when the ZOOM button is pressed. The sequence is 2X, 3X, 4X, 1/2X, 1/3X, 1/4X, 1X. ZOOM SEARCHING FOR A SPECIFIC SCENE 1. Press the SEARCH button on the remote control. 2. Press the UP, DOWN and OK button to move to desired section. 3. Input valid number to choose specific time or title, chapter or track. 4.
BASIC OPERATIONS ENG 31 PROGRAM PLAYBACK The program playback function can automatically play titles, chapters, or tracks in accordance with the programmed order. 1. Insert a disc and then press the PROGRAM button on the remote control. At this time, menu appears as below. PROGRAM 2. Using / / / and the number buttons to select the title and chapter in your preferred order. 3. Using / / / to move the cursor to PLAY and press OK button. The player starts PROGRAM playback. 4.
32 ENG BASIC OPERATIONS USING THE ON-SCREEN DISPLAY 1. This DVD video player allows you to view the operational status and disc's information on screen. 2. Press OSD button on the remote control during playback. The disc's information will be displayed on screen. 3. Press OSD button again, the information will disappear. OSD PLAYING A MP3 FORMAT DISC AND JPEG CD AVI Use to move the cursor to a folder, a file, MP3 ICON or JPEG ICON.
BASIC OPERATIONS ENG 33 PLAYING DivX FILES Your player is an Official DivX Certified product that plays DivX.5, DivX.4, DivX.3 and DivX.VOD video content, in compliance with DivX Certified technical requirements. NOTE: To guarantee playback of DivX files the audio must be MP3 format. DivX Certified devices can play any interleaved MP3 audio at any bitrate, both CBR and VBR. The audio must be sampled at standard frequencies, such as 32 kHz, 44.
34 ENG SETUP THE PLAYER GENERAL STEPS OF SETUP 1. Press the SETUP button on the remote control, the main setup menu appears. L SYSTEM SETUP TV SYSTEM TV TYPE SCREEN FORMAT TV SCREEN PASSWORD RATING DEFAULT EXIT SETUP 2. Press the LEFT or RIGHT buttons to highlight the icon of the desired page, then press the DOWN or UP button to activate that page. L VIDEO SETUP BRIGHTNESS CONTRAST HUE SATURATION EXIT SETUP 3. Press the DOWN button to highlight the desired option.
SYSTEM SETUP ENG 35 The system setup options are illustrated below: TV SYSTEM If you want to connect the player to a TV, please choose a correct TV system first. AUTO: Choose this setting if your DVD player is connected to a multi-system TV. NTSC: Choose this setting if your DVD player is connected to a NTSC TV. PAL: Choose this setting if your DVD player is connected to a PAL TV. The default setting is AUTO .
36 ENG SYSTEM SETUP TV TYPE 16:9 (Wide Screen): Choose this setting if your DVD player is connected to a wide screen TV. If you choose this setting and you don’t have a wide screen TV, the images on the screen may appear distorted due to vertical compression. 4:3 LB (Letter Box): Choose this setting if your DVD player is connected to a normal ratio TV. You’ll see the movies in their original aspect ratio (height -to width ratio). You’ll see the entire frame of the movie .
SYSTEM SETUP ENG 37 SCREEN FORMAT 16:9: Choose this setting to change TFT MODE to 16:9. 4:3: Choose this setting to change TFT MODE to 4:3. The default setting is 16:9. L SYSTEM SETUP TV SYSTEM TV TYPE SCREEN FORMAT TV SCREEN PASSWORD RATING DEFAULT EXIT SETUP TV SCREEN NORMAL: Choose this setting to have normal display. ROTATE 180 C: Choose this setting to have upside down display. The default setting is NORMAL.
38 ENG SYSTEM SETUP PASSWORD Step1: for first time use: enter 0000 as password or assigned password to unlock. Step2: once parental control is unlock, go to rating menu and assign rating. Step3: enter new password of your choose in 4 digit number to lock player rating. If you forget your assigned password, you can use 0000 to unlock the rating again.
SYSTEM SETUP ENG 39 DEFAULT Choose this option to resume factory settings. L SYSTEM SETUP TV SYSTEM TV TYPE SCREEN FORMAT TV SCREEN PASSWORD RATING DEFAULT EXIT SETUP RESTORE MOBILE ENTERTAINMENT PDF 文件使用 "pdfFactory Pro" 试用版本创建 www.fineprint.
40 ENG LANGUAGE SETUP The language setup options are illustrated below: OSD LANGUAGE Highlight the OSD LANGUAGE option, and press the arrow buttons to choose the OSD language you prefer. Press OK to confirm, and it will display OSD in that language. There are 5 optional OSD languages: English, German, Spanish, French and Italian. L LANGUAGE SETUP OSD LANGUAGE AUDIO LANG. SUBTITLE LANG. MENU LANG. ENGLISH GERMAN SPANISH FRENCH ITALIAN EXIT SETUP AUDIO LANG. Highlight the AUDIO LANG.
LANGUAGE SETUP ENG 41 SUBTITLE LANG. Highlight the SUBTITLE LANG option, and press the arrow buttons to choose the subtitle language you prefer. Press OK to confirm. If the disc you are playing has that language available, it will display subtitles in that language. There are 7 optional subtitle languages: Chinese, English, Japanese, French, Spanish, German and Italian. Choose off to remove all subtitles from being displayed. L LANGUAGE SETUP OSD LANGUAGE AUDIO LANG. SUBTITLE LANG. MENU LANG.
42 ENG AUDIO SETUP AUDIO OUT Highlight the AUDIO OUT option, and press the arrow buttons to choose the audio output mode you prefer. Press OK to confirm: There are 3 optional audio output modes: SPDIF/OFF, SPDIF/RAW and SPDIF/PCM. SPDIF / OFF: Choose this setting to output analog signal, and there will be no digital signal output from an coaxial output jack. SPDIF / RAW: Choose this setting if your DVD player is connected to a power amplifier with a coaxial cable.
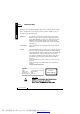
ENG 43 FM TRANSMITTER FM TRANSMITTER (Optional) 1. The FM transmitter is an optional function. 2. Press direction buttons to enter transmission frequency in MHZ press OK to input FM frequency. The prompting message “PLEASE PRESS ENTER TO INPUT FM” will appear at the bottom of the screen. 3. Press OK button. The prompting message will be changed to “PLEASE INPUT FM 87.6-107.9” to enter the transmission frequency input modes. 4.
44 ENG VIDEO SETUP The video setup options are illustrated below: BRIGHTNESS Use the UP and DOWN buttons to move the scroll and adjust the brightness. L VIDEO SETUP BRIGHTNESS CONTRAST HUE SATURATION EXIT SETUP CONTRAST Use the UP and DOWN buttons to move the scroll and adjust the contrast. L VIDEO SETUP BRIGHTNESS CONTRAST HUE SATURATION EXIT SETUP MOBILE ENTERTAINMENT PDF 文件使用 "pdfFactory Pro" 试用版本创建 www.fineprint.
VIDEO SETUP ENG 45 HUE Use the UP and DOWN buttons to move the scroll and adjust the hue. L VIDEO SETUP BRIGHTNESS CONTRAST HUE SATURATION +6 +4 +2 0 -2 -4 EXIT SETUP -6 SATURATION Use the UP and DOWN buttons to move the scroll and adjust the saturation. L VIDEO SETUP BRIGHTNESS CONTRAST HUE SATURATION EXIT SETUP MOBILE ENTERTAINMENT PDF 文件使用 "pdfFactory Pro" 试用版本创建 www.fineprint.
46 ENG DIGITAL SETUP The digital setup options are illustrated below: SOUND EFFECT Here are two sound output effect modes: NORMAL and SURROUND. You can choose SURROUND to enhance the output sound effect. L DIGITAL SETUP SOUND EFFECT DYNAMIC RANGE DivX(R) VOD NORMAL SURROUND EXIT SETUP DYNAMIC RANGE Choose this setting to adjust the line out compressing ratio and get different effects.
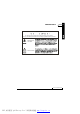
DIGITAL SETUP ENG 47 DivX(R) VOD (VIDEO ON DEMAND) DivX VOD files are downloaded after paying a rental from certain commercial websites. Prior to downloading a VOD you need to input the registration number of your DVD player on the purchase form on the site. Write down the VOD 8-character registration number so that you can fill in the form on the website you purchase your DivX VOD files from.
48 ENG OTHERS SIZE AND PARAMETER Product name: Tablet DVD player Power: DC1 2V Consumption: 22W Audio out: R/L 2ch,CO AXIAL Video out: Com posite Size: 262X170X44.1mm DVD PLAYER Weight: 1760g FM out put 87.6 to 107.9 MHZ IR out put CHA L 2.3MHZ R 2.8MHZ CHB L 3.2MHZ R 3.8MHZ DC out put 12VDC 1A MAX MOBILE ENTERTAINMENT PDF 文件使用 "pdfFactory Pro" 试用版本创建 www.fineprint.
OTHERS ENG 49 BATTERY OPERATION INSTRUCTION NAMES OF BATTERY PARTS AND THEIR FUNCTIONS 2 3 1 2 1 Note: Remember to insert back the rubber cover of the unit to BATTERY CONNECTOR after using the battery pack. 4 RECHARGING THE BATTERY PACK 5 1 DC IN connector Connect the power adapter to recharge. 2 Player terminals Supply power to the player. Do not short-circuit the terminals. 3 Battery indicator LED When the battery is discharging, LED is off. When recharging the battery, LED is red.
50 ENG OTHERS TROUBLE SHOOTING NO PICTURE Is screen damaged? “ See smashed Screen Identification” section. Is power applied and power light on? Is disc cover ( screen ) closed correctly? NO SOUND Is the volume turned down? Are headphones plugged in? Is the wrong audio track selected from the DVD? DISC RESET TO THE BEGINNING DURING PLAYBACK Disc cover ( LCD screen ) is not firmly shut, close firmly. DISC WON’T PLAY Check that the disc is loaded correctly. Check disc for dirt / scratches, change the disc.
OTHERS ENG 51 USE OF DVD RECORDABLE MEDIA DVD + RW format disks may not read correctly on this DVD player as the DVD +RW format is not a fully recognized format with the DVD forum. There are significant variations in the recording / media. Use DVD-RW or DVD +/- R media in preference. HEADREST MOUNT NOT FITTING CORRECTLY Adjust the straps and tension them to fit correctly. Angle the mount towards the rear seat occupants. HEADREST MOUNT SLIDES DOWN Tighten the straps to prevent slippage.
52 ENG OTHERS SMASHED SCREEN IDENTIFICATION A Liquid Crystal Display (LCD) screen is a multilayer complex component. Under the tough outer plastic layer, the glass sandwich beneath holds the LCD crystals in place, which are themselves suspended in fluid. In the unfortunate event of an accident, particularly a sharp localized impact, the glass will break. The tough plastic outer sheet on the surface of the glass keeps all the glass intact underneath, preventing shards from falling out.
SDV685-AC-ENG-NB-A2 PDF 文件使用 "pdfFactory Pro" 试用版本创建 www.fineprint.