
Installation Guide


25
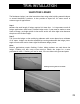
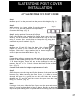
Step 1
Determine the height above ground where the bottom
of the column should be. Measure up 2 ¾" from this
point and strike a level line. Attach the top of the
starter strip on this line. Level and attach starter strip
on each face of the column stopping 2" from each
corner edge. (fig. 1)
Note:
Each box contains 2 left (L-2,L-4) and 2 right Interlocking
corners (R-1, R-3). 2 boxes are needed for 2 courses.
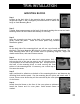
Step 2
Use 4 right pieces for the 1st course and 4 left pieces for
the next course. Slide corners down into the starter strip
and attach all pieces at indicated on the screw hem. There are 3 screw points on the
long side of the corner and 2 on the shorter end. Make sure to use 5 screws per
corner. Hold the bottom edge of corner snug against the substrate while placing the
screws. (fig. 2)
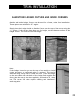
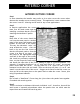
Step 3
For the next course, L-2/L-4 and L-2/L-4, slide corners
down onto first row of corners and attach as described
above. Continue to alternate as needed until the desired
height is achieved. When alternating courses, make sure
to not stack the same number on one another to prevent
pattern repetition. (fig. 3)
Note:
Do not over tighten the screws when attaching the corner pieces. Over tightening
can cause corners to “kick out” at the bottom and create a gap. If a gap is present,
pull the corners together to minimize the gap and face screw diagonally through the
tongue and groove. Use a 3" deck screw. Use NextStone™ caulk to fill screw head
and NextStone™ touch up paint for a professional finish.
Figure 2
2nd Course
1st Course
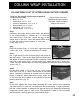
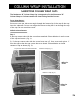
Build out the desired column to be wrapped at
no more or less than:
Brick: 13" x 13"
Castle Rock: 13 ¾" x 13 ¾"
Country Ledgestone: 14 ¾" x 14 ¾"
Random Rock: 14 ¾" x 14 ¾"
Slatestone: 12 ¾" x 12 ¾"
Stacked Stone: 13 ⅝" x 13 ⅝"
COLUMN WRAP INSTALLATION
COLUMN WRAPS OUT OF INTERLOCKING OUTSIDE CORNERS
Figure 1
Figures shown are using
Slatestone Outside Corners.
The same install concept is
used for all corners.
Figure 1
Figure 3