
Installation Guide

21
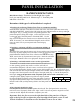
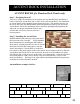
RANDOM ROCK PANEL
Metal Starter Strip - Determine at what height above grade
level you want the panel to sit. Measure up 2 ¾" from this point
and strike a level line.
Determine which type of wall installation is required.
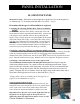
1) Paneling the wall using Window Door Trim as termination molding.
Install Window and Door Trim (WDT) to both ends of the wall. Insert panel into starter strip
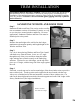
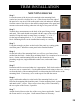
and slide behind WDT. Attach to the wall using the screw indicator marks on the top and right
end tongues. (Fig. 1) Firmly press the next panel against the first
panel and repeat working left to right. At the end of the course;
cut the right end of the final panel to fit behind WDT. Use the
drop off from that panel to start the new row behind the left end
WDT. If necessary, cut some additional length from the off fall
pieces on some rows to prevent panel ends from lining up
vertically.
2) Paneling a wall using a WDT as a termination molding on
the left
Dry fit the first corner into the starter strip. Secure with screws if necessary. Moving from right
to left: dry fit panels tightly across the wall. Cut the left end of the final
panel behind the Window Door Trim or flush to the wall. If not using
WDT, remove the dry fit panels and corner piece. Panel the wall from
left to right. Reattach corner over right panel. Repeat on each row.
3) Paneling a wall with outside corners on the right and left.
When there are 2 outside corners with no break in the wall (no window
or door opening), panels may need be cut if the wall will not
accommodate full panels. On each course, work from left to right and
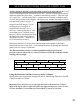
dry fit as described earlier. Decide on each course which panel to cut. Dry fit full panels from
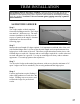
each end until less than one panel length remains in the middle. Measure from the rock edge on
the right side of the left panel to the left edge of the right panel (Fig. 2). Cut the final panel to
this length. (Stagger the placement of the cut panels up the wall to avoid verticals line.) After
cutting the panel, lightly rasp the top of the cut edge to smooth
the edge and blend it with the rocks of the next panel (Touch up
any exposed Polyurethane edges with a NextStone™ Touch Up
Paint Kit and Caulk) (sold separately) Slide in the final panel and
attach
4) Dry fit panels from left to right
Cut first panel on the left to fit flush against the left wall. The final panel in the course may
need to be cut to fit properly flush to the “right” wall. Us the off cut panel to begin the second
course at the left. Repeat this method to complete your wall.
Important: Drive the first screw on the right hand side of the panel at a 45 degree
angle to the left in order to tighten the panel into adjacent the panel, corner or wall.
Visit the NextStone™ classroom at www.NextStone™.com to see on video.
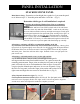
PANEL INSTALLATION
2 3 4 1
1 2 3
4
Figure 1
Figure 2