
Installation Guide

42
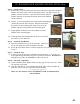
Unpack and Verify Materials:
1 - Mailbox Enclosure (9 pieces) 1 - Metal Mailbox and Flag 1 Cap
4 - Brackets
The Hardware Package Contains:
4 - 1 1/2" Screws 4 - Butterfly Screws
4 - 3" Screws 4 - Washers
40 - 2 1/2" Screws 2 - Nuts and Bolts
*Please contact the vendor if any parts are
missing.
Consider these Points Before Installing:
A) Follow any USPS setback requirements.
B) The front and side edges of the post will end up at
9" back from the finished front and sides of the mailbox enclosure when
installed. Allow for a 24" x 24" overall footprint being sure that the ground
is clear and level.
Do not install in grass areas or lawn. Damage caused by lawn or garden
equipment is not covered under the warranty.
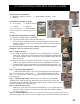
Step 1 - Prepare the Post
A) The mailbox enclosure is designed to fit over a standard 4" x 4" pressure
treated post. Make sure the front post is EXACTLY parallel to the direction
you want the mailbox to face. If the post is off the mailbox will not face the
desired direction.
B) Make sure the post is plumb in both directions. If the post is not plumb, the
mailbox may appear crooked or skewed once the installation is finished.
C) If possible leave the post long until the exact height has been measured. Set
into the concrete approximately 18" with an above ground height of at least
36".
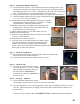
Step 2 - Attach the Bottom Bracket
Slide the bottom bracket (#1)over the post keeping the lip on the bottom
side. Level the bracket at the desired base height and attach to the post
with 1 - 2 " screw per side. Secure through the inner ring of the bracket into the
side of the post.
Step 3– Attach the 2nd bracket. Measure up 24 1/2” from the top of Bracket
#1.Mark a line. Slide the 2nd ring down and secure with the top of the bracket
on this line, using the same procedure as described in Step 2. Make sure the front of
the ring is pointing to the front of the post.
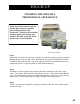
Step 4 - Measure and Cut Post
Measure 35" up from the top of the attached bracket #1. Use a speed square to
mark all 4 sides of the post. Cut the post at this height. Be careful to make the
top of the post level.
Step 5 - Attach 3rd Bracket– Place the 3rd bracket on the top of the post once it is cut to
the correct height. Secure with 4 screws through the top of the bracket into the top of the post.
2
5
6
6C
6
22" SLATESTONE MAILBOX INSTALLATION