
Installation Guide


19
2 3 4 1
1 2 3
4
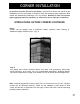
PANEL INSTALLATION
C) Paneling the wall using Interlocking Outside Corners
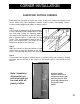
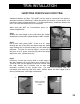
When there are 4 outside corners with no break in the wall (no window or door
opening), panels may need be cut to fit the length of the wall. On each course, work
from left to right and dry fit Panels and Corners. Decide on each course which panel
to cut to avoid a vertical seam. Measure from the rock edge on the right side of the
left panel to the left edge of the right panel (fig. 3). Cut the final panel to this
length. (Stagger the placement of the cut panels up the wall to avoid verticals
line.) After cutting the panel, lightly rasp the top of the cut edge to smooth the edge
and blend it with the rocks of the next panel (fig 4). (Touch up any exposed
Polyurethane edges with a NextStone™ Touch Up Paint Kit and Grout) (fig. 5). Slide in
the final panel and attach (fig. 6).
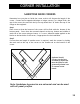
D) Paneling an Accent Wall Corner to Corner
Straight cut first panel on the left to fit flush against the left wall. The final panel in
the course will need to be cut to fit properly flush to the “right” wall. Use the off
cut panel to begin the second course at the left. Repeat this method to complete
your wall.
All products must be allowed to acclimate; removed from boxes and stored at the
installation site for a minimum of 48 hours. Heat and moisture cause expansion. Best
results are obtained by installing a cool, dry product. NextStone™ does not warrant
against gapping caused by expansion or contraction due to improper installation.
Figure 3
Figure 6
Figure
Figure 4
Figure 5
Figure 6
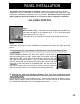
Important Installation Tips!
Drive the first screw on the right hand side of the panel at a 45 degree
angle and to the left in order to tighten the panel into adjacent panel, corner
or wall. Visit the NextStone™ Classroom at www.NextStone™.com to see the
video.
Each panel is numbered on the back. Stagger the placement of each panel
and cut panels to avoid vertical lines or repetitious patterns.
Example