
Installation Guide


28
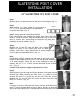
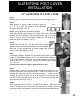
Step 1
Measure up 41" on the post and cut the post to this height. (fig. 1)
Step 2
When using a 4 x 4 post, either fir out the post to 5
½" x 5 ½" or use the optional sold separately
Converter Kit Rings. (fig. 2)
Step 3 (using optional Converter Kit Rings)
Place the bottom ring (marked B) flange down onto the base
surface. Pre-drill the four sides and attach the ring to the post
using 2" screws. Use wood shims to keep the ring snug and
centered on post if needed. (fig. 3)
Step 4
Measure up 13" and 26" from the base. Use a Speed
Square to mark a line around the post at these heights.
Slide the 2 rings (marked M) to these heights and screw in
place as described above. (fig. 4)
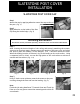
Note:
If attaching railings, measure up and mark on the post to the
height of the bottom and top rail. Fir out the post an additional
1" at these heights. These will act as the landings for the rail
mounts. Use a 3" x 3" x 1" block. Center the block at the scribed
line . (Fig. 5)
Consult local codes for height requirements of rails.
Step 5
Position Side 1 with the arrow facing up against the post. Fit the
bottom of the post into the bottom ring. Face screw the Post Cover
through the rings and into the wood post using 2 ½" screws. Screw
through the post in a grout line or at the base of a rock as this will
hide the screws. Measure up 13" and 26" and face screw through the
posts and into the rings. (fig. 6)
Step 6
After securing Side 1 in place, fit side 2 into place. Make sure the
arrow is facing up. Dry fit the piece to make sure all finger joints line
up and are tight. Secure side 2 at the ring heights as described above.
SLATESTONE POST COVER
INSTALLATION
(fig. 6)
(fig. 2)
(fig. 1)
(fig. 4)
(fig. 3)
(fig. 5)
41" SLATESTONE 2PC POST COVER