NEXTSTONE™ INSTALLATION MANUAL
CONTENTS Forward and Important Notes ………….………………………………………………… 3 Product Line …………………………………………………………….…………………….. 4 - 9 Basic Tools ……………………………………………………………..………………………….. 10 Preparing the Wall ……………………………………………………..……………………... 11 Starter Strip Installation …………………………………………………….………………. 12 Corner Installation ...………………………………………………….………………. 13 - 17 Panel Installation ………………………………………………………………………... 18 - 19 Trim Installation ………………………………………………………………………….. 20 - 23 Column Wrap Installation……………………………………………………………….
FORWARD Compared to natural or cast stone, NextStone™ polyurethane products are designed for an easier, quicker installation requiring fewer steps. Masonry skills are not required. This Manual provides basic guidelines for NextStone™ installation. Additionally, it is recommended that Installers review applicable building codes for specific products and/or geographic areas. This publication is not intended to provide specific advice, legal or otherwise, on particular products or processes.
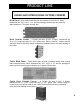
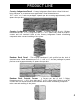
PRODUCT LINE PANELS AND INTERLOCKING OUTSIDE CORNERS Brick Panel - Brick Panels have the look and texture of classic brick. Panel dimensions are 15¼" x 43½" x 1½" and are packaged 4 Panels per box covering approximately 17.72 square feet per box. Brick Outside Corner - 4 Corners per box (2 Left, 2 Right). Dimensions are 12" x 15¼" (long side) and 6½" x 15¼" (short side). Used to wrap 90° corners and will interlock flush to the Brick Panels eliminating compound miter cuts and caulking of the joints.
PRODUCT LINE Country Ledgestone Panel - Country Ledgestone Panels have a faux finish and bring character to a common stone application. Panel dimensions are 15½" x 43½" x 1½" and are packaged 4 panels per box covering approximately 16.96 square feet per box. Country Ledgestone Outside Corner - 4 Corners per box (2 Left, 2 Right). Dimensions are 8¼" x 15½" (long side) and 5½" x 15½" (short side).
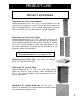
PRODUCT LINE Slatestone Panel - Slatestone panels have a stacked stone appearance with deep and defined grout lines . Panel dimensions are 8¼" x 43" x 1¾" and are packaged 8 panels per box covering approximately 17.12 square foot per box. Slatestone Outside Corner - 4 Corners per box (2 Left, 2 Right). Dimensions are 12¾" x 8¼" (long side) and 4¼" x 8¼" (short side). Used to wrap 90° corners and will interlock flush to the Slatestone Panels eliminating compound miter cuts and caulking of the joints.
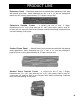
PRODUCT LINE SANDSTONE CORNERS Sandstone Outside Corner - 2 corners per box for a total of 8 linear feet. Dimensions are 5½" x 5½" x 48". These corners are used on 90 degree outside Corners and are installed prior to the panels. Panels will sit securely behind the corners. Sandstone Inside Corner - 2 corners per box for a total of 8 linear feet. Dimensions are 3½" x 3½" x 48". These corners are used on 90 degree inside Corners and are installed prior to the panels.
PRODUCT LINE SANDSTONE ACCESSORIES Sandstone Ledger - 4pcs. per box for a total of 16 linear feet. Dimensions are 2½" x 4" x 48". Used as a water sill and aids in the transition between other siding products and NextStone™ Panels in wainscot installations. Sandstone Ledger Outside Corner - 2pcs. per box. Dimensions are 4¼" x 6¼" x 2½". Used to wrap corners in conjunction with Ledgers. Prevents the need for compound miter cuts or caulking 90˚ joints. Sandstone Ledger Inside Corner - 2pcs. per box.
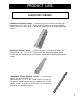
PRODUCT LINE SPECIALTY ACCESSORIES Slatestone 1pc Post Cover (Sleeve) Outside dimensions are 8" x 8" x 41". Can be installed over any nominal 4x4 or 6x6 post or column. Post covers can be stacked for taller post applications or cut for shorter applications. Converter Kits are available to fir out 4x4 posts and are sold separately. Slatestone 2pc Post Cover (Split) Outside dimensions are 8" x 8" x 41". Split Post Covers are for installing around existing posts or columns that can not detach.
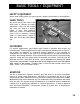
BASIC TOOLS / EQUIPMENT SAFETY EQUIPMENT Always wear safety glasses for eye protection. Wearing a dust mask is recommended. HAND TOOLS Any wood cutting saw with a fine tooth steel or carbide tip blade. (NextStone™ does not dull blades and does not require a special blade). 4' level, tape measure, chalk line, power or cordless drill with 4" bits or extension, framing square or speed square, jigsaw or saber saw, wood rasp, and caulking gun.
PREPARING THE WALL RECOMMENDATIONS FOR NEW CONSTRUCTION All studs must be straight and true to avoid bulges or dips in the finished wall. Correct any bowed studs prior to installation if necessary. Sub-wall assembly must be weather tight before applying NextStone™. NextStone™ accessories alone may not constitute a waterproof installation. Wall sheathing should be weather-resistant, or covered with a weather-resistant barrier such as fanfold insulation, house wrap, or building paper.
STARTER STRIP INSTALLATION STARTER STRIP In order for NextStone™ panels to be installed level and to avoid screwing through the rock face of the panel, the starter strip at the base of the wall must be level. Step 1 Mark the wall horizontally where you want the bottom of the panel to rest. Measure up 2½" to 3" depending on ground level surface and partially drive a nail at one corner for attaching your chalk line. Step 2 Attach a chalk line: go to the next corner, repeat step 1, and pull the line taut.
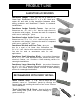
CORNER INSTALLATION SANDSTONE OUTSIDE CORNERS Determine how you plan to finish the corner as this will dictate the length of the corner when using bold Sandstone Outside Corners versus Interlocking Corners. Corners can be capped with ledger or ledger corners. Step 1 Cut 6 pieces of plumbers strap approximately 6" long. With the corner upside-down so that the “stair-step” blocks are exposed, attach the strap to the top block on the left side so that it extends out at a right angle to the corner.
CORNER INSTALLATION SANDSTONE INSIDE CORNERS Determine how you plan to finish the corner as this will dictate the length of the corner. Corners can be capped with ledger or ledger corners. For a ledger finish, the top of the corner (the end with the lip on top) should be 1 ⅝" below the top of the flange on the top panel. Step 1 Place corner so that the bottom of the corner will be flush with the bottom of the bottom panel.
CORNER INSTALLATION SANDSTONE FLUSH OUTSIDE CORNER Step 1 Install moisture barrier. Flush mounted corners can allow moisture infiltration between the panel and the corner. A moisture barrier may be required behind the panels and corner extending a minimum of 4" from either side of the corner. A self-adhering flashing membrane such as Grace Vycor® is recommended. Step 2 Flush mounted outside corners are 4' tall. The placement of the corners will depend on how the top of the corner is terminated.
CORNER INSTALLATION All products must be allowed to acclimate; removed from boxes and stored at the installation site for a minimum of 48 hours. Heat and moisture cause expansion. Best results are obtained by installing a cool, dry product. NextStone™ does not warrant against gapping caused by expansion or contraction due to improper installation. INTERLOCKING OUTSIDE CORNERS Step 1 After placing the Start Strip, set the outside corner piece against the corner and down into the strip.
CORNER INSTALLATION All products must be allowed to acclimate; removed from boxes and stored at the installation site for a minimum of 48 hours. Heat and moisture cause expansion. Best results are obtained by installing a cool, dry product. NextStone™ does not warrant against gapping caused by expansion or contraction due to improper installation. INTERLOCKING OUTSIDE CORNERS CONTINUED Step 4 Corners can be capped with a Sandstone Ledger (requires miter cutting) or Sandstone Ledger Outside Corner. (fig.
PANEL INSTALLATION All products must be allowed to acclimate; remove from boxes and store at the installation site for a minimum of 48 hours. Heat and moisture cause expansion. Best results are obtained by installing a cool, dry product. NextStone™ does not warrant against gapping caused by expansion or contraction due to improper installation. ALL PANEL PROFILES Figure 1 Step 1 Metal Starter Strip - Determine at what height above grade level you want the panel to sit.
PANEL INSTALLATION All products must be allowed to acclimate; removed from boxes and stored at the installation site for a minimum of 48 hours. Heat and moisture cause expansion. Best results are obtained by installing a cool, dry product. NextStone™ does not warrant against gapping caused by expansion or contraction due to improper installation.
TRIM INSTALLATION SANDSTONE WINDOW AND DOOR TRIM Sandstone Window and Door Trim (WDT) can be used as a universal trim piece to terminate sections of NextStone™ where the panels will not turn a corner and/or as a trim piece around windows and doors. For most applications, Sandstone Window and Door Trim must be installed prior to the panels.
TRIM INSTALLATION SANDSTONE LEDGER The Sandstone Ledger is an ideal transition when using other building materials above or around NextStone™ products. It also provides a sloped sill for water runoff in wainscot type of applications. Step 1 Measure the total length of ledger required in Linear feet. It is important to end all Ledger applications with factory finished ledger ends.
TRIM INSTALLATION SANDSTONE LEDGER OUTSIDE AND INSIDE CORNERS Outside and Inside Ledger Corners can be used for a faster, miter free installation. Theses pieces are molded for 90˚ angles. Simply place the Ledger Inside or Outside Corner over the top of the corner using the “v” groove. If the corners have been cut for height, use the bottom surface of the Ledger Corner. Toe screw as with the Ledger.
TRIM INSTALLATION MOUNTING BLOCKS Step 1 Looking at the back side of the mounting block, measure both the length and height of the rectangular pre-formed block on either the Large or Small Mounting Block. Step 2 Transfer these measurements to the back of the panel needing the cut out and mark. Mounting blocks can be installed horizontally or vertically. Step 3 Using the rectangle you drew on the back of the panel as a cutting guide, cutout the panel.
COLUMN WRAP INSTALLATION SLATESTONE 30" COLUMN WRAP Step 1 Build out the desired column to be wrapped at no more or less than 13 ⅞" x 13 ⅞" . Note: The Slatestone 30" Column Wraps are made up of 4 pieces, MARKED 1-4, and interlock using the designed finger joints. Step 2 Place the first panel, #1, against the column. Be sure to place all panels with the top arrow pointing up. Slide in panel #2 and #3 on the right and left side. This will center panel # 1 around the enclosure. (fig.
COLUMN WRAP INSTALLATION COLUMN WRAPS OUT OF INTERLOCKING OUTSIDE CORNERS Build out the desired column to be wrapped at no more or less than: Brick: 13" x 13" Castle Rock: 13 ¾" x 13 ¾" Country Ledgestone: 14 ¾" x 14 ¾" Random Rock: 14 ¾" x 14 ¾" Slatestone: 12 ¾" x 12 ¾" Stacked Stone: 13 ⅝" x 13 ⅝" Figures shown are using Slatestone Outside Corners. The same install concept is used for all corners. Step 1 Determine the height above ground where the bottom of the column should be.
COLUMN WRAP INSTALLATION SANDSTONE COLUMN WRAP CAPS The Sandstone 18" Column Wrap Cap is designed to fit the Slatestone 30" Column Wraps or Columns made with Interlocking Outside Corners. Screw Attachment: Drive one screw per side at an angle through the bottom lip of the cap all the way into the substrate. Do not over angle the screws so they don’t run through the top of the cap. Do not overdrive screws.
SLATESTONE POST COVER INSTALLATION 41" SLATESTONE 1PC POST COVER Step 1 Measure up 41" on the post and cut the post to this height. (fig. 1) Step 2 When using a 4 x 4 post, either fir out the post to 5 ½" x 5 ½" or use the optional sold separately Converter Kit Rings. (fig. 2) (fig. 1) (fig. 2) Step 3 (using optional Converter Kit Rings) Place the bottom ring (marked B) flange down onto the base surface. Pre-drill the four sides and attach the ring to the post using 2" screws.
SLATESTONE POST COVER INSTALLATION 41" SLATESTONE 2PC POST COVER Step 1 Measure up 41" on the post and cut the post to this height. (fig. 1) Step 2 When using a 4 x 4 post, either fir out the post to 5 ½" x 5 ½" or use the optional sold separately Converter Kit Rings. (fig. 2) (fig. 1) (fig. 2) Step 3 (using optional Converter Kit Rings) Place the bottom ring (marked B) flange down onto the base surface. Pre-drill the four sides and attach the ring to the post using 2" screws.
SLATESTONE POST COVER INSTALLATION (Fig. 8) SLATESTONE POST COVER CAP (fig. 1) Step 1 Attach the cap by applying adhesive around the top surface of the post. (fig. 1) Step 2 Apply adhesive on the inside of the Post Cap along the inside ledge. (fig. 2) (fig. 2) Installing Rail Mounts (Fig. 2) Rail Mounts must be purchased separately. NextStone™ does not manufacture Rail Mounts.
MITERED CORNER MITERED OUTSIDE CORNER Step 1 In some situations the installer may prefer to do a miter cut at the corner rather than use the outside corner accessory pieces. This application is most common when the corner is not 90°. Mitering can be used for any corner applications. Step 2 In exterior applications the corner must first be made water-tight by installing a moisture barrier prior to installing the NextStone™ panels.
MITERED CORNER USING WINDOW DOOR TRIM TO MAKE A CORNER THAT IS NOT 90° Step 1 If the application calls for a corner trim that is not a 90° right angle, a corner can be constructed on any angle using two pieces of door/window trim back to back. With a table saw, cut the back side (the side that would be away from the panel and against a door) of the door/window trim pieces length-wise at an angle half that of the wall. i.e. if the adjoining wall was at a 45° angle, cut the trim piece at a 22 ½° angle.
TOUCH UP FINISHING THE JOB FOR A PROFESSIONAL APPEARANCE Panel cuts resulting in exposed polyurethane must be coated to p r e v e n t d i s c o l o ra t i o n . T h e NextStone™ Touch Up Kit contains touch up paint, instructions and brushes. Each kit is specific to the panel colors and rock profile. Touch Up Paint Kit Step 1 Inspect the job closely for any nicks, scratches or exposed cut edges of panels and apply the appropriate touch-up paint.
CLEAN UP The natural appearance of NextStone™ products are maintained with little effort. Although NextStone™ products will get dirty as with any product exposed to the elements, a heavy rain or a simple washing with a garden hose will clean the product well. If additional cleaning is required, the following steps outline recommended cleaning procedures. Step 1 A mild dish soap followed by light brushing with a soft bristle brush will work with the NextStone™ product.
FREQUENTLY ASKED QUESTIONS Q. What is the NextStone™ product made from? NextStone™ products are made of an advanced hybrid composite polyurethane. The polyurethane is mixed with UV inhibitors and fire retardants. The solid polyurethane is also made with recycled PVC for durability. Q. What is required to cut the NextStone™ product? NextStone™ products are easily cut with any woodworking saw or carpentry device. Q.
FREQUENTLY ASKED QUESTIONS Q. What maintenance will be required down the road? Because of the NextStone™ polyurethane formulation and its durable coating, there is virtually no maintenance required. NextStone™ offers a 20 year limited warranty. Q. How will NextStone™ handle the elements? NextStone™ products have been tested equivalent to 20 years in an advanced weather testing chamber with little discoloration or weathering to the products. Q.
TAKE-OFF SHEET PANELS Brick Panel dimensions are 15¼" x 43½" x 1½". Each Panel covers 4.43/sq. ft. Configure Square Footage of area to be covered. (length x width) Total Square Feet _______ / 4.43sq.ft. = _________ number of Panels necessary. Round total to nearest box quantities of four (4) panels per box. Castle Rock Panel dimensions are 15¼" x 43¼" x 1 ½". Each Panel covers 4.03/sq. ft. Configure Square Footage of area to be covered. (length x width) Total Square Feet _______ / 4.03sq.ft.
TAKE-OFF SHEET INTERLOCKING OUTSIDE CORNERS Brick Outside Corner dimensions are 6½" x 12" x 15¼" Each Corner covers 1.29/lin. ft. (1.41/sq. ft. ) Configure Linear Footage of area to be covered. (height) Total Height _______ / 1.29 lin. ft. = _________ number of Corners necessary. Round total to nearest box quantities of four (4) corners per box. Castle Rock Outside Corner dimensions are 7" x 11" x 15 ¼". Each Corner covers 1.29/lin. ft. (1.41/sq. ft. ) Configure Linear Footage of area to be covered.
TAKE-OFF SHEET SANDSTONE CORNERS Sandstone Outside Corner dimensions are 5 ½" x 5 ½" x 48" Configure Vertical Linear Inches. Total Linear Inches _______ / 48" = _____ number of pieces of corners. Sandstone Outside Corners can be used with any rock profile. The Panel will fit behind the corner. Two (2) corners per box. Sandstone Inside Corner dimensions are 3½" x 3½" x 48" Configure Vertical Linear Inches. Total Linear Inches _______ / 48" = _____ number of pieces of corners.
TAKE-OFF SHEET ACCESSORIES 1. Sandstone Ledger dimensions are 2 ½" x 4" x 48" Configure Horizontal Linear Feet. Total Linear Feet ______ / 4' = number of pieces of Ledger. This accessory is used to trim out the top row and can be used with any rock profile. Four (4) Ledgers per box. 2. Sandstone Window/Door Trim dimensions are 2 ¼" x 3 ½" x 48" Configure Vertical and Horizontal Linear Feet. Total Linear Feet _____ / 4' = number of pieces of window/door trim.
SPEC DATA Product Description: NextStone™’s masons and master craftsmen have created products that are an ideal combination of stone textures and sizes, melding them artistically into an extremely easy to install paneling system. NextStone™ products are a light weight veneer wall panel system, providing a very realistic “rock wall” appearance. These products are intended for exterior applications over masonry, wood framed, or metal framed construction, be it residential or commercial.
SPEC DATA Product Type Length (inch) Width (inch) Thickness (inch) Coverage Per Piece Brick Panel 43.5" 15.25" 1.5" 4.43 sq. ft. Weight Per Piece 4.55 lbs. Qty Per Box Castle Rock Panel 43.25" 15.25" 1.25" 4.03 sq. ft. 4.08 lbs. 4 Country Ledgestone Panel 43.5 15.5" 1.5" 4.24 sq. ft. 4.89 lbs. 4 Random Rock Panel 48" 15.5" 1.5" 4.75 sq. ft. 5.1 lbs. 4 Slatestone Panel 43" 8.25" 1.75" 2.14 sq. ft. 2.5 lbs. 8 Stacked Stone Panel 46.5" 13.25" 1.5" 3.63 sq. ft. 4.
SPEC DATA Listed below are the colors of NextStone™ Panels with color codes along with their suggested coordinating Sandstone trim colors.
SPEC DATA Listed below are the colors of NextStone™ Panels with color codes along with their suggested coordinating Sandstone trim colors.
Material Safety Data Sheet Effective date: 5/28/04 Supersedes: n/a Section 1: PRODUCT AND COMPANY IDENTIFICATION: Product: Product Use: Distributor: Polyurethane siding panels and accessories Exterior and interior siding product NextStone™ P.O. Box 39914 Denver, Co. 80239-0914 (303) 371-8232 (303)371-8296 (fax) www.NextStone™.com Section 2: COMPOSITION INFORMATION ON INGREDIENTS: *No Hazardous Ingredients* Component: % Weight Case No. Polyurethane (rigid) Proprietary Ingredients 94.
Section 5: REACTIVITY DATA: Stability: Incompatibility (Materials to avoid): Hazardous decomposition products: Stable under normal conditions Avoid open flame. Avoid contact with oxidizing agents. Product may auto-ignite at temperatures in excess of 450 degrees Fahrenheit.
Warranty Important: All Claims under this warranty must be reported to NextStone™ within sixty (60) days of the date that the defect is first discovered. Claimant should describe the defect and provide name, address, date of installation and warranty certificate number if available. Original Owner’s 20 Year Limited Liability Warranty: NextStone™ rock-face paneling and accessories are manufactured using quality raw materials and produced with engineering excellence designed for years of maintenance free use.
NOTES ______________________________________________________________ ______________________________________________________________ ______________________________________________________________ ______________________________________________________________ ______________________________________________________________ ______________________________________________________________ ______________________________________________________________ ______________________________________________________________ __
Inspired by Nature…… Designed by NextStone™. www.NextStone™.com 866-371-8232 VER. 12.01.