
Installation Guide


FAUX WOOD BEAM INSTALLATION
Step 1
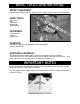
Measure inside width of the beam. If the 2x4 board or blocks are larger than the
inside dimensions of beam, measure and rip down to needed
size. (fig. 1)
Step 2
Determine where the beam will be installed. If installing
multiple beams, determine your spacing.
Step 3
Once you have determined installation points and spacing,
mark the center points along both sides of the wall using a
chalk line to connect the marks.
Step 4
With at least a 2 foot clearance and using the center
line, attach wood blocks or boards to the ceiling using
toggle bolts. If installing only blocks, install them every
3 to 6 feet. (fig. 2)
Step 5
Measure each installation point before cutting to account for variances in the ceiling.
It is recommended to cut the beams slightly longer than the framing so they fit snug
and can be adjusted after dry fitting.
Step 6
Dry fit each beam without adhesive or screws and make adjustments to the beam
length as needed.
Step 7
After dry fitting and making any necessary adjustments, apply construction adhesive
to the outside of the blocks or boards. Fit the beam over the blocks or boards and
press firmly into place and hold. Allow the adhesive to take hold before releasing;
this could take several minutes.
Step 8
Using finishing nails or screws, fasten the beam to the blocks or boards. Screws will
need to be driven well past the surface of the
beam, covered with wood filler, and painted
for a finished look.
(fig. 3)
Step 9
Clean off excess adhesive. If needed, apply
caulk where the beam and wall meet.
Step 10
Install decorative Faux Metal Strap by screwing directly
to the beam. (fig. 4)
*For more information, visit www.NextStone.com or
call 1-866-371-8232 to speak with a Representative.
Figure 1
Figure 2
Figure 3
Figure 4