
Instructions / Assembly

41
22" RANDOM ROCK MAILBOX INSTALLATION, Cont.
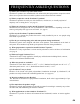
Step 5 - Attach to Post
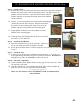
A) Remove the 12 screws holding the top bracket and remove the bracket. Slide the
mailbox forward to expose the top of the third bracket. DO NOT remove the
mailbox from the enclosure. Leave the block of foam under the
mailbox attached, as this helps fill the gap between the mailbox
and the enclosure.
B) Drive 4 -2" screws through the top of the mailbox mounting plate
(3rd bracket) into the top of the post. Slide the metal mail-
box back over the mounting plate. Align the holes in the
mailbox with the preset threads in the mounting plate.
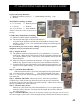
C) Finger tighten 4 butterfly screws and washers to secure
mailbox to the mounting plate.
D) Attach the front pull and back latch to the face of the mail-
box with 2-¾" nuts and bolts.
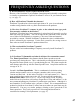
Step 6 - Attach the Top Bracket
A) Place the bracket into the top of the enclosure. Make sure
the top sits firmly down into the mailbox enclosure.
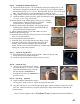
B) Secure the top bracket into the enclosure using the 12 screws that were removed
in step 5.
Step 7 - Attach the Cap
A) Set the cap over the enclosure. Attach the cap by driving 4 –2 ¾" screws at a
steep angle through the bottom lip of the cap into the enclosure. DO NOT drive
through the top of the cap. DO NOT over drive the screws.
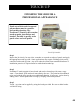
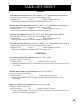
Step 8 - Touch Up - (Optional)
A) Caulk around the metal mailbox if there are any gaps to keep out insects. Fill in
any exposed screw heads.
B) After the caulk has set, cover with the appropriate paint color and feather the
paint out over the rock face. Paint Kit is sold separately.
Please view the complete video at NextStone™.com. for additional help
with installation.
5A
5B
6A
6B
7A
7A
5D
5C
5D
8C