
Installation Guide
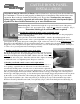

Starter Strip (SS)- Determine the height above ground for the bottom of the panels.
Strike a level line 2 3/4” up from this point. Attach the top of the SS on this line. (Fig. 1)
Determine which type of wall installation is required.
1) Paneling the wall from an inside corner to an inside corner.
Install Window and Door Trim (WDT) on both ends of the wall. (see last paragraph for
detail on installing WDT).
Insert panel into SS and slide behind WDT. Attach to the wall through the screw
indicator marks on the top and right hand end tongues. (Fig. 2) Firmly press the next
panel against the first panel and repeat working left to right. At the end of the row; cut the right hand end of the
final panel to fit behind WDT. Use the off fall from that panel to start the new row under the left end WDT.
Stagger the joints of the panel ends up the wall. If necessary, cut some additional length from the off fall piece
on some rows to prevent panel ends from lining up vertically.
2) Paneling a wall with one outside corner on the right.
Dry fit the first corner into the starter strip. Secure with screws if necessary.
Moving from right to left: dry fit panels tightly across the wall. Cut the left
hand end of the final panel under the WDT or flush to the wall. Remove the
dry fit panels and corner piece. Panel the wall from left to right as in example
1). Reattach corner over right hand panel. Repeat on each row.
3) Paneling a wall with outside corners on the right and left.
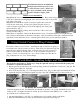
When there are 2 outside corners with no break in the wall (no window or
door opening)– a panel in the row will need to be cut if the wall will not
accommodate all full panels. On each course, work from left to right and dry
fit as described earlier. Decide on each course which panel to cut. Dry fit full panels from each end until less
than one panel length remains in the middle. Measure from the rock edge on the right side of the left panel to
the left edge of the right panel (Fig. 3). Cut the final panel to this length. Stagger the placement of the cut panels
up the wall to avoid a vertical line. After cutting the panel, lightly rasp the top of the cut edge to smooth the
edge and blend it with the rocks of the next panel (fig 4). Touch up any exposed Polyurethane edges with a
NextStone Touch Up Paint Kit and Caulk (sold separately) (Fig 5). Slide in the final panel and attach (Fig. 6).
CASTLE ROCK PANEL
INSTALLATION
All products must be allowed to acclimate; removed from boxes and stored flat at the installation site
for a minimum of 72 hours or until properly acclimated prior to installation. Heat and moisture cause
expansion. Best results are obtained by installing cool, dry product. NextStone does not warrant
against gapping caused by expansion and contraction. Always seat and attach panels tightly
together. For more detailed instruction, go to www.NextStone.com
Figure 3
Figure 4
Figure 5
Figure 6
Figure 1
Figure 2