
Installation Guide


16
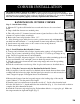
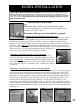
CORNER INSTALLATION
RANDOM ROCK OUTSIDE CORNER
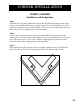
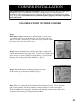
Step 1 - Attach Starter Strip
1. Measure 2¾" up the wall from the base at each end of area to be covered and
mark.
2. Snap a chalk line between two marked points.
3. This will provide ¼" clearance between bottom of panel and base or floor. If more
clearance is required, adjust accordingly.
4. Backset the starter strip from the corner 1 ¾".
5. After allowing proper width for accessories, position starter strip with top edge
on chalk line and so that the “v” is at the bottom of starter strip and away from wall.
6. Attach starter strip with screws on 16" centers or into strong substrate
7. Check starter strip with level
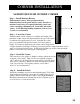
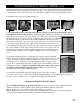
Step 2 - Install Random Rock Outside Corners
1. Corners can be finished with a Ledger (requires miter cutting) or Ledger Outside
Corner. Top of corner (end with lip on top) should be 1 ⅜" below top of flange on top
panel. Dry fit if top panel must be cut horizontally.
2. There are 4 designs. Alternate designs 1,2,3,4 and repeat when continuing up the wall.
Be sure and alternate “left” and right” pieces to break up vertical lines.
3. Slide the corner piece down onto the starter strip snugly and screw the top nailing
strip where indicated.
4.Slide the second corner over the top of the 1st piece and secure as described above.
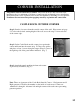
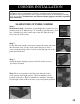
Step 3 - Using the Converter strip for Random Rock Outside Corner.
If the job requires 2 outside corners to be finished with no breaks between them, when
working from the left moving right, the final panel piece must be cut and converted to a
“male” tongue for proper fit and grout lines to be maintained.
1.Measure the distance from the last panel tongue to the leading edge of the outside
corner. Subtract ⅜".Cut the panel to this length.
2.Turn the panel over and measure in from the cut side ⅝". Scribe a line down the back.
3.Set the saw blade for ⅜ “ depth and follow the scribed line (Fig. 1). Use a box knife or chisel to
complete the dado channel in the back.
4.Attach the Converter strip using hot glue, Polyurethane adhesive, or super glue gel. Make sure
the tongue matches in depth and height. (Fig. 2)
All products must be allowed to acclimate; removed from boxes and stored flat at the
installation site for a minimum of 48 hours or until properly acclimated prior to installation. Heat
and moisture cause expansion. Best results are obtained by installing cool, dry product. NextStone
does not warrant against gapping caused by expansion and contraction.