
Installation Guide

46
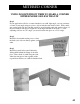
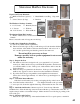
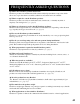
D) Seat the bottom of the address plaque in the groove of panel#1. Seat the bottom of panel 5
onto the top of panel 1. Continue counterclockwise, and attach panels #6,and 7.
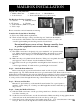
E) Slide the metal mailbox through the front opening onto the mounting plate. Align the holes in
the mailbox with the preset threads in the mounting plate.
F) Finger tighten 4 butterfly screws and washers to secure mailbox to the mounting plate.
G) Attach the front pull and back latch to the face of the mailbox with (2)-3/4" nuts and bolts.
H) Attach panel #8 as described earlier.
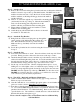
I) Attach the Flag. Be sure and seat the outer flange to hook in the slot on
the mount. This keeps the flag resting horizontally. Place the bolt
through the flag assembly and mount. Secure on the inside with
locking nut. Tighten until the flag moves with some resistance.
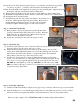
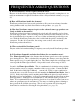
Step 7 - Attach the Top Bracket
A) Bring both the connector and plug wires up through the center
opening of the 4th bracket. Move them off to one side. Place the
bracket into the top of the enclosure. Make sure the top seats
firmly down into the mailbox enclosure.
B) Secure the top bracket into the enclosure using 12 screws.
Step 8 - Attach the Cap
A) Switch the solar collector to “On”. Place the collector in the cap with Velcro. Firmly
press the collector into the cutout of the cap to secure.
B) Attach the threaded male connector from the cap to the female connector of the
address block. Hand tighten the plastic nut . Locate the remaining wire. Insert the
male lead into the back of the collector to complete the circuit. For maximum
battery charge, place the cap so the collector faces south.
C) Seat the cap over the enclosure. Check for light placement prior to placing the
screws or you may drill into one of the lights or the cord Attach the cap by driving
4 -3" screws at a steep angle through the bottom lip of the cap into the enclosure.
DO NOT drive through the top of the cap. DO NOT over drive the screws. DO
NOT use sealant on the cap to secure it, as you will need to access the solar collector
for periodic battery replacement.
Step 9 - Touch Up - Optional
A) Caulk around the metal mailbox if there are any gaps to keep out insects. Fill in any exposed screw heads.
B) After the caulk has set, cover with the appropriate paint color and feather the paint out over the rock face.
Add more texture by using the paint brush to dab a small amount of sand onto the painted surface.
Please view the complete video at NextStone.com. for additional help with installation.
6E
7A
7B
8C
8B
8A
5D
6F
6G
6I