
Installation Guide


38
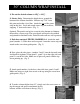
SLATESTONE 1PC POST COVER INSTALL
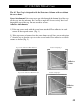
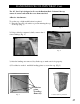
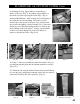
1) Post covers are 41” tall. Measure up 41” on the
post and cut the post to this height. (Fig. 1)
2) If using a 6x6 post, skip ahead to #8.
3) When using a 4x 4 post, either fir out the post to 5 1/2 x 5 1/2 or use
the optional Converter Kit Rings. 4 pieces per kit. (Fig. 2)
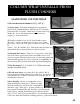
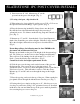
4) Place the bottom ring (marked B), flange down, onto the deck.
Pre-drill the four sides and attach the ring to the post using 2”
galvanized screws. Use shims to make the ring snug and centered on
post. (Fig. 3)
5) Measure up 13” and 26 “ from the deck. Use a Speed Square to
mark a line around the post at these heights. Slide the 2 rings (marked
M) to these heights, shim and screw in place as described above.
(Fig. 4)
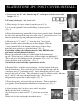
If attaching railings, the following must be done PRIOR to the
placement and attachment of the post.
Measure up and mark on the post to the height of the bottom and top
rail. Fir out the post on these faces at these heights an additional 1".
These will act as the landings for the rail mounts. Use a 3"x3" x1"
block. Center the block at the scribed line . (Fig. 5)
Consult local codes for height requirements of rails.
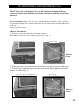
6) Slide the post over the rings, and seat the bottom of the post into
the bottom ring. Face screw the post to the rings using 2 1/2"
galvanized screws. It is best to screw through the post in a grout line or
at the base of a rock. This will make it easier to hide the screws.
Measure up 13" and 26" and screw through the rings at this height.
(Fig. 6)
7) Place the top ring and seat in the top of the post. Shim to make the
post plumb. Screw through the indented areas into the post. (Fig. 7)
8) If using a 6x 6 post, simply cut the post to 41", slide the post cover
over the post, and secure using 2 1/2" galvanized screws as described
in #6 above. Be sure and shim the top of the post to make it plumb be-
fore screwing the post cover to the post.
(Fig. 2)
(Fig. 1)
(Fig. 3)
(Fig. 4)
(Fig. 5)
(Fig. 6)
(Fig. 7)
Continued on page 40