NextWindow 2700 Touch Overlay Installation Guide
V1.
Table of Contents Introduction .................................................................................................. 2 Capabilities ................................................................................................... 3 Unpacking the Unit....................................................................................... 4 Installation Instructions............................................................................... 6 USB Installation.................................
Introduction Congratulations on your purchase of a NextWindow 2700 Touch Overlay. This product turns a large-format display, such as a plasma or LCD, into an interactive display. You can control a computer application simply by touching the screen. The 2700 can be connected to the computer via a serial or USB cable, thus providing maximum versatility. The USB option is HID compliant, providing true plug-and-play operation, just like a USB mouse.
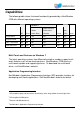
Capabilities The following table shows the touch functionality provided by a NextWindow 2700 with different operating systems.
Unpacking the Unit Unpack the unit, taking care not to damage the surfaces. Check the product for any signs of damage in transit. Installation Requirements Once you have unpacked the unit, make sure you have the following: The display monitor that you are going to mount the touch overlay onto. The computer that runs your software application, including the cable that connects the computer to the display screen. The USB or serial cable to connect the touch overlay to the computer.
Parts of the Touch Overlay The 2700 Touch Overlay consists of aluminium extrusions joined at the corners with cast zinc corner pieces. The electronics and connection sockets are housed in the top bar of the overlay. Soft padding is provided to protect your monitor when the overlay is fitted to it. The overlay is secured with straps, which allow flexibility for fitting to different manufacturers’ monitors.
Installation Instructions Different methods are used for different applications: For pedestal-mounted screens, the touch overlay can be fitted to the screen where it stands. For wall-mounted screens, the screen may need to be removed from the wall first and then fitted to the touch overlay. The installation normally requires two people. Preparation 1. Make sure the monitor is stable and situated so that you can walk all around it. 2.
Spacers The 2700 overlay comes with suitable spacers for the monitor that it was ordered for. The spacers support the weight of the overlay and also provide for air circulation. All 2700 overlays have one spacer as standard, but up to two extra spacers are required for certain monitors.
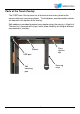
Installing on a Pedestal-Mounted Monitor 1. Stand the touch overlay on its bottom edge and carefully flip the top securing straps (the shorter ones) over to the front of the overlay. 2. Lift the overlay onto the monitor at an angle as shown below and locate the top edge first. 3. Lower the bottom edge of the overlay into place. 4. While holding the overlay in place so that it cannot fall off, attach the straps at the rear and pull tight to secure the overlay. Note: You need two hands to fasten the straps.
3-bar slider Pull strap tight 5. Tuck the loose end of the strap into the 3-bar slider provided.
Installing on a Wall-Mounted Monitor To install the touch overlay on a wall-mounted monitor, first remove the monitor from the wall, and then place it onto the overlay. This will require two people. Lower the monitor onto the touch overlay, top edge first. Make sure the top is a snug fit, then lower the bottom onto the overlay. Tighten the straps firmly around the display screen, making sure that they do not cover any connections or air vents.
USB Installation USB installations require no special software; the touch overlay communicates directly with the computer’s operating system via the USB interface, just like a USB mouse. Connect the USB cable from the touch overlay to the computer. Velcro cable tie You can use the Velcro cable-tie provided in order to fasten the USB cable at the back of the monitor.
For USB communications, you do not need to install any software. However, an optional USB Configuration program is provided that allows you to change the default operating parameters if required (see page 16). Before operating the touch screen, you need to calibrate it. USB Calibration With a clear desktop on the computer, Press [Scroll Lock] on the computer keyboard six times, Or Gently push a ballpoint pen into the hole on the side of the unit until you hear a beep.
Calibration notes When removing your finger, lift it straight off the screen, making sure you don’t drag it across the screen. You can exit calibration mode by pressing the calibrate button again or by pressing the [Scroll Lock] key twice. Test the calibration by moving the mouse pointer around the screen checking that it closely follows your finger. If the calibration is not satisfactory, you can re-calibrate.
Serial Installation To use serial communications, you need to purchase the optional Serial Communication Pack from NextWindow. The Serial Communication Pack consists of a serial cable and a power adaptor. The power adaptor provides power to the touch overlay via a USB connection.
Connecting the Serial Cable Connect the 4-pole jack plug into the touch overlay. Connect the DB9 serial connector at the other end of the cable into the serial port of the computer. Connecting the Power Adaptor With the power switched off at source, plug the adaptor into a power socket. Connect the USB cable from the touch overlay to the power adaptor. Switch on the power. The touch screen should now beep when you touch it.
Installing the Serial Communications Software For the serial option, you need to install software on the computer to provide communications to the touch screen. The serial utilities are included in the Touch+ Suite, which you can install from the CD that comes with the product or download from NextWindow’s website. The Touch+ Suite installs five programs: Program Name Purpose USB Config Allows you to change the default USB operating parameters.
Serial Calibration With a clear desktop on the computer, 1. Click the serial icon on the taskbar , then select Serial Config. 2. Click the [Calibrate] button, then let go of the mouse without moving it. The program moves the mouse pointer to a position at the top left of the screen and displays the following dialog. 3. Touch and hold your finger on the screen at that position until you hear a long beep. 4.
Calibration notes When moving your finger to the next calibration point, lift it straight off the screen, making sure you don’t drag it across the screen. Test the calibration by moving the mouse pointer around the screen checking that it closely follows your finger. If the calibration is not satisfactory, you can re-calibrate.
Operating the Touch Screen Mouse actions NextWindow's 2700 Touch Overlay provides full mouse functionality—click, drag, double-click and right-click. Single click is performed by tapping you finger once on the screen. Double click is performed by tapping your finger twice on the screen in quick succession. Drag is performed by touching and moving your finger across the screen without lifting off. Right click is performed by touching and holding your finger in one position for a short time.
Operating with an Apple Mac Computer To operate with an Apple Mac computer, the 2700 Touch Overlay must be in Apple Mac mode. This is achieved by running NextWindow’s CalibrateNWTS utility program, which also allows you to calibrate the touch screen. You only need to run this program once—when first connecting to an Apple Mac. To Enable Apple Mac Mode 1.
Calibration button The mouse pointer automatically moves to a position at the top left of the screen. Touch and hold your finger (or stylus) on the screen at that position until you hear a long beep. The pointer moves to three further positions in sequence—top right, bottom right and bottom left. Touch each point in turn until you hear the beep. This completes the calibration procedure.
Cleaning the Touch Screen To clean the touch screen, use a lint-free, soft cloth dampened with standard, household glass cleaning solution as follows: 1. Spray a small amount of glass cleaner onto the cloth. 2. Wipe the glass of the touch screen to remove any dirt, dust, or finger marks. 3. Wipe the clear surfaces around the edges of the screen. 4. Remove any residual glass cleaner with a dry, soft, lint-free cloth.
Troubleshooting This section provides some solutions to possible problems that might occur with the touch screen. If the problem persists, contact your NextWindow product support provider for further advice. Touch screen does not respond to touches Make sure the communications cable (USB or serial) is connected to the computer and to the touch overlay.
“USB not recognized” message appears on screen To remedy, unplug the USB cable, then plug in the USB cable again. If this does not fix the problem, you may need to uninstall and reinstall the USB device. See the next section. Uninstalling and Reinstalling the USB Device 1.
3. On the Properties screen, verify that the location refers to the touch screen. 4. Close the Properties screen. 5. With USB Composite Device selected in the Device Manager list, press [Delete] on your keyboard. The computer displays the following dialog. 6. Click [OK] to confirm. This will remove the touch screen from the Hardware Device list. To reinstall the USB device, follow the instructions given in “USB Installation” on page 11.
Regulatory Compliance Information Federal Communication Commission (FCC) Statement (For the United States of America.) This equipment has been tested and found to comply with the limits for a class A digital device, pursuant to part 15 of the FCC Rules. These limits are designed to provide reasonable protection against harmful interference when the equipment is operated in a commercial environment.
Damaged Goods In the event of damage to this Product or packaging you should immediately advise the shipper and the reseller who sold you the product. Retain all original packaging. Future shipment of this product in incorrect packaging may void your warranty.
Disclaimers and Other Provisions: EXCEPT AS SPECIFICALLY STATED IN THIS LIMITED WARRANTY (A) SUPPLIER PROVIDES THE PRODUCT WITH ALL FAULTS, (B) THE ENTIRE RISK AS TO SATISFACTORY QUALITY, PERFORMANCE, ACCURACY, AND EFFORT IS WITH THE PURCHASER AND USER, (C) SUPPLIER MAKES NO WARRANTY AGAINST INTERFERENCE WITH ANY PURCHASER’S OR USER’S ENJOYMENT OF THE PRODUCT OR AGAINST INFRINGEMENT, AND (D) SUPPLIER DOES NOT WARRANT THAT THE OPERATION OF THE PRODUCT WILL BE CONTINUOUS OR ERROR-FREE.