
Instruction Manual


2 3
1
2
3
4
5
67 8910
11 12 13 11
14 15
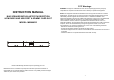
MAIN UNIT
1. VOLUME - BUTTON
2. VOLUME + BUTTON
3. STANDBY BUTTON
4. MODE BUTTON
5. PAIR/PLAY/PAUSE BUTTON
6. SD/MMC CARD SLOT
7. USB PORT
8. LCD DISPLAY
9. BLUETOOTH INDICATOR
10. REMOTE SENSOR
11. HANGING HOLES
12. FM ANTENNA
13. AC CORD
14. AUX IN JACKS
15. LINE IN JACK
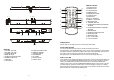
REMOTE CONTROL
1. SLEEP BUTTON
2. MODE BUTTON
3. CLOCK BUTTON
4. TIMER BUTTON
5. NUMERIC BUTTONS
6. VOICE BUTTON
7. EQ BUTTON
8. BASS +/- BUTTONS
9. TREBLE +/- BUTTONS
10. MUTE BUTTON
11. STANDBY BUTTON
12. TUNING/SKIP/SEARCH BACKWARD
BUTTON
13. TUNING/SKIP/SEARCH FORWARD
BUTTON
14. MEM BUTTON
15. PAIR/PLAY/PAUSE BUTTON
16. MUSIC BUTTON
17. MOVIE BUTTON
18. VOL +/- BUTTONS
19. CH+/- BUTTONS
POWER SUPPLY
Plug AC plug into the outlet socket for connecting the main power.
SLEEP TIMER SETTING
You can set the sleep timer at power on modes as following instructions:
During playback, press the SLEEP button on the remote control repeatedly to cycle through
the sleep time options, Release the SLEEP button when your desired sleep time shows on
the screen. Once the sleep time is expired, the unit will be switched off.
During playback, press SLEEP button once to check the remaining sleep time.
HOW TO SET TIME
At the standby mode, press and hold the CLOCK button on the remote until Hour flashes on
the screen; use the TUNING/SKIP/SEARCH buttons on the remote to adjust the hour and
confirm your adjustment by pressing the CLOCK button on the remote; Minute starts
blinking on the screen, press the TUNING/SKIP/SEARCH buttons on the remote to set the
minute accordingly, press the CLOCK button on the remote again to confirm your setting.
During playback, press and hold the CLOCK button on the remote to check the current time.
Note: The time only could be set at standby mode.
1
2
3
4
5
6
7
8
9
10
11
12
13
14
15
16
17
18
19