
Instructions for Use


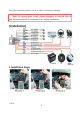

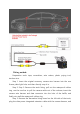
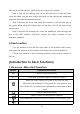
Table Of Contents
- Content
- [Customer]
- [Instructions for use]
- [Installation]
- 1.Installation Steps
- 1>How to find the power cord of the car ?
- 2>How to find the ground wire of the car (negative
- 3>How to find the horn line of the car?
- 4>How to test whether the unit work properly?
- 5>How to connect Bluetooth?
- 6>How to fix the unit ?
- 7>How to install the navigation antenna ?
- 8>The default factory mode password
- 9>The default Bluetooth Pin Code
- 2.Schematic diagram of reversing camera wiring
- 3.Fixed machine
- 1.Installation Steps
- [Introduction to basic functions]
- [Simple Trouble shooting]
- 1>Unable to boot normally
- 2> Automatic shut-down
- 3> Having noise
- 4> Remote control cannot be used
- 5> Settings con not be saved (no memory)
- 6> Car audio with Bluetooth but if can't work
- 7>The product smoke has proved that the internal c
- 8>How to adjust the sound, where is the equalizer
- 9>Support no image of reversing camera
- 10> USB flash disk can not be played, the card wit
- 11> FM does not receive the program
- 12>How to install
- 13>How to remove the original car's radio
- 14>Install it without reading the card or USB flas
- 15> Just installed no sound
- 16> After a while there is no sound
- 17>Machine reset
- 18>The other party cannot hear the voice of the Bl
- 19>The clock is still displayed after the product

10
lead out from the rear trim panel along the original car harness.
Step 4: Peel off the sealing strip on the left side door of the rear seat,
route the cable into the rear cockpit, and pull out the data power integrated
plug and the remaining extension cords.
Step 5: Recover the trunk, and insert the extension cord into the gap of
the plastic panel along the rubber strip on the door side, all the way to the
cockpit door.
Step 6: Remove the storage box under the headlights, pass through the
top of the OBD interface, and then connect the wiring interface to the
navigator interface.
3.Fixed machine
1.Fix the bracket on the left and right sides of the machine with screws,
and adjust the position of the bracket according to the actual installation.
2.Screw the machine in the mounting position of the central console of
the car.
[Introduction to basic functions]
1.On-screen -Main Unit Operation
Symbol
Operations & Controls
MIC
Built-in microphone hole
RST
Press with a pointed object to reset the device
When the unit is turned off, press to turn on the unit.
When the unit is turned on, long press for 3 seconds to turn
turn off the unit, and short press repeatedly to mute and relieve
mute.
Press to the MAIN MENU.
Press to return to the previous interface.
Press repeatedly or press & hold to increase sound output level.
Press repeatedly or press & hold to reduce sound output level.