SuperOne Ci In-Wall Loudspeaker OWNER’S MANUAL 1-31-047-1 Now Hear This 6400 Goodyear Road Benicia, CA 94510 800-NHT-9993
Thank you for your purchase of the NHT SuperOne Ci in-wall loudspeaker. Please take a few minutes to read through this Owner's Manual prior to installing your new speakers. The information provided will help you to obtain maximum performance from your audio system.
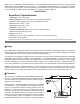
between the two speakers (fig.1). To get an idea how they will look in the room, try taping the supplied cutout templates to the wall. Keep in mind that room furnishings play an important role in absorbing and reflecting soundwaves. Midrange and high frequencies in particular will be absorbed by soft furnishings such as sofas, carpets and curtains. A large number of these soft furnishings will dull the sound, while a “live” room with few furnishings will brighten the sound.
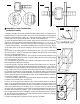
fig.2 fig.3 fig.4 Installation: New Construction (unfinished walls) 1. Begin by installing the mounting bracket between adjacent studs. The SuperOne Ci performs best in the vertical orientation. Be sure to mount the bracket in the appropriate direction so that the tweeter is at the top. Attach the mounting wings to the bracket by inserting them into the locking plastic tabs in the side of the bracket (fig.2). 2.
fig.7 fig.8 Installation: Existing Construction (retrofitting finished walls) fig.9 Warning: Exercise caution when drilling into existing walls. Do not drill through existing wires, pipes, conduits, heating or air conditioning ducts. If you feel resistance while drilling, stop immediately. 1. Using a studfinder or the “knocking” method, locate the wall studs in the wall area where you wish to mount the speaker.
Tech Tips: Optimizing Sonic Performance Bass response is smoothest when the speaker is mounted within a rigid wall that flexes very little. For improved performance, add 2”x4” cross-braces horizontally roughly one foot above and one foot below the speaker location. Use wood glue and extra screws when attaching the drywall to the studs around the speaker.
speakers. When permanently installing cable inside walls, be sure to use cable that is rated for in-wall use and has special jacketing for fire prevention. In the U.S., the U.L. standard is CL-2, CL-3 and CM cable, and in Canada the CSA standard is FT4 cable. The cables should be run in accordance with National Electrical Code and any applicable local building codes. Prepare the cable by stripping 1/4” to 3/8” of insulation from the ends and twisting the exposed wire strands tightly.