® UHET 0.8 GPF Ultra High-Efficiency Toilet 0.8 GPF / 3 LPF Toilet Inodoro de Muy Alta Eficiencia WARRANTY & INSTALLATION INSTRUCTIONS GARANTÍA E INSTRUCCIONES DE INSTALACIÓN For models: Para los modelos: 77000WHAI1 77001RWHAI1 N7717 Bowl (Taza) N7716 Bowl (Taza) N7714 Tank (Tanque) www.NiagaraCorp.
NIAGARA CONSERVATION WARRANTY INFORMATION Manufacturer’s Limited Lifetime Warranty For Vitreous China Products PLEASE READ CAREFULLY AND RETAIN FOR YOUR RECORDS.
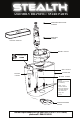
® ASSEMBLY DRAWING / SPARE PARTS Flush button with Lock Nut C7715-6.4 N7714TL Toilet Lid Flush Valve C7715-6 BSB Kit - C7715-1 Fluidmaster Seal Seal - C7715-2 Ceramic tank Fill Valve C7715-7 Air Tube - C7715-3 The bolt assembly kit includes the following: 2 4 2 2 2 2 bolts - 5/16" rubber washers flat brass washers oval S/S washers hex-head nuts wing nuts C7715-5 Tank to Bowl Gasket C7715-4 To order replacement parts for your UHET 0.8 GPF / 3 LPF toilet, please call 1.800.831.
Installation Instructions Vitreous china plumbing products are heavy and fragile. To avoid injury or damage, ask for assistance and handle with extreme care. You have purchased the best gravity-flush, 0.8 gallon (3 Liters) flush toilet. To insure proper installation carefully read these instructions and be sure you have the proper tools to complete the job. When installing a 0.8 gallon (3 Liters) per flush toilet, make sure the plumbing system is vented adequately and that the soil pipe is clean.
4. Make sure that the toilet bowl is level. If the toilet tilts or is rocking, insert shims under the base. 5. Install the plastic washer (be sure that the side marked “top” is facing up), round metal washer, and full hex nut. DO NOT OVERTIGHTEN. Cut off any excess bolt length and snap the bolt cap in place. Run a bead of caulk around the base of the toilet for a finished look and to meet plumbing codes. 6. 7. Install the toilet tank.
Troubleshooting Guide Problem Possible Cause Poor or sluggish flush Corrective Action A. Water supply is blocked. A. Shut off water supply, disconnect supply and check water supply valve opening.(Valve is located on wall or floor). B. Water level is too low in tank. C. Water supply valve is partially closed B. Adjust water level in tank to water level mark by turning adjustment screw on FluidmasterTM. D. P artially clogged trapway or drain. E. O utlet is partially blocked by wax gasket C.
INFORMACIÓN DE LA GARANTÍA DE NIAGARA CONSERVATION El fabricante da garantía limitada de por vida para los productos de vitrocerámica POR FAVOR, LEA CON CUIDADO Y GUARDE COPIA PARA SUS ARCHIVOS.
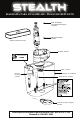
® DIAGRAMA DE REPUESTO REPUESTO DIAGRAMAPARA PARA ENSAMBLAJE ENSAMBLAJE // PIEZAS PIEZAS DE Flush with Lock Nut Botónbutton de descarga C7715-6.4 con contratuerca de ajuste C7715-6.
Instrucciones para la instalación Los productos de vitrocerámica son duros y frágiles. Para evitar daño o lesión, pida ayuda y manipule con extremo cuidado. Ha comprado el mejor inodoro de descarga por gravedad: 0.8 galones (3 litros). Para garantizar la instalación adecuada, lea con cuidado estas instrucciones y asegúrese de contar con las herramientas apropiadas para completar el trabajo. Al instalar el inodoro de 0.
4. Asegurar que la taza del inodoro esté nivelada. Si el inodoro se inclina o mece, insertar cuñas debajo de la base. 5. Instalar la arandela de plástico (asegurar que el lado marcado como superior mire hacia arriba), la arandela redonda de metal y la tuerca hexagonal completa. NO APRETAR DEMASIADO. Recortar el largo saliente de cualquier perno y colocar a presión el cubreperno en su lugar.
Guía para la solución de problemas Problema Causa Posible Descarga pobre o lenta Solución A. E l suministro de agua está bloqueado A. Cerrar el suministro de agua, desconectarlo y revisar la apertura de la válvula de suministro (Esta válvula está en la pared o en el piso). B. E l nivel de agua en el tanque es muy bajo C. L a válvula de suministro de agua está parcialmente cerrada B. Ajustar el nivel de agua en el tanque al marcado girando el tornillo de ajuste en FluidmasterTM. D.
Warranty Registration Card Purchaser’s Name: Address: Phone: Date Purchased: Dealer Name: Dealer Address: Who installed the toilet? Plumber* ( ) Self / Spouse ( ) Builder/New House ( ) Other ( ) * Please provide installer’s name and address (optional): IMPORTANT: Warranty Registration card must be completed and returned to Niagara Conservation along with proof of purchase for warranty to become effective. Return address: Niagara Conservation / ATTN: Customer Service Dept.