TM 3 LPF/0.8 GPF Toilet Inodoro de 3 LPD/ 0.8 GPF WARRANTY & INSTALLATION INSTRUCTIONS GARANTÍA E INSTRUCCIONES DE INSTALACIÓN REV072010 www.StealthToilets.
10 Year Limited Warranty For this warranty to become effective, the accompanying warranty registration card, found on the back cover of this instruction booklet, and proof of purchase must be completed and returned to the address on the warranty registration card within thirty (30) days of purchase. Niagara Conservation warrants its vitreous china to be free from defects in workmanship of materials under normal use and service for the lifetime of the product.
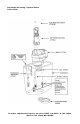
Assembly Drawing / Spare Parts Toilet Tank To order replacement parts for your UHET 0.8 GPF / 3 LPF toilet, please call 1.800.831.
Installation Instructions Vitreous china plumbing products are heavy and fragile. To avoid injury or damage, ask for assistance and handle with extreme care. You have purchased the best gravity-flush, 0.8 gallon (3 Liters) flush toilet. To insure proper installation carefully read these instructions and be sure you have the proper tools to complete the job. When installing a 0.8 gallon (3 Liters) per flush toilet, make sure the plumbing system is vented adequately and that the soil pipe is clean.
4. Make sure that the toilet bowl is level. If the toilet tilts or is rocking, insert shims under the base. 5. Install the plastic washer (be sure that the side marked “top” is facing up), round metal washer, and full hex nut. DO NOT OVERTIGHTEN. Cut off any excess bolt length and snap the bolt cap in place. Run a bead of caulk around the base of the toilet for a finished look and to meet plumbing codes. 6. 7. Install the toilet tank.
Troubleshooting Guide Problem Possible Cause Poor or sluggish flush A. Water supply is blocked. B. Water level is too low in tank. C. Water supply valve is partially closed D. Partially clogged trapway or drain. E. Outlet is partially blocked by wax gasket Corrective Action A. Shut off water supply, disconnect supply and check water supply valve opening.(Valve is located on wall or floor). B. Adjust water level in tank to water level mark by turning adjustment screw on FluidmasterTM. C.
Garantía limitada de 10 años Para que esta garantía sea válida, debe completar y enviar la tarjeta de registro de garantía adjunta, que se encuentra en la contraportada de este folleto de instrucciones, junto con el comprobante de compra a la dirección que figura en la tarjeta de registro dentro de los treinta (30) días de adquirido el producto.
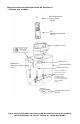
Diagrama De Ensamblaje/Piezas De Repuesto — Tanque Del Inodoro Botón de descarga con tuerca de fijación C7715-6B R&T Válvula de descarga A2702 C7715-6 BSB Kit - C7715-1 Disco de sello de caucho Fluidmaster Pieza N.º 242 Sello C7715-2 Fluidmaster, Inc. Válvula de carga 400 C7715-7 Tanque de cerámica Tubo de aire C7715-3 El equipo de ensamblaje con pernos incluye lo siguiente: 2 pernos de 5/16 pulg.
Instrucciones De Instalacion Los productos de plomería de porcelana de vidrio son pesados y frágiles. Para evitar lesiones o daños, solicite asistencia y trátelos con extremo cuidado. Usted acaba de adquirir el mejor inodoro de 0.8 galones por descarga (3 LPD) basada en la gravedad. Para garantizar la correcta instalación del producto, lea atentamente estas instrucciones y asegúrese de contar con las herramientas adecuadas para realizar el trabajo. A la hora de instalar un inodoro de 0.
4. 5. 6. 7. 8. Asegúrese de que la taza del inodoro esté nivelada. Si el inodoro está inclinado o desbalanceado, coloque cuñas debajo de la base. Instale la arandela de plástico (asegúrese de que el lado con la marca “top” [superior] quede hacia arriba), la arandela metálica redonda y enrosque completamente la tuerca hexagonal. NO AJUSTE EN EXCESO. Corte todo exceso del largo del perno y asegure el perno de cabeza en su lugar.
Guía De Resolución De Problemas Problema Causa posible Descarga lenta o deficiente A. El suministro de agua está bloqueado. B. El nivel de agua del tanque es demasiado bajo. C. La válvula de suministro de agua está parcialmente cerrada. D. El desagüe o el drenaje están parcialmente obstruidos. E. La salida está parcialmente bloqueada por la junta de cera. La válvula de carga no se cierra A. El nivel de agua del tanque es demasiado elevado cuando debe coincidir con la línea del agua. B.
Warranty Registration Card Purchaser’s Name: Address: Phone: Date Purchased: Dealer Name: Dealer Address: Who installed the toilet? Plumber* ( ) Self / Spouse ( ) Builder/New House ( ) Other ( ) * Please provide installer’s name and address (optional): IMPORTANT: Registration card must be completed and returned within thirty (30) days from purchase for this warranty to become effective Tarjeta De Registro De Garantia Nombre del comprador: Dirección: Teléfono: Fecha de compra: Nombre del distribuidor