
Operation Manual


-7-
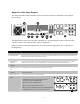
Remote Control
This light indicates that another user is accessing the Niagara Pro across the network from a computer.
Audio Activity
These lights indicate audio input presence.
Connectors
Headphone Jack & Volume Buttons
The jack allows headphones to be connected to the Niagara Pro for audio monitoring. The Volume Buttons
control the audio level on the headphones.
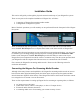
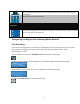
Configuring the Niagara Pro Streaming Media Encoder
First Start Setup
The first time the Niagara Pro is powered, the LCD display will be presented with a series of menus
that will assist in setting up the system clock, date, and video input format (NTSC (North
America/Japan) or PAL).
To start Niagara Pro, press the <POWER> button located on the front panel.
During the power up process, the Niagara Pro LCD readout displays the following message:
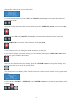
After Niagara Pro powers up the first time, it displays the following message:
Press the <ENTER> button to begin the initial setup.