
Installation Guide


81
NIBCO INC. WORLD HEADQUARTERS • 1516 MIDDLEBURY ST. • ELKHART, IN 46516-4740 • USA • PH: 1.800.234.0227
TECH SERVICES PH: 1.888.446.4226 • FAX: 1.888.336.4226 • INTERNATIONAL OFFICE PH: +1.574.295.3327 • FAX: +1.574.295.3455
www.nibco.com
Visit our website for the most current information.
www.nibco.com
AHEAD OF THE FLOW
®
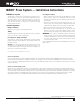
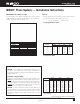
4. Select the jaw set that corresponds to the size of the joint to be crimped
and insert the jaw set into the pressing tool (Figure 5).
Figure 5 — Inserting the NIBCO Press System jaw
5. Push the jaw set mounting pin until it clicks into position.
NOTE: The tool will not properly press unless the pin is fully engaged.
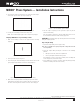
Crimping a NIBCO Press System Fitting or Valve
1. Make sure the tubing is inserted to the proper depth in the fitting.
(Figure 6).
Figure 6 — Inserting the tube to proper depth
2. Squeeze jaw arms to open the jaw set.
3. Place the open jaws around the fitting and ensure that the contour of the
jaw is properly aligned with the contour of the fitting (Figure 7).
Figure 7 — Open the jaw set and place around the fitting
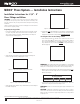
4. Make sure the tool is perpendicular to the tubing and depress the switch
(Figure 8). Keep the trigger depressed from the time the cycle begins and
the rollers contact the jaw arms until the end of the entire crimp cycle.
Figure 8 — Jaw set should be square to tubing
5. Once the crimp is complete, press the jaw arms to open the jaw and
remove from the fitting.
If the tool displays an LED flash or emits an audible alarm, please refer to
the tool instruction manual for troubleshooting suggestions.
CAUTION Avoid handling sharp edges that may have formed on the fitting
during the crimping operation.
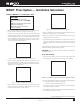
Inspecting the Crimp
1. Inspect the crimped fitting to ensure proper crimp.
NOTE: The use of the NIBCO Press System jaw will produce a unique witness mark “N”
on the crimped fitting.
2. Inspect the crimped fitting checking the connection for the following
problems:
• Not fully inserted tube, double check depth marks
• Incorrect jaw alignment with the fitting contour
If any problems are found, a new section of tubing and a new fitting will
need to be prepared, installed and crimped.
3. Test the NIBCO Press System in accordance with crimp intergrity testing
instructions for fittings and valves in this catalog.
NIBCO
®
Press System — Installation Instructions
Revised 11/9/2017