
Installation Guide


NIBCO Technical Services • Phone: 1.888.446.4226 • Fax: 1.888.336.4226
6
i. Actuate valve to open or closed position, whichever shall be locked.
ii. The handle contains .150 inch and .275 inch holes for locking.
Insert locking device into appropriate-sized hole in handle.
Evaluate effectiveness.
iii. Lockout/tagout devices should always be confirmed for use upon
installation per OSHA Lock-Out/Tag-Out guidelines.
3. Memory Stop Lever Handle (MS)
a. The Memory Stop Lever Handle allows flow through the valve to be
balanced by limiting ball position from full-open. The valve maintains
closing capability with memory stop properly adjusted.
b. Installation
i. Actuate lever handle to balanced position.
ii. Remove handle nut and lever handle to access bare stem.
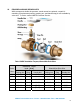
iii. Place memory stop plate over stem (part number facing up, round
hole over stem,) and reinstall handle and handle nut (see Table 1
for wrench size and torque).
iv. Slide the memory stop plate against the valve handle stop.
v. Insert provided screw into largest hole in handle and memory stop
plate’s curved slot.
vi. Install and tighten provided lock nut and screw to 60-80 in-lb.
vii. The valve can now be closed and then reopened to the set position.
NOTE: If handle or memory stop plate binds on packing nut when
rotated, tighten packing nut 1/8-turn and retry. Repeat until
handle and memory stop plate travel freely, not to exceed
1/2-turn.
viii. Even though the handle is designed for throttling, by use of the
memory stop feature, the application characteristics must be
considered prior to actual usage in order to prevent damage to the
valve seats from excessively high velocity.
4. NIB-SEAL
®
Insulated Handle (NS)
a. The NIB-SEAL Extended Handle is specifically designed for use with
bronze ball valves installed in insulated, chilled and hot water lines, and
was tested to UL 2043-UL listed for installations in air-handling spaces
(plenums). The recommended operating temperature range is 15°F to
250°F (15 psi SWP) maximum.
b. Installation and Maintenance Instructions
i. Measure, cut and install insulation as required.