
User's Manual


4
Programming is divided into three stages:
1. Memorising the transmitters
2. Programming the “0” and “1” positions
3. Optional programming
WARNING: All the transmitter memorisation and para-
meter programming sequences are timed, i.e. they must
be carried out within set time limits.
• For radio controls designed to handle multiple “units”,
before proceeding with the memorisation you need to
select the unit to which the motor should be associated.
• All the motors within the range of the transmitter can be
programmed by radio; therefore, only the motor involved
in the operation should be kept switched on.
4) Programming
1. Press and hold down key ▲ or ▼ on a memorised remote control until the closing of the
awning is complete and the motor has stopped automatically.
2. Press and hold down key ▼ to lower the awning.
3. Release key ▼ when the awning has reached the desired position (“1”).
If necessary, adjust the position using keys ▼ and ▲.
4. Press and hold down key ■ on the transmitter until you hear a beep (approx. 5 seconds).
5s
5. Release and then press again key ■ for 5 more seconds until you hear 4 short beeps.
5s
6. Press and hold down key ▼ until 3 beeps and a brief up and down movement signal that
the position has been memorised.
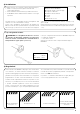
Table “A3” Programming the “0” and “1” positions (fig. 9) Example
4.1) Memorising the transmitters
Each radio control is recognised by the receiver incorporated in the NEOMAT H control unit through an individual “code” that is unlike any
other. The control unit must therefore be programmed to recognise each separate radio control through a “memorisation” process.
When the memory does not contain any code, you can proceed to program the first radio control by operating as follows:
!
1. When the control unit is switched on, you will hear two long beeps.
2. Within 5 seconds, press and hold down (for approx. 3 seconds) key ■ on the transmitter
that must be memorised. 3s
3. When you hear the first of the 3 beeps confirming the memorisation, release key ■
Note: If the control unit already contains codes, 2 short beeps will be heard when it is switched on. In this case you cannot proceed as
described above but must use the other memorisation method (Table “A2”)
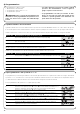
Table “A1” Memorising the first transmitter (fig. 7) Example
1. Press and hold down (approx. 5 seconds) key ■ on the new transmitter until you hear
the beep. New 5s
2. Slowly press key ■ on a previously enabled (old) transmitter 3 times.
Old X3
3. Press again key ■ on the new transmitter.
New
4. Finally, 3 beeps will signal that the new transmitter has been correctly memorised.
Note: If the memory is already full (14 codes), 6 beeps will indicate that the transmitter cannot be memorised.
Table “A2” Memorising additional transmitters (fig. 8) Example
When one or more transmitters have already been memorised, additional ones can be enabled by proceeding as follows:
4.2) Programming the “0” and “1” positions
To program the positions you need to use a previously memorised remote control. Unless the “0” and “1” positions have been memorised in
the control unit, the movements require manual control. Initially the direction of the motor is not defined, but when step 1 in table “A3” has
been executed, the direction of the motor will be automatically assigned to the remote control keys.
To program positions 0 and 1 proceed as follows: