
Instructions / Assembly


Find your niche
VERSATILE AND MODERN
ASSEMBLY INSTRUCTIONS
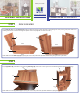
STEP 6
Snap Top Shelf (G) onto assembled por on in between Hutch
Sides (E) by lining up pins with their coordina ng holes and
pressing into place. (Note: Pieces snap together in numerical order.)
Slide Hutch Backs (F) into assembled Hutch Sides (E)
by inser ng
into precut grooves
and pressing down into place (See fi gure 1).
(Note: Make sure to have wood grain facing interior of hutches.)
Note: Make sure the Top Shelf (G) is facing the correct way with
holes for support a achment facing down.
fi gure 1
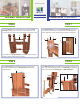
Snap Hutch Tops (J) to assembled hutches by lining up
holes
with their coordina ng pins on
Hutch Sides (E)
and pressing
down into place.
Snap Back Support (P) to assembled unit star ng with inser ng pins
at an angle into coordinga ng holes on Top Shelf (G) (see fi gure 1).
Then push forward into Desktop (A) and Bo om Shelf (C).
G
F
F
F
F
E
E
E
STEP 8 STEP 9
STEP 7
fi gure 1
J
E E
P
C
G
G
A
CORNER DESK PCNRDS6025