
Technical Specifications

NICHIHA INSTALLATION GUIDE FOR SIX-FOOT HORIZONTAL PANELS
22
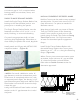
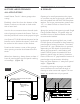
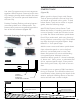
WINDOW/DOOR HEADERS
STARTER TRACK:
When starting a course of whole panels above
a window or door, add flashing and Starter
Track at the header, installed with fasteners at
each framing member. Add flashing tape to
seal flashing to the WRB.
(Figure 45)
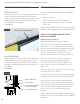
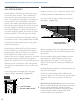
FACE FASTENING:
When adding a cut panel above the opening,
install flashing and corrugated Spacer first
and then face fasten panels at each framing
member. Add flashing tape to seal flashing to
the WRB.
(Figure 46)
OUTSIDE CORNERS
There are several outside corner installation
options:
• Nichiha Corners
• Fiber Cement and PVC Trim Boards
• Metal (Open Outside, Corner Key) and
Vinyl Trim
Appropriate ashing must be used as required to
prevent moisture penetration on outside corners.
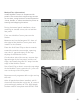
NICHIHA RECOMMENDED METHODS
NICHIHA CORNERS
Method One (primary):
Install Nichiha Corners prior to panels.
Set Corner on the Starter Track and secure
with two 1-1/2” cut Ultimate Clips that each
retain a downward panel engagement flange.
Refer to Cutting Panel Clips section. Place
one clip on each side of the Corner and
secure with fasteners into framing/structure.
Place the next Corner on top of the first,
fitting the ship-lapped edges together
over the clips. Secure the top edge in the
same manner with two Ultimate Clip 1-1/2”
segments.
Continue up the outside corner, stacking and
securing the Corner pieces.
The top Corner will be cut to the appropriate
height and face fastened over 10mm Spacer.
Add Double Flange Sealant Backer behind
the Corners on both sides, all the way down
from the top of the wall section to the Starter
Track. Secure Sealant Backer to structure
every 12-14” on the exposed fastening
flanges.
After all the panels have been installed, apply
ASTM C-920 compliant sealant to the Sealant
Backers.
"Z" FLASHING BY OTHERS
NICHIHA 10MM SPACER
FACE FASTENER
1/4" CLEARANCE FROM EDGE
OF PANEL TO FLASHING
Fig. 45
Fig. 46
Starter Track over Z-flashing