
Installation Guide


INSTALLATION
INSTRUCTIONS
WARNING: Before wiring to the power supply, turn off the electricity at fuse or circuit
breaker
box. Ensure grounding to avoid potential electrical shock and to ensure reliable lamp starting.
WIRING
OF
THE
LIGHT
FIXTURE
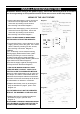
1)
Connect
the
black
supply
(
house
)
wire
to
the
black wire from the light fixture. Secure the
connection by inserting into the wirenut,
then revolving until secure.Diagram 1.
2)
Connect
the
white
supply
(
house
)
wire
to
the
white wire from the light fixture. Secure the
connection by inserting into the wirenut,
then revolving until secure.Diagram 1.
CHECK
TO
MAKE
SURE
NO
BARE
WIRES
ARE EXPOSED OUTSIDE THE WIRENUTS.
3)
To
ground
the
fixture,
connect
the
bare
or
green
supply ( house ) wire to the green wire comes
with the fixture by inserting into the wirenut,
then revolving until secure. Diagram 1.
DIMMING
1)
If
1
-
10
dimming
is
to
be
used,all
incoming
dimming supply leads must be Class 1(300V
minimum).If dimming is not to be used,cap
off fixture Purple and gray leads separately.
2)Connect the supply positive dimming lead to the
Purple lead from the fixture.Diagram 2.
3)Connect the supply negative dimming lead to
the Gray lead from the fixture.Diagram 2.
IF
THE
HOUSE
WIRING
DOES
NOT
HAVE
A GROUND WIRE, CONSULT YOUR LOCAL
ELECTRIC CODE FOR APPROVED METHOD.
Attacher le cable d’alimentation noir au cable noir
de
la
lampe
,et
le
Cable
d
’
alimentation
blanc
au
cable blanc de la lampe à l’aide des connecteurs,
Raccorder le fil de terre de la lampe au fil de terre
de
l
’
alimentation
en
utilisant
un
connecteur.
4) Replace the wireway cover by reversing the
steps as described on page 2, point 2. See
Diagram 3,4
THE FIXTURE SHOULD NOT BE OPERATED
WITHOUT THE WIREWAY COVER IN PLACE.
5)
Replace
the
lens
by
reversing
the
steps
as
described on page 2, point #1. See
Diagram 5.
BE
EXTREMELY
CAREFUL
WHEN
REPLACING
THE LENS BACK ON THE LIGHT FIXTURE TO
AVOID POSSIBLE DAMAGE TO THE LENS.
Diagram 3
Diagram 4
Diagram 5
Diagram 1
Diagram 2