
Installation Guide


What’s In The Box
One (1) DGD
One (1) Romex Connector
One (1) Driver
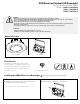
ATTENTION:
• Turn power o before inspection, installation, or removal.
• Suitable for use in dry, and damp locations. Use only on 120 VAC, 60Hz circuits.
DGD Recessed Gimbal LED Downlight
INSTALLATION INSTRUCTIONS
Model(s):
DGD21120#KRD&&
DGD31120#KRD&&
DGD41120#KRD&&
Tools Needed
This LED Recessed Downlight requires very few
tools for installation. A screwdriver a wrench, and a
pair of wirecutters will help to install the driver and
downlight . Additionally, the installer must provide
one Romex connector.
Identify xture location and use the included paper
template to cut the mounting hole.
1
Installing the DGD LED Recessed Downlight
Make sure all power is turned o before beginning installation
WARNING:
• Risk of electric shock. Disconnect power at fuse or circuit breaker before installing or servicing.
• To prevent early lamp failure, lamp should only be installed in operating environments between -20°C and + 40°C (-4°F and 104°F)
• No user serviceable parts inside. To avoid electric shock do not disassemble product.
• This product is not intended for use in emergency light xtures or exit signs.
• This product contains a chemical known to the state of California to cause cancer, birth defects and other reproductive harm.
• Risk of re or electrical shock.
• To prevent wiring damage or abrasion, do not expose wiring to edges of sheet metal or other sharp objects.
*metal roughin template available for DGD3 and DGD4
Attach Romex connector to junction box.
2