
Installation Guide

What’s In The Box
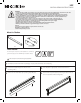
LSC Cover plate
NOTICE:
Green ground screw provided in proper location. Do not relocate.
Minimum 90° supply conductors.
Suitable for Dry or Damp location.
LSC
INSTALLATION INSTRUCTIONS
Tools Needed
The LSC requires very few tools for installation. A screwdriver, a
pair of wire strippers and a drill will help to install the xture.
Carefully unpack the xture from its packaging. Inspect product for defects due to shipping.
1
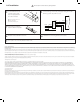
Remove LED array carrier plate by removing the two screws on
each end. (Caution: avoid touching LEDs)
5
Locate desired positioning for the xture on the
mounting surface.
2
Turn o power to appropriate circuit at the breaker box.
3
Make sure all power is turned o before beginning installation
Remove the lens from xture by squeezing and pulling up.
4
WARNING:
• To reduce the risk of death, personal injury or property damage from re, electric shock, falling parts, cuts/abrasions, and other
hazards read all warnings and instructions included with and on the xture box and all xture labels.
• Before installing, servicing, or performing routine maintenance upon this equipment, follow these general precautions.
• Commercial installation, service and maintenance of luminaires should be performed by a qualied licensed electrician.
• For installation: If you are unsure about the installation or maintenance of the luminaires, consult a qualied licensed
electrician and check your local electrical code.
• To prevent wiring damage or abrasion, do not expose wiring to edges of sheet metal or other sharp objects.
• Do not make or alter any open holes in an enclosure of wiring or electrical components during kit installation.
• Turn o electrical power at fuse or circuit breaker box before wiring xture to the power supply.
• Turn o the power when you perform any maintenance.
• Verify that supply voltage is correct by comparing it with the luminaire label information.
• All wiring connections should be capped with UL approved wire connectors.