
Installation Guide

What’s In The Box
One (1) Prime Chime Plus Two (2) Lighted Doorbell Buttons
Prime Chime Plus
INSTALLATION INSTRUCTIONS
Model:
PRCP1
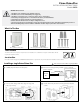
Tools Needed
The Prime Chime Plus requires very few tools for installation. A screwdriver and a pair of wirecutters will be
required to install the chime.
Carefully unpack xture and faceplate.
1
Installing a single Prime Chime Plus
Make sure all power is turned o before beginning installation
WARNING - RISK OF SHOCK
1. This xture is to be installed by only a qualied electrician.
2. This xture is to be used at 120V AC/60Hz power supply only.
3. This xture is designed for use in a circuit protected by a fuse or circuit breaker.
4. Turn o the power supply at the fuse or circuit breaker box before you install this xture.
5. Turn o the power supply again when you perform maintenance.
6. Double check all connections to be sure they are all tight and correct.
7. Operation environment: to be installed indoors under dry and ventilated environment. It should NOT be installed damp locations or
environment with high temperature. Installation of this xture should be kept away from other electrical devices.
Connect line voltage wiring (120VAC, 18ga or greater)
per the diagram.
2
One (1) Hardware Pack
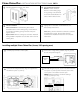
Junction Box
Pre-install a dual voltage box (CARLON Model#SC200DV or equivalent, not provided) before installation of this device.
Connect low voltage bell wires (18ga or 22ga) into
ports 1(+) and 2(-).
3
Junction
Box
Black (Line)
Black (Line)
White (Neutral)
White (Neutral)
120V/60Hz only
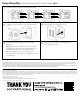
Install chime into junction box using four (4) included
screws.
4