
Installation Guide


NICOR, Inc. 2200 Midtown Place NE, Albuquerque, NM 87107 P: 800.821.6283 F: 800.892.8393 www.nicorlighting.com October 8, 2021 9:22 AM PRCP2 Rev - Page 2 of 4
7
5
Prime Chime Plus - INSTALLATION INSTRUCTIONS Model: PRCP2
6
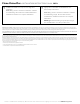
Apply power. The button should illuminate. Test
functionality of the chime.
Note: Wiring of video doorbells is identical to standard
doorbell wiring (step 6). Please follow doorbell
manufacturer’s installation instructions for complete
information.
Warning: Continued holding or repeated pressing of the
doorbell button can cause product issues.
8
Attach faceplate by pressing onto chime.
For Stucco Button:
New construction: Install mounting tube. Attach
doorbell button to chime wiring using screw terminals.
Insert button mounting springs into tube and push
against surface.
Replacement: Remove existing stucco button. Reattach
wiring to PRCP2 compatible stucco button and insert
into existing tube.
For Standard or Decorator
Buttons: Attach doorbell
button to chime wiring (18ga
or 22ga) using screw terminals
and mount doorbell button to
surface with included screws.
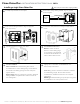
Carefully unpack xture and faceplate.
1
Installing a single Prime Chime Plus
Make sure all power is turned o before beginning installation
Connect line voltage wiring (120VAC, 18ga or greater)
per the diagram.
2
Connect low voltage bell wires (18ga or 22ga) into
ports 1(+) and 2(-).
3
Junction
Box
Black (Line)
Black (Line)
White (Neutral)
White (Neutral)
120V/60Hz only
Install chime into junction box using four (4) included
screws.
4