USER’S MANUAL Panoramic Camera www.NightOwlSP.
Thank you for choosing Night Owl Security Products! By purchasing a Night Owl product, you receive a one (1) year warranty covering manufacturing defects in material and workmanship. In addition to warranty and technical support benefits, you will have access to our multitude of free instructional “How to Videos”. You can also view our instructional videos by clicking the “How to Videos” tab within your product’s page on our website.
Table of Contents FCC Warnings ........................................................................................................................ 2 Table of Contents ................................................................................................................... 3 Chapter 1: Safety Instructions................................................................................................. 4 Chapter 2: Specifications ..................................................................
Chapter 1: Safety Instructions USE THE PROVIDED POWER ADAPTER. Do not use this product with a power source that applies more than the specified voltage. NEVER INSERT METAL INTO THE CAMERA CASE OR ITS OPENINGS. Inserting metal into the camera may cause electric shock. DO NOT OPERATE IN WET OR DUSTY AREAS. Avoid placing the camera in areas such as a damp basement or duty attic. DO NOT EXPOSE THE CAMERA TO RAIN OR USE NEAR WATER.
Chapter 2: Specifications 2.1 Camera Requirements Please be sure that your mobile device complies with the following specifications: Android™: 4 and above iOS®: 9 and above THIS MANUAL WAS ACCURATE AT THE TIME IT WAS COMPLETED. DUE TO OUR ONGOING EFFORT TO CONSTANTLY IMPROVE OUR PRODUCTS, SPECIFICATIONS MAY HAVE BEEN ADDED OR CHANGED. 2.
2.3 Panoramic Camera Diagram FRONT VIEW BACK VIEW Audio Speaker LED Status Light Base Mount Camera Lens Removable Base LEFT SIDE VIEW RIGHT SIDE VIEW Reset Button: USB DC 5V Input Press and hold for 10 seconds to reset to Factory Settings. The camera reboots and then unpairs from the App. The camera must be deleted from the App and then re-added. Must use a 5V 1A adapter to power on the camera. Use the included power cord. MicroSD Card Slot Base Mount The maximum microSD card size is 128 GB.
Chapter 3: Getting Started 3.1 Status Light 3.2 Audio Prompt Camera Status Light The camera’s audio prompts let you know its current status. LED Solid: Camera is Connected LED Quick Flashing: Camera is in pairing mode LED Slow Flash for 1 Second: Camera is disconnected. Audio Condition Audio Prompt After the camera boots up Device is ready to use. Camera starts without previous Wi-Fi connection Camera is in pairing mode.
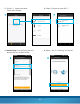
Chapter 4: Software Description 4.1 Night Owl Connect Setup 1 Download and Install Application Download the appropriate App from the App Store or Google Play Store and install the application on your device. NOTE: Setup is the same for Smartphone and Tablet. 2 Create an account using an email address for the username and a password between 6-20 characters. 3 After completing the account setup and verification process, sign into the App and tap the “+” symbol to add a device. 4.1.
1. Tap the “+” symbol and select “Stand Alone Camera”. 2. Select “Connect to Home Wi-Fi.” 1 2 3. (Android only) Go to the Smart Device’s settings and turn off Mobile Data 4. Select “Yes, it is Flashing” to continue.
5a. (Android only) Cameras detected by the Network are listed. Select a camera from the list to add to the App. 5b. (iOS only) Leave the Night Owl Connect App and open the Smart Device’s settings. Go to the Wi-Fi settings and select the network starting with “NOIP.” Return to Night Owl Connect. Android iOS 5a 6. Select your Wi-Fi network from the list, enter the password, and tap “Connect.” 5b 7. The camera is completing the setup process. It may take a couple of minutes.
8. Name the camera and select “COMPLETE SETUP.” 8 If the camera’s setup fails, reset the camera and repeat the setup process. If the setup process fails again, go to the troubleshooting section of this manual for assistance.
4.2 Night Owl Connect Live View Add Device Account Displays real-time footage of your system Add connected devices to the App.
4.2.1 Night Owl Connect Tutorial After logging into the App, you are shown tutorials on key features. The first tutorial teaches you how to zoom in and out of the screen by pinching. The second tutorial teaches you how to switch to and from the spherical and panoramic view modes. View Mode Button: Switches the view mode to Spherical. View Mode Button: Switches the view mode to Panoramic view.
4.3 Live View 4.3.1 Portrait Mode Month: Displays the current month. Settings: Tap to access the camera’s settings. Back: Tap to return to the previous screen. Day Selector: Scroll left or right to select a date and view its recordings. Go Live Button: Tap to return to the current live view. Playbacks: Indicates a recording exists at that time. View Mode Button: Switches the view mode to Spherical or Panoramic view. Sound: Enables one-way audio allowing the user to hear sound near the camera.
4.3.2 Landscape Mode 1. Sound: Enables one-way Audio allowing the user to hear sound near the camera. Once Audio is activated, a TALK button appears on the screen. Tap the “Talk” button to speak through the camera. Release to listen (similar to a Walkie Talkie). 2. View Mode Button: Switches the view mode to Spherical or Panoramic view. 1 2 1 2 4.3.
4.4 Camera Settings 1. Back: Tap <– to return to the previous screen 1 2 2. Save: Tap to save the camera’s settings. 3 3. Device Name: View and edit the device’s name. 4 4. Model: The camera’s model number. 5 5. Firmware Version: Version of the software running on the camera. 6 6. Push Notification: Enable / Disable push notifications. 7 7. Motion Sensitivity: Select low, medium, or high to adjust camera sensitivity. 8 8. Record Mode: Select either Motion or Continuous recording. 9 9.
Chapter 5: Warranty NIGHT OWL, LLC (“Night Owl”) provides the following warranty to the original retail purchaser only (the “Purchaser”) with respect to this product (the “Product”): For a period of one (1) year after the date of sale, the Product shall be free from manufacturing defects in material and workmanship. In the event that the Product is defective, the Purchaser must return the Product at the Purchaser’s cost (no CODs) to the address below, with the original proof of purchase receipt.
NEED HELP? Why Call? Our Support Site Has It All! For manuals, troubleshooting guides, FAQs, video tutorials and more: 1 Please visit www.NightOwlSP.com. 2 Click the Support tab. 3 Type WCC20 in the search bar. 4 Access the support material needed. CONTACT US PHONE (English, Spanish & French) EMAIL WEBSITE Technical Support Technical Support 24/7 Product Support 1.866.390.1303 Live Chat 24/7, 365 days a year Sales Support Support@NightOwlSP.com • How-To-Videos • Manuals Sales@NightOwlSP.