QUICK SETUP GUIDE Home & Business SECURITY SYSTEMS
What’s in the Box Package Contents DISCLAIMER: The exact components of your system, images and quantities may vary depending on your model number. While these may vary, this QSG will address the setup and initial configuration of your NVR and cameras. NVR (x1) Camera(s) NVR Antenna (x2) NVR Power Adapter (x1) Camera Antenna (1 per camera) 9 ft. Camera Power Adapter (1 per camera) 9 ft. Wi-Fi Extender Antenna and Mounting Hardware (1 for every 4 cameras) 6 ft. RJ-45 Cable (Ethernet) (x1) 6 ft.
Product Overview NVR Rear View 7 GROUND 7 AUDIO OUTPUT VGA HDMI LAN USB POWER 12V 1 2 3 4 5 6 NOTE: The maximum number of cameras you can connect to your NVR will be determined by the number of channels. 1 Audio Output – Allows for the connection of an amplified speaker. 2 VGA Output – Allows for a video connection. If the TV/Monitor does not have an HDMI input but does have a VGA input, connect the VGA cable from the VGA output port on the NVR to the VGA input port on your TV/Monitor.
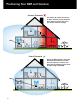
POSITIONING YOUR WIRELESS NVR Positioning Your NVR and Cameras Incorrect Placement Your wireless IP cameras will reach up to 300 ft. Therefore, proper placement of the NVR in your home will ensure you achieve maximum coverage. NVR Correct Placement Placing the NVR centrally in your home will help make certain that no matter where you mount your cameras, they will be able to wirelessly connect inside the signal range of the WNVR.
How Obstacles Affect Your Signal Strength When your wireless signal is transmitted through various materials, such as walls and windows, the signal strength is affected. Though the NVR and wireless camera may be very close in proximity, you could still notice high signal interference if the signal passes through certain obstacles. For instance, if the signal passes through a concrete wall it will be severely weakened.
Connecting Your System HDMI 1 Connect the two included antennas to your NVR. This will ensure you achieve the maximum wireless range for transmission from your wireless cameras. HDMI 2 Plug one end of the included HDMI cable into the HDMI port on the back of the NVR. ETHERNET You may also connect using VGA (not included) 3 Plug the other end of the HDMI cable into the back of your TV or monitor. 4 Plug one end of the included Ethernet cable into the LAN port on the back of the NVR.
(Surge Protector Not Included) 7 Connect the NVR power adapter to the Power Input on the rear of the NVR. NOTE: Power adapters will be labeled as either NVR or Camera. 8 Plug the NVR power adapter into a surge protector or Uninterruptible Power Supply (UPS). (Surge protector and UPS not included) NOTE: Make sure NVR is in intended location before testing cameras. 9 Connect the included camera antenna to the antenna mount on the camera.
Booting Up for the First Time Startup Wizard 1 When you power on the NVR you will be prompted with the following screen. Please follow the instructions to complete the Startup Wizard. Important… Please Read 2 On the Password Creation screen, please note the following: Admin Account Creation By default, the username will be admin. It must remain admin upon your initial account configuration. However, you may add additional users at a later time.
3 When you reach the Camera / Channel Settings screen, you will want to have installed the cameras in their final position. Please make sure you have mounted cameras at least 7ft. above the ground and angled them slightly down. NOTE: If your camera has an infrared sensor, it works best for ‘side to side’ movement across the camera’s field of view as opposed to directly to or away from the camera.
Using Night Owl Connect Download and Install Application 1 Download the app from the App Store or Google Play Store and install the application on your device. NOTE: Setup is the same for Smartphone and Tablet. 2 Create an account using an email address for the username and a password between 6–20 characters. 3 After completing the account setup and verification process, sign into the app and tap the “+” symbol to add a device.
Connecting and Adding your Device NOTE: When adding a new device, it may take 5–10 minutes before you begin receiving notifications. A device can be added to the Night Owl Connect App by using the application’s Smart Auto Detection or through a QR Code Setup. With Smart Auto Detection, your NVR will automatically be detected by the Night Owl Connect software, making connecting easy! To use this preferred method, ensure your Smart Device and NVR are both on the same network.
Using Night Owl Connect 5 On the Device Login screen, enter the login information for the NVR (Remember, the NVR login and Night Owl Connect App login are different). The NVR username is admin by default. If you are not the admin, login with your username credentials. admin is case sensitive (all lowercase). The password will be the same password you created during the Startup Wizard and should be stored in your QSG.
App Overview Live View Add Device Account Displays real-time footage of your system. Add connected devices to your NVR and access your footage. Manage account settings, add a shared device, and change password.
Using Night Owl Connect CMS Software Access your NVR from any computer, anywhere! Live View Playback Device Manager Viewing live video, controlling PTZ functionality and setting image parameters. View system recordings and images and save them directly to your PC or Mac®. Add and configure available NVRs and cameras on your network. Night Owl Connect CMS Software The Night Owl Connect Control Management Software (CMS) allows you to view your Night Owl Security system remotely from a PC or Mac®.
Pairing a Replacement Wireless Camera By default, each camera within your NVR kit comes pre-paired to the NVR. Additionally, your NVR has its own built-in Wi-Fi for secure, uninterrupted video transmission and recording. Pairing allows for the wireless transmission coming from the camera to be detected by the NVR. However, if you have a camera that needs to be replaced while under warranty, the replacement camera will similarly need to be paired to the NVR.
Pairing a Replacement Wireless Camera 4 Next, you will need to reset the replacement camera. To do so, press and hold the reset button until you hear a beep, indicating the camera has begun the reset process. NOTE: The reset process may take up to 3 minutes. NOTE: The Reset Button location depends on the camera version. 5 A After 3 minutes have passed or after hearing the camera beep, click on Wireless Add located on the Add Camera screen. Your NVR will now search for new cameras.
7 If you have not exceeded the channel limitation, the new camera will appear in a vacant video field once paired. 8 WooHoo! Your add-on camera has now been paired to the NVR using the NVR’s built in Wi-Fi.
Frequently Asked Questions FAQs 1. Does my NVR have to be connected to the Internet to work? No, your NVR does not have to be connected to the Internet to work. You can view live feed and recordings by connecting it to a TV/Monitor via HDMI or VGA. 2. Will I be able to view my system while away from home? In order to view your wireless system remotely, your NVR will need to be manually connected to a modem/router via the included Ethernet cable.
Notes 18
Need Help? CONTACT US PHONE (English, Spanish & French) Technical Support 1.866.390.1303 Live Chat 24/7, 365 days a year For system manuals, troubleshooting guides, FAQs, video tutorials and more: Please refer to the sticker located on top of the device for steps on how to access your product’s support material. Pre-Sales Support 1.866.979.0580 EMAIL Sales Support Sales@NightOwlSP.com Technical Support Support@NightOwlSP.com WEBSITE 24/7 Product Support • How-To Videos • Manuals www.NightOwlSP.