Extreme X4 Actioncam USER MANUAL EN © Elmarc, 16/05
Table of contents 1 Intended use 3 2 2.1 2.2 Safety 4 Labels in this manual 4 General safety instructions 4 3 3.1 3.2 3.3 Preparations for use Unpacking Package contents Charge the battery 7 7 7 8 4 4.1 Functions Extreme X4 9 9 5 5.1 5.2 5.3 5.4 5.5 5.6 5.7 5.8 5.9 5.
1 Intended use The Extreme X4 is an actioncam to make pictures and movies. Use the delivered accesoires by example to attach the Extreme X4 on your bike, helmet and belt. The actioncam may not be exposed to splashing or dripping water without the waterproofcase. Use the iSport Cam App on your smartphone to operate the Extreme X4. The device is intended for consumer use, not for professional use.
2 Safety 2.1 Labels in this manual 66 WARNING A warning means that injury is possible if the instructions are not obeyed. 11 CAUTION A caution means that damage to the equipment is possible. 55 A note gives additional information, e.g. for a procedure. 2.2 General safety instructions General 66 To prevent damage or malfunctions: Please take time and read the general safety instructions.
66 Do not block the ventilation holes. 66 Never leave children unattended with the packing material. The packaging material represents a danger of suffocation Children frequently underestimate the danger.always keep childern away from the packaging material. 66 Do not operate the device during driving. 66 Warning! It is not permitted to open the product yourself or to have it opened, neither is it permitted to repair the product yourself or to have it repaired. This will void the warranties.
Keep the appliance housing's rubber seal clean. A single hair or grain of sand can cause a leak and damage your camera. 11 After every use in salt water, rinse the outside of the camera housing with non-salt water and dry. Not doing this can eventually cause corrosion of the hinge pin and salt buildup in the seal, which can damage the camera housing. 11 The camera contains sensitive components, including the battery. 11 Avoid exposing your camera and battery to very cold or very hot 11 temperatures.
3 Preparations for use 3.1 Unpacking • Unpack the appliance carefully. • Check the package contents as described below. If any item is missing, please contact your reseller. • We recommend that you retain the original carton and packing materials in case it ever becomes necessary to return your product for service. This is the only way to safely protect the product against damage in transit.
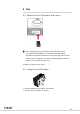
3.3 Charge the battery 1 2 3 3 Hr HDMI MICRO SD • Open the battery door. • Place the battery and close the battery door. • The battery is fully charged within 3 hours. The LED indicator is red during charging. When the battery is full the LED indicator is off.
4 Functions 4.1 Extreme X4 Filming Make a photo Play Settings 5 1 6 HDMI MICRO SD 2 7 3 0P 108 1. 2. 3. 4. 5. 6. 7.
5 Use 5.1 Memory Card: Placement and access 55 Due to the great variety of products with external memory connection (USB, SD/MMC, etc.) and their sometimes quite manufacturer-specific functions we can neither guarantee that all devices will be recognised, nor that all operating options that are possible in theory will actually work. (7) Memory card slot max. 32 Gb 5.2 Using the on/off button 0P 108 4 • Keep key MODE (4) pressed for 3-5 seconds • The device has now been turned on.
5.
5.5 Make a photo 1 2 3 0P 108 4 55 When you turn the appliance on, you are already in the film mode. • Press repeatedly on the Mode button (4) untill you reach the photo mode. • Press on the button OK (1) to make a photo. 5.6 Play 1 2 3 0P 108 4 55 When you turn the appliance on, you are already in the film mode. • Press repeatedly on the Mode button (4) untill you reach the play mode. You can display the photo`s and watchthe recorded videos.
5.7 Settings 1 2 3 0P 108 4 • Press repeatedly on the Mode button (4) untill you reach the settings mode. • Press OK (1) to confirm your selection. • Use the (2) and (3) keys to navigate within the menu. Movie size: adjust the size of the movie. Seamless: is the process of recording video feeds.
Resolution: you can set here the resolution. You can choose from: 12M (4000 x 3000), 12M (3648 x 2736), 8M (3264 x 2448), 6M (2816 x 2112), 3M (2048 x 1536), 2M (1920 x 1080) and VGA (640 x 480). Exposure: you can set the exposure here. You can choose from: -2.0, -5/3, -4/3, -1.0, -2/3, -1/3, 0.0, +1/3, +2/3, +1.0, +4/3, +5/3, +2.0 Quality: Super Fine, Fine, Normal White balance: you can set the white balance here: You can choose from: Auto, Daylight, Cloudy, Tungsten, Fluorescent.
Firmware version Here you can see the systeminformation, 5.8 Remove the battery • Open the battery door. • Take the tab on the batterij en move the batterij out of the camera. 5.9 Connecting a USB to a computer HDMI MICRO SD Insert the USB cable into the camera and the computer. You can choose the following options: USB Mode View and export videos and photos. Charging mode You can make photos and videos with the computer.
5.10 Make an HDMI connection with the television 5 1 6 HDMI MICRO SD 2 7 3 0P 108 4 • Keep key MODE (4) pressed for 2 seconds • The device has now been turned off. • Insert the mini HDMI cable (5) (not included) in the actioncam and connect the actioncam with the television. • Select the television on the desired source input (see the manual of • the television). • Perform the steps as described on the television screen.
6 Managing your camera using your smartphone 6.1 View your camera image on your mobile WIFI information 1x WIFI SSID: WIFI password: X20V_040d 1234567890 WIFI SSID: X20V_040d Install iSportCam APP program 55 To use the camera with your mobile Phone, you need to download the iSportCam app from the playstore. • Press the button WIFI for 2 seconds. • Open the iSportCam app on your mobile phone. • Select the WIFI: 95-A000001 and insert the password. Select connection.
6.3 Mount the camera on the helmet 1 2 3 6 7 11 12 4 8 13 14 5 9 15 10 18 16 17 3M 3M 2x 4x 2x You can mount the actioncam two ways on the helmet. Only use the supplied accessory.
6.4 Mount the camera on your bike You can mount the actioncam on your bike. Only use the supplied accessories.
6.5 Attach the camera with the clip You can mount the camera on your belt (for example). Only use the supplied accessories.
7 Cleaning and maintenance 11 Do not dry the camera or battery with an external heat source such as a microwave oven or hair dryer. 11 The rubber seal that lines the camera housing forms a waterproof barrier that protects the appliance in wet and underwater conditions. Keep the appliance housing's rubber seal clean. A single hair or grain of sand can cause a leak and damage your camera. • If you do not use the appliance for an extended period, remove the batteries.
8 Technical data • • • • • • • • • • • • • • • • • • • • • • • • • • • • • Picture formats: JPEG (4:3) LCD Display 1.5" LCD (3.8 cm), Voltage: 5V/1A Resolution of videos recorded: 1080P/720P/WBGA Images per second: 30 fps Resolution of photos: 12M, 8M, 5M Image sensor Viewing angle: 170º External memory: Micro SD (TF) max. 32 GB Connectivity: HDMI and Micro USB2.0. WiFi connection Battery: 3.7V Li-ion, 900MAH, 3.
9 Disposal of used electric and electronic equipment The meaning of the symbol on the material, its accessory or packaging indicates that this product shall not be treated as household waste. Please, dispose of this equipment at your applicable collection point for the recycling of electrical and electronic equipments waste. In the European Union and Other European countries which there are separate collection systems for used electrical and electronic product.