
User's Manual


Total Station Nivo Series Instruction Manual 13
Preparation 2
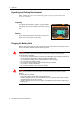
Setting Up the Tripod
C
CAUTION – The tops of the tripod ferrules are very sharp. When handling or carrying the
tripod, take care to avoid injuring yourself on the ferrules.
1. Open the tripod legs enough to for the instrument to be stable.
2. Locate the tripod directly over the station point. To check the tripod’s position,
look through the center hole in the tripod head.
3. Firmly press the tripod ferrules into the ground.
4. Level the top surface of the tripod head.
5. Securely fasten the thumb screws on the tripod legs.
6. Place the instrument on the tripod head.
7. Insert the tripod mounting screw into the center hole of the base plate of the
instrument.
8. Tighten the tripod mounting screw.
Note – Do not carry the instrument while it is attached to a tripod.
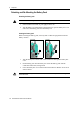
Centering
When you center the instrument, you align its central axis precisely over the station
point. To center the instrument, you can either use the optical plummet or a plumb
bob.
Centering using the optical plummet
Note – If you require high accuracy, check and adjust the optical plummet before you
center the instrument. For detailed instructions, see Checking and Adjusting the
Optical/Laser Plummet, page 136.
To center the instrument using the optical plummet:
1. Set up the instrument on the tripod. For detailed instructions, see Setting Up the
Tripod, page 13.
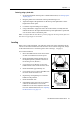
2. While looking through the optical plummet, align the
reticle with the station point. To do this, turn the leveling
screws until the center mark of the reticle is directly
over the image of the station point.
3. While supporting the tripod head with one hand, loosen
the tripod leg clamps and adjust the lengths of the legs
until the air bubble is in the center of the circular level.
4. Tighten the tripod leg clamps.