
User's Manual


2 Preparation
14 Total Station Nivo Series Instruction Manual
5. Use the electronic level to level the instrument. For detailed instructions, see
Leveling, page 15.
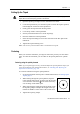
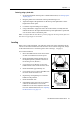
6. Look through the optical plummet to check that the image of the station point is
still in the center of the reticle mark.
7. If the station point is off center, do one of the following:
– If the station point is slightly off center, loosen the tripod mounting screw
and then center the instrument on the tripod. Use only direct movement to
center the instrument. Do not rotate it.
When the instrument is centered, tighten the mounting screw.
– If the displacement of the station point is major, repeat this procedure
from Step 2.
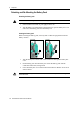
Centering using the laser plummet
Note – Do NOT look into the laser directly.
Note – If you require high accuracy, check and adjust the laser plummet before you
center the instrument. For detailed instructions, see Checking and Adjusting the
Optical/Laser Plummet, page 136.
1. Set up the instrument on the tripod. For detailed instructions, see Setting Up the
Tripod, page 13.
2. Turn on the laser plummet. See Laser plummet ON/OFF, page 36.
3. Align the laser pointer to the station point. To do this, turn the leveling screws
until the laser pointer is over the station point.
4. While supporting the tripod head with one hand, loosen the tripod leg clamps
and adjust the lengths or the legs until the air bubble is the center of the circular
level.
5. Tighten the tripod leg clamps.
6. Use the electronic level to level the instrument. For detailed instructions, see
Leveling, page 15.
7. Check the laser pointer is over the station point.
8. If the station point is off center, do one of the following:
– If the station point is slightly off center, loosen the tripod mounting screw
and then center the instrument on the tripod. Use only direct movement to
center the instrument. Do not rotate it.
– When the instrument is centered, tighten the mounting screw.
– If the displacement of the station point is major, repeat this procedure
from Step 2