
Digital Camera User Manual


Table Of Contents
- Getting the Most from Your Camera
- Table of Contents
- For Your Safety
- Notices
- Introduction
- Still Image Mode
- Smart Photo Selector Mode
- Movie Mode
- Motion Snapshot Mode
- More on Photography
- More on Playback
- Connections
- The Playback Menu
- The Shooting Menu
- Reset Shooting Options
- Exposure Mode
- Image Quality
- Image Size
- Continuous
- Shutter Type
- Frame Rate
- Movie Settings
- Metering
- White Balance
- ISO Sensitivity
- Picture Control
- Custom Picture Control
- Color Space
- Active D-Lighting
- Long Exposure NR
- High ISO Noise Reduction
- Fade in/Fade Out
- Movie Sound Options
- Interval Timer Shooting
- Vibration Reduction
- AF-Area Mode
- Face-Priority AF
- Built-in AF Assist
- Flash Control
- Flash Compensation
- The Setup Menu
- Reset Setup Options
- Format Memory Card
- Slot Empty Release Lock
- Welcome Screen
- Display Brightness
- Grid Display
- Sound Settings
- Auto Power Off
- Remote on Duration
- Assign AE/AF-L Button
- Shutter Button AE Lock
- Video Mode
- Flicker Reduction
- Reset File Numbering
- Time Zone and Date
- Language
- Auto Image Rotation
- Battery Info
- Firmware Version
- Technical Notes
87
Q
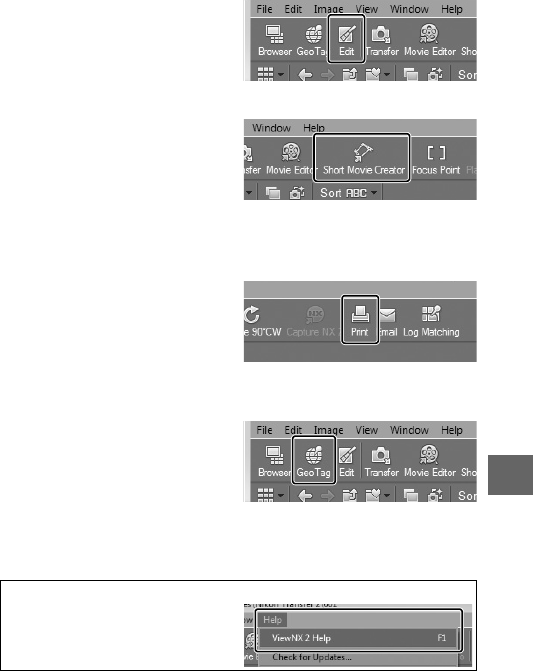
❚❚ Retouching Photographs
To crop pictures and perform
such tasks as adjusting sharp-
ness and tone levels, click the
Edit button in the toolbar.
❚❚ Creating Short Movies
Use the Short Movie Creator to
create short movies combining
music, Motion Snapshots,
movie footage, and photos
taken in still image or Smart
Photo Selector mode (0 88).
❚❚ Printing Pictures
Click the Print button in the
toolbar. A dialog will be dis-
played, allowing you to print
pictures on a printer connected
to the computer.
❚❚ Viewing Places
If the selected image contains
GPS data recorded using an
optional GP-N100 GPS unit
(0 66), click the Geo Tag but-
ton in the toolbar to view a
map showing where the picture was taken (Internet connection
required).
A
For More Information
Consult online help for more infor-
mation on using ViewNX 2.