
Digital Camera User Manual


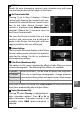
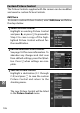
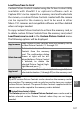
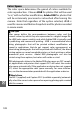

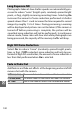
Table Of Contents
- Getting the Most from Your Camera
- Table of Contents
- For Your Safety
- Notices
- Introduction
- Still Image Mode
- Smart Photo Selector Mode
- Movie Mode
- Motion Snapshot Mode
- More on Photography
- More on Playback
- Connections
- The Playback Menu
- The Shooting Menu
- Reset Shooting Options
- Exposure Mode
- Image Quality
- Image Size
- Continuous
- Shutter Type
- Frame Rate
- Movie Settings
- Metering
- White Balance
- ISO Sensitivity
- Picture Control
- Custom Picture Control
- Color Space
- Active D-Lighting
- Long Exposure NR
- High ISO Noise Reduction
- Fade in/Fade Out
- Movie Sound Options
- Interval Timer Shooting
- Vibration Reduction
- AF-Area Mode
- Face-Priority AF
- Built-in AF Assist
- Flash Control
- Flash Compensation
- The Setup Menu
- Reset Setup Options
- Format Memory Card
- Slot Empty Release Lock
- Welcome Screen
- Display Brightness
- Grid Display
- Sound Settings
- Auto Power Off
- Remote on Duration
- Assign AE/AF-L Button
- Shutter Button AE Lock
- Video Mode
- Flicker Reduction
- Reset File Numbering
- Time Zone and Date
- Language
- Auto Image Rotation
- Battery Info
- Firmware Version
- Technical Notes

134
i
❚❚ Picture Control Settings
* Not available if Active D-Lighting (0 139) is on; reset if Active D-Lighting is
activated after value is changed.
Quick adjust
Choose from options between –2 and +2 to reduce or
exaggerate the effect of the selected Picture Control
(note that this resets all manual adjustments). For
example, choosing positive values for Vivid makes pic-
tures more vivid. Not available with Neutral, Mono-
chrome, or custom Picture Controls.
Manual adjustments
(all Picture Controls)
Sharpening
Control the sharpness of outlines. Select A to adjust
sharpening automatically according to the type of
scene, or choose from values between 0 (no sharpen-
ing) and 9 (the higher the value, the greater the sharp-
ening).
Contrast
Select A to adjust contrast automatically according to
the type of scene, or choose from values between –3
and +3 (lower values prevent highlights in portrait sub-
jects from being “washed out” in direct sunlight, while
higher values preserve detail in misty landscapes and
other low-contrast subjects).
*
Brightness
Choose –1 for reduced brightness, +1 for enhanced
brightness. Does not affect exposure.
*
Manual adjustments
(non-monochrome only)
Saturation
Control the vividness of colors. Select A to adjust satu-
ration automatically according to the type of scene, or
choose from values between –3 and +3 (lower values
reduce saturation and higher values increase it).
Hue
Choose negative values (to a minimum of –3) to make
reds more purple, blues more green, and greens more
yellow, positive values (up to +3) to make reds more
orange, greens more blue, and blues more purple.
Manual adjustments
(monochrome only)
Filter
effects
Simulate the effect of color filters on monochrome pho-
tographs. Choose from Off, yellow, orange, red, and
green (0 135).
Toning
Choose the tint used in monochrome photographs
from B&W (black-and-white), Sepia, Cyanotype (blue-
tinted monochrome), Red, Yellow, Green, Blue Green,
Blue, Purple Blue, and Red Purple (0 135).