Digital Camera User Manual
Table Of Contents
- Getting the Most from Your Camera
- Table of Contents
- For Your Safety
- Notices
- Introduction
- Still Image Mode
- Smart Photo Selector Mode
- Movie Mode
- Motion Snapshot Mode
- More on Photography
- More on Playback
- Connections
- The Playback Menu
- The Shooting Menu
- Reset Shooting Options
- Exposure Mode
- Image Quality
- Image Size
- Continuous
- Shutter Type
- Frame Rate
- Movie Settings
- Metering
- White Balance
- ISO Sensitivity
- Picture Control
- Custom Picture Control
- Color Space
- Active D-Lighting
- Long Exposure NR
- High ISO Noise Reduction
- Fade in/Fade Out
- Movie Sound Options
- Interval Timer Shooting
- Vibration Reduction
- AF-Area Mode
- Face-Priority AF
- Built-in AF Assist
- Flash Control
- Flash Compensation
- The Setup Menu
- Reset Setup Options
- Format Memory Card
- Slot Empty Release Lock
- Welcome Screen
- Display Brightness
- Grid Display
- Sound Settings
- Auto Power Off
- Remote on Duration
- Assign AE/AF-L Button
- Shutter Button AE Lock
- Video Mode
- Flicker Reduction
- Reset File Numbering
- Time Zone and Date
- Language
- Auto Image Rotation
- Battery Info
- Firmware Version
- Technical Notes

142
i
Take photographs automatically at preset intervals.
1
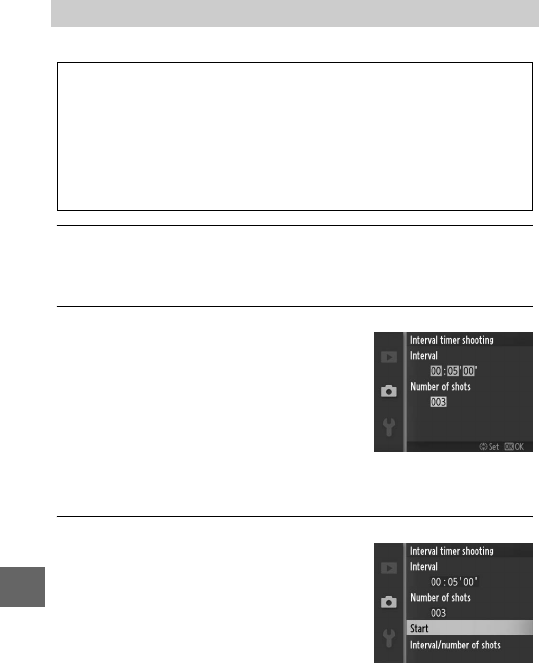
Select Interval/Number of shots.
Highlight Interval/Number of shots and press 2 to display
interval timer options.
2
Adjust settings.
Press 4 or 2 to highlight hours, min-
utes, or seconds and press 1 or 3 to
choose an interval longer than the
slowest anticipated shutter speed,
then highlight the number of intervals
and press 1 or 3 to change. Press J
to return to the interval timer shoot-
ing menu when settings are complete.
3
Start shooting.
Highlight Start and press J. Shoot-
ing will start after about 3 s, and con-
tinue at the selected interval until all
the shots have been taken (one shot is
taken at each interval). Note that the
pause following the recording of each
shot varies with shutter speed and the
time needed to record the image, with the result that photo-
graphs may not be recorded at the selected interval.
Interval Timer Shooting
D
Before Shooting
Before proceeding, check that the clock is set correctly (0 19, 158) and
then take a test shot at current settings and view the results in the mon-
itor.
Use of a tripod is recommended. To ensure that shooting is not inter-
rupted, be sure the battery is fully charged or use an optional EH-5b AC
adapter and EP-5B power connector.


