
Digital Camera User Manual

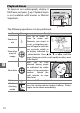

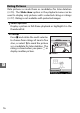

Table Of Contents
- Getting the Most from Your Camera
- Table of Contents
- For Your Safety
- Notices
- Introduction
- Still Image Mode
- Smart Photo Selector Mode
- Movie Mode
- Motion Snapshot Mode
- More on Photography
- More on Playback
- Connections
- The Playback Menu
- The Shooting Menu
- Reset Shooting Options
- Exposure Mode
- Image Quality
- Image Size
- Continuous
- Shutter Type
- Frame Rate
- Movie Settings
- Metering
- White Balance
- ISO Sensitivity
- Picture Control
- Custom Picture Control
- Color Space
- Active D-Lighting
- Long Exposure NR
- High ISO Noise Reduction
- Fade in/Fade Out
- Movie Sound Options
- Interval Timer Shooting
- Vibration Reduction
- AF-Area Mode
- Face-Priority AF
- Built-in AF Assist
- Flash Control
- Flash Compensation
- The Setup Menu
- Reset Setup Options
- Format Memory Card
- Slot Empty Release Lock
- Welcome Screen
- Display Brightness
- Grid Display
- Sound Settings
- Auto Power Off
- Remote on Duration
- Assign AE/AF-L Button
- Shutter Button AE Lock
- Video Mode
- Flicker Reduction
- Reset File Numbering
- Time Zone and Date
- Language
- Auto Image Rotation
- Battery Info
- Firmware Version
- Technical Notes
79
I
3
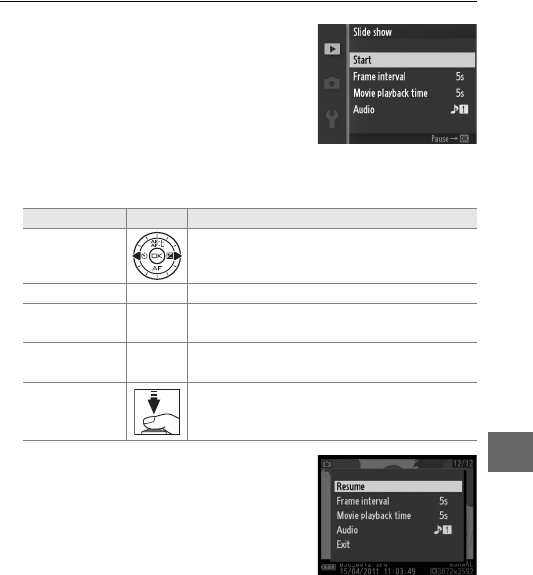
Select Start.
The following operations can be performed while a slide
show is in progress:
The options shown at right are dis-
played when the show ends. Select
Resume to restart or Exit to exit to the
playback menu.
Highlight Start and press J to start
the slide show.
To Use Description
Skip back/skip
ahead
Press 4 to return to the previous frame, 2
to skip to the next frame.
Pause/resume J Pause the show. Press again to resume.
Adjust volume W
Press up to increase volume, down to
decrease.
Exit to playback
mode
K
End the show and return to playback
mode.
Exit to shooting
mode
Press the shutter-release button halfway to
exit to shooting mode. Photographs can be
taken immediately.