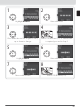
Encryption 1 2 Highlight encryption method. Return to wireless menu (2/2). 3 Highlight encryption key. Skip Steps 3–5 if No encryption was selected in Steps 1–2. 4 Edit encryption key: • Base 16: press multi selector left or right to select character, up or down to change. 64bit keys require 10 digits, 128-bit keys 26 digits, TKIP and AES keys 64 digits. • ASCII : enter key as described on page 26.
Key index: In infrastructure networks that use WEP encryption, choose the key index used by the host or access point. 1 2 Choose index. Return to wireless menu (1/2). TCP / IP Adjust TCP / IP settings as described on the following pages. The TCP / IP menu has two pages of options; to scroll between pages, press the multi selector up or down. TCP / IP Menu, Page 1/2 Obtain automatically: Highlight this option and press the multi selector right to toggle it on (✔) or off.
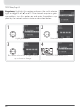
1 2 Highlight Address. 3 Enter edit mode. 4 Press multi selector left or right to select, up or down to change. 5 Exit to TCP / IP menu (1/2). If subnet mask is required, proceed to Step 5. 6 Highlight Mask. 7 Enter edit mode. 8 Choose subnet mask. Exit to TCP / IP menu (1/2).
TCP / IP Menu, Page 2/2 Use gateway: Highlight this option and press the multi selector right to toggle it on (✔) or off. If the network requires a gateway address, turn this option on and enter the address supplied by the network administrator as described below. 1 2 Highlight Address. 3 Press multi selector left or right to select, up or down to change. 40 Enter edit mode. 4 Return to TCP / IP menu (2/2).
Enable DNS: Highlight this option and press the multi selector right to toggle it on (✔) or off. If a Domain Name Server (DNS) exists on the network, turn this option on and enter the address supplied by the network administrator as described below. 1 2 Highlight Address. 3 Press multi selector left or right to select, up or down to change. Enter edit mode. 4 Return to TCP / IP menu (2/2).
FTP Adjust ftp settings as described on the following pages. The ftp menu has three pages of options; to scroll between pages, press the multi selector up or down. FTP Menu, Page 1/3 Server 1 2 Highlight Address. Display text entry dialog. 3 4 Enter server address (required; 35). 5 Return to ftp menu (1/3). 6 Highlight Folder. Display text entry dialog. 7 Enter destination folder name ( 42 8 35). Return to ftp menu (1/3).
9 10 Highlight Port. 11 Press multi selector left or right to select, up or down to change. Enter edit mode. 12 Return to ftp menu (1/3). PASV mode: Highlight this option and press the multi selector right to toggle PASV mode on (✔) or off. Turn this option off to use normal (PORT) mode. Be sure the server supports PASV mode before turning this option on.
FTP Menu, Page 2/3 Anonymous login: Highlight this option and press the multi selector right to toggle it on (✔) or off. Turn this option on for anonymous login, off to enter a user name and password as described below. 1 2 Highlight User ID. 3 Display text entry dialog. 4 Enter user name ( 35). 5 Return to ftp menu (2/3). 6 Highlight Password. 7 8 Enter password ( 44 Display text entry dialog. 35). Return to ftp menu (2/3). Password is disguised as a row of dots.
FTP Menu, Page 3/3 Use proxy server: Highlight this option and press the multi selector right to toggle it on (✔) or off. If a proxy server is required for ftp, turn this option on and enter an address and port number as described below. 1 2 Highlight Address. Display text entry dialog. 3 4 Enter proxy server address ( 35). 5 Return to ftp menu (3/3). 6 Highlight Port. 7 Press multi selector left or right to select, up or down to change. Enter edit mode. 8 Return to ftp menu (3/3).
Settings (Transfer Mode Only) The following settings are available in transfer mode: Auto Send Choose whether to upload photographs to the server as they are taken. Option Description Photos are not automatically uploaded as they are taken. Off Photos can be selected for transmission when camera is in (default) playback mode. Photos are uploaded immediately after being recorded to On camera memory card.* Be sure memory card is inserted in camera before shooting.
Send Folder All files in the selected folder (including those already marked as “sent”) will be uploaded in ascending order by file number, beginning when the folder is selected. The folder itself will not be uploaded. This option is not available when the memory card contains no folders. Deselect All? Select Yes to remove “send,” “sending,” and “sent” marking from all images on the memory card. Upload of any images marked with a “sending” icon will immediately be terminated.
Appendices Creating ftp Profiles Using the Camera Menus In transfer mode, the camera menus can be used to create ftp profiles in place of the WT-3 Setup Utility. Before creating an ftp profile with the camera menus, set the camera USB option to PTP and connect the WT-3. To prevent unexpected loss of power, be sure the battery is fully charged or use an optional EH-6 AC adapter.
4 The registration dialog shown at right will be displayed. Press the multi selector up or down to highlight an option, then press to the right to select. Select Done to proceed to Step 5 when settings are complete. Rename: The dialog shown at right will be displayed. Enter a profile name of up to 16 characters as described in “Text Entry” ( 35) and press the button to return to the registration dialog. Interface type: The dialog shown at right will be displayed.
5 If On is selected for Wireless transmitter > Wireless LAN system, a confirmation dialog will be displayed. Choose from the following options: • Yes: Open a connection to the new server and return to the top level of the wireless transmitter menu. • No: Return to Step 3 without connecting to the server. If the wireless transmitter is off, the dialog shown in Step 3 will be displayed and the WT-3 will not open a connection to the new server.
Troubleshooting Problem “POWER” LED does not light. All LEDs blink at once. Wireless transmitter option not available. Excessive radio interference. Camera displays “Ethernet cable is not connected.” Camera displays wireless error. Camera displays TCP/IP or FTP error. Memory card error displayed. Photos can not be transferred to computer to which PictureProject has been installed. Transfer interrupted before all photographs are sent. Error displayed stating that no images are available for printing.
Glossary Ad-hoc: Devices in an ad-hoc wireless network communicate directly (“peer to peer”), without a wireless access point. AES (Advanced Encryption Standard): An encryption standard developed for use by the American government. AES has been praised for combining strong encryption with rapid processing. Auto IP (APIPA—Automatic Private IP Addressing): Allows devices in a network to automatically assign themselves unique IP addresses if no DHCP server is found on the network.
Infrastructure: Devices in an infrastructure network communicate via wireless access points that may be connected to an Ethernet network, allowing wireless and Ethernet devices to coexist on a single network. IP address: The address given to each node in a TCP/IP network. All nodes in a TCP/IP network must have a unique IP address. Private IP addresses are recommended for nodes that are part of a local network.
SS-ID (Service Set ID): An SS-ID prevents interference between devices in different networks by allowing communication only between devices that share an SS-ID. See BSS-ID, ESS-ID. Subnet mask: A mask that divides a network into subnets.
Specifications Wireless Standards IEEE 802.11b/g (standard wireless LAN protocol), ARIB STD-T66 (standard for low power data communications systems) Communications IEEE 802.11g: OFDM protocols IEEE 802.11b: DBPSK, DQPSK, CCK Operating frequency WT-3: 2412–2472 MHz (13 channels) WT-3A: 2412–2462 MHz (11 channels) Range (line of sight) Approximately 80 m (262 ft.) with built-in antenna Approximately 280 m (919 ft.
Battery Life The number of shots that can be taken with a fully-charged EN-EL3e battery (1500 mAh) varies with the condition of the batteries, temperature, and how the camera and WT-3 are used. The following measurements were performed at a temperature of 20 °C (68 °F) both with the WT-3 off and while uploading photographs to a Windows XP Professional SP2 computer using Auto send. Example 1 Network None (WT-3 off ) Wireless (802.11g, infrastructure mode) Ethernet (100 base-TX) No.
Index Symbols , , , 24 G Gateway, 15, 40, 52 A AC adapter, 20 Access point. See Wireless LAN, access point Ad-hoc, 2, 14, 36, 52 Antenna, 4 Auto send, 46 I IP address, 15, 38, 53 Infrastructure, 2, 14, 36, 53 B BSS-ID, 36, 52 BUSY.