
Owner's Manual

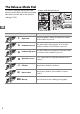

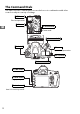
Table Of Contents
- Quick Start Guide
- Camera User Manual
- Restoring Default Settings
- Q&A Index
- Table of Contents
- For Your Safety
- Notices
- Supplied Accessories
- Parts & Controls
- Getting to Know the Camera
- Camera Menus
- First Steps
- Basic Photography and Playback
- Live View Photography
- Movie Live View
- P, S, A, and M Modes
- User Settings: U1 and U2 Modes
- Release Mode
- Image Recording Options
- Focus
- ISO Sensitivity
- Exposure
- White Balance
- Image Enhancement
- Flash Photography
- Other Shooting Options
- More on Playback
- Connections
- Menu Guide
- Navigating the Menus
- The Playback Menu: Managing Images
- The Shooting Menu: Shooting Options
- Custom Settings: Fine-Tuning Camera Settings
- The Setup Menu: Camera Setup
- The Retouch Menu: Creating Retouched Copies
- My Menu/Recent Settings
- Technical Notes
- Troubleshooting
- Error Messages
- Specs
- Index
- Lens User Manual
- Scan of CD-ROM
- Warranty

5
X
The Mode Dial
The camera offers the modes
listed below.
To choose a
mode, press the mode dial lock
release and rotate the mode
dial.
P, S, A, and M Modes
Select these modes for full control over camera settings.
• P—Programmed auto (0 75)
• S—Shutter-priority auto (0 76)
• A—Aperture-priority auto (0 77)
• M—Manual (0 78)
Auto Modes
Select these modes for simple, point-and-shoot
photography.
• i Auto (0 35) • j Auto (flash off) (0 35)
Scene Modes (0 40)
The camera automatically optimizes settings to suit
the selected scene.
Match your selection to the
scene being photographed.
U1 and U2 Modes (0 81)
Store and recall customized shooting settings.
A Non-CPU Lenses
Non-CPU (0 285) lenses can be used only in modes A and M.
Selecting another mode when
a non-CPU lens is attached disables the shutter release.
Mode dial
Mode dial lock release